Let’s talk Monarch’s!!

So, yesterday, I had the background finished and now it was time to think about the guest of honor….the butterfly!!

I found a great photo online and enlarged it to the size I wanted.

I started out by drawing the outline on a piece of black fabric and then roughly cutting it out.

Next, I added the wing bits…..

As I was trying to figure out how to add all of the small white areas, my friend Linda said “Why don’t you paint them??” At one point I thought I might do some painting on this quilt so I brought my paint supplies with me!!

It didn’t take long to paint the white spots. I decided to add a bit of grey to the edges to give them a bit more depth.

I also added a bit of green paint to the inner sections to give more depth there too.

Since I am NOT a painter, what I did was minimal but I think that it added a lot to the Monarch!!

Now it was time to tackle the Milkweed.

I brought this photo with me…..

….and used it as my guide.

Once again, I am going for depth so started with some paints on white fabric. I got excited doing this step and kept forgetting to take photos, but you can see it pretty well in this photo….

I started out with a sea sponge, then added brush strokes in green and then some brown as well.

Next, I used the photo and cut out lots and lots of flower shapes. The first set was fused onto the background and heavy embroidery threads were added to the centers. I also used a marker to add some more interest.

The next morning, I added a layer of batting to the back and another set of flowers…..this time sewing them on the machine….

I actually like those better than the hand-sewn ones but I think that the diversity will add to the design.

Once I saw that this idea was going to work okay, I cut out a bunch more flower shapes with fusible on the back and then also fused two fabrics together and cut out flowers that will be loose on the top.

Before I left for the retreat, I found a font that I liked and printed out the words. It was easy work to transfer them to the fusible web and cut them out of fabric. They didn’t show up well on the green background so I added a black fabric strip under them.

I will rough-cut the black before I fuse it down.

When I left the retreat, the quilt was at this stage…..


Lot’s more to come…..I just have to find the time to do it!!!


If you subscribe to my mailing list, you can receive this free pattern for “Dancing Squares”…..

You can sign up HERE……

Challenge piecing….

On Thursday I told you about the start of my “two for the price of one” challenge!!

When I left you, I had cut and pieced the first set of duet strips for the background squares…..

But, I wasn’t happy with them.

I wanted the blocks to have lots of strips in them to add interest….

…and these were simply TOO wide!!

So, I started cutting the strips down and re-sewing them together again.

I knew that this would use even more fabric so at this point…..


Please tell me that you do this too!!

I kept adding strips one at a time…..

….until I had a strip set that was the width that I needed.

Now it was time to cut the squares and this took a bit more planning…..

The unfinished squares need to be 5.5 inches and I am going to piece a curve in the corner. Since I know that I may lose a bit of size with piecing the curve, I wanted the squares to be a bit bigger than needed.

BUT, since I am working with fat-quarters and still want to make the best use of the fabric, I needed to know the maximum number of squares that I could get from my strip set.

That number was 3 squares out of the “almost 18-inch” strip.

Since the strip wasn’t quite 18-inches, I settled on 5-7/8’s inch squares.

Yes, that is getting a bit picky, but the sizes need to be exact to produce the needed 20-inch quilt!!

And it got even crazier after that as I started adding the curves…..

Come back next week for more!!

If you have an interest in ruler quilting, check out this online course…..

Click HERE for more information

I’ve made a start….

Last week, I posted about my idea of turning two challenges into one quilt…

…and this week, I have made a start!!

The first thing that I needed to do was make the strip sets for the background blocks…

I only had 3 fat-quarters in the needed greens so I knew that I was going to have to be VERY precise in my cutting and planning!

I trimmed a minimal amount to even up the edges…

….and cut a set of strips out of each fabric. They varied in width from 1-inch to 2-1/2- inches.

I matched the fabrics into duets….

….and sewed them together, being REALLY sure of my 1/4-inch seam allowance…..

I even chose to piece with a Bottom Line thread which is 60 weight thread. I have never used this before but it seems to be working well.

OKAY….the first set of strips are sewn…..

Am I happy with them?

Not so much!!!

Come back on Saturday to see the next moves!

In this blog, I post DAILY stories about creativity, techniques, tools of the trade, and lots more about the wonderful art of quilting. If you are enjoying these posts, please subscribe to be notified of each new blog as it becomes available.

GRAFFITI!!!

Today will take a wander thru the Cherrywood GRAFFITI challenge..;….

There were SO many of these quilts displayed at the International Quilt Festival. This is just ONE of the walls (notice that is PLURAL)…..

There are a few requirements for this challenge…. First of all you must use ONLY the eight fabrics that you purchase and it MUST be 20-inches finished size. You even have to put a ruler on your entry photos to prove that!!

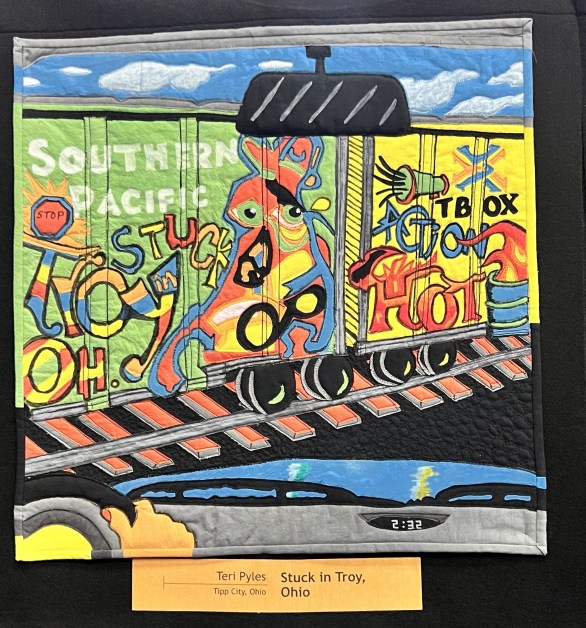
I am going to start with my favorite, and see if you notice the same thing that I did……

When I first looked, I saw the train car with graffiti on it….that’s cute. THEN, I looked further and realized that you are sitting in a car, looking out at the train. HOW CLEVER!! I especially love the clock and the rear view mirror. Teri Pyles definitely gets kudos for creative thinking!!

I think that the giraffe drew me to this one…..

…but the title didn’t hurt either!!

Since I am a huge fan of bright flowers, I loved this wall…..

…and I especially liked the painter in this one…..

“Quilter Power” was evident in this creative entry…..

….and this colorful cat was amazing……

I love the way she did the background and the pawprint “signature” on the right corner is a perfect touch!!

Finally, this one caught my eye because the background was a different color…..

Most chose the grey or black background and the yellow made it stand out from the others!!


Now….for YEARS I have thought that I would join the challenge but each year I found a reason that I didn’t want to do it….. no time, no inspiration, etc.

This year, I made my friend Linda promise that she wouldn’t let me leave without the fabrics and challenge pack. She kept her promise…..

…and I am now ready for the Monarch challenge!

The fabrics are so rich in color and texture…..

…and my mind is already starting to churn over ideas.

I am planning to do some research on the Monarchs, hoping that something will light up that creative spark!!!

Are you planning to enter this year? IF so, let me know and maybe we can URGE each other along!!!