Easter and Ironing

First of all, I hope that everyone had a marvelous Easter Sunday. We started off with a neighborhood walk complete with reminders that He is Risen…..

….followed by a quick gathering of some of our church family…..

It was so good see faces and hear voices!!!

The rest of the day was spent doing a bit of play and a bit of work….all in all, a MARVELOUS day!!!

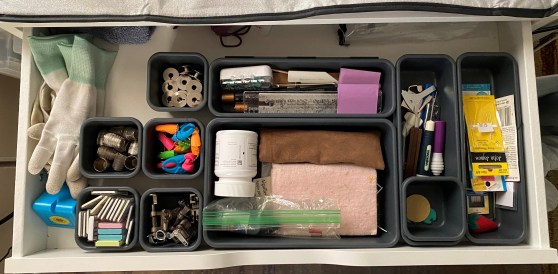
Elle asked if I had any idea how the ironing surface had been made so I thought I would show a few photos…..

This is the underside of the board…..

It appears to be made of plywood (15/32), and is cut to 21″ by 60″.

There are two wood strips added to each edge and then the slanted strips that follow the contour of the ironing board base…..

It is covered by a VERY heavy felt and then topped with an ironing board fabric. The only thing that I added was an elastic band around it to help it fit tighter.

Even though it wasn’t designed for my particular board, it fits perfectly……

….and is SO sturdy. I think that it helps that the original ironing board is a workhorse!! It belonged to my Grandma and I love thinking of her when I use it!!!

On other thing that I have done for years is to plug my iron into a power strip rather than into the wall. That way, I just tap the switch with my foot to turn it on and I am ready to go. Another quick tap when I am finished and everything is off and safe.

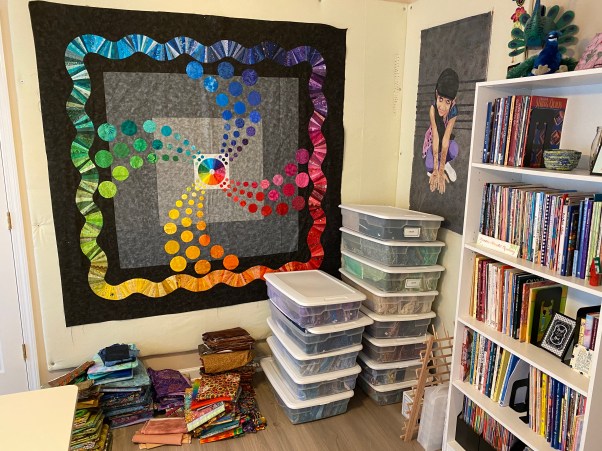
On the fabric organization side, I am slowly working thru the blue fabrics but am finding that I have a bunch that are too small for my folding method. I am now trying to figure out exactly how to store those smaller pieces. Many people say to cut them down into strips and squares but I feel that I already have too many of those so hate to add more to it!!

I am also realizing as I fold that I am truly ready to get to work on a project. It has been over 3 months since I could walk into my studio and sit down at my machine!!!! But eventually everything will return to normal…..in the world AND in my studio!!!

TTFN…..Ta-ta for now!!!

Folding FUN!!

I have had a couple of people ask for a demonstration of exactly how I am folding the fabric.

The technique that I use is NOT my own creation. I saw this idea many years ago on some Youtube video and I have used it successfully on a portion of my fabrics during the last 10 years.

The first step is to figure out how big you want your folded fabrics to be. In my case, the shelves were 13 inches wide, 15+ inches deep and 13 inches high

I knew that I wanted two rows of fabrics in each cube so that meant that they could be a maximum of 6.5 inches each. After lots of trial and error, I decided on a 6 inch fabric width.

Since most fabric is approximately 44 inches wide, that makes it 22 inches wide when folded in half (selvedges matching). If I fold it in half again, it is 11 inches “deep” which would fit perfectly in my 15 inch shelves.

And so it begins………

Not all of the fabric pieces are as easy as the ones that I demonstrated. It has been interesting to try to make every piece fit in some way, but I have honestly been able to fold more of them than I thought I would.

Today I found a few minutes to finish one of the blue boxes….only 3 more to go…..

Stay safe and sane!!!!

Spring Cleaning

Or maybe it is COVID cleaning!!! This weekend I knew that I needed to spend some time getting the house cleaned up and some spring decorations out…..I have had enough for blue for now!!!

The first stop was the second floor!! I hadn’t done a good clean since the studio remodel and everything was still covered in a fine layer of dust. My first priority was my studio….naturally!!!

After dusting and sweeping everything in sight, I wanted to get some projects on the design walls to inspire me to keep creating. Then I moved all of the unsorted fabric boxes out of the bathroom and into my room……

I have worked thru 6 boxes and have 17 more to go. Yikes…..I may be folding fabric for the rest of my life!!!

I put quilts on the wall to add a bit more inspiration……

Here is the entire room in one photo……

And the best thing is that the bathroom is empty again……

I finally got the new hall (that leads to a bedroom and bathroom) decorated…..

….and I especially like the view as I am walking down the hall to my studio…..

Finally, to add a bit of color to the stairs, I decided to hang one of the quilts that my Mom made……

This quilt has a great story. She started it back when my Dad was away serving in WWII and remembered that it was the first time she had ever purchased fabric to make a quilt. She pieced the top but never got around to quilting it. Over the years her interest in quilting waned and it sat, unfinished, in a small cardboard box!! In the early 1970’s her interest in quilting returned and she offered to finish the quilt for my “hope chest”. Unfortunately, the white fabrics had yellowed badly so she carefully un-pieced it and re-pieced it with new white fabric. She added her gorgeous hand quilting to finish it…..

Anyway, on Monday it was back to work as usual, but at least with a cleaned house and lots of colorful, Spring decorations…..

Busy, busy weekend

As you might imagine, I spent a lot of time in my studio this weekend but am super happy with the progress that I made.

I did a bit of fabric folding just to see how the new shelves are going to work. After trying several different sizes of folds, I discovered that the 6 inch width worked best. But, I did use a smaller one (5-1/2) to fold the larger lengths. They just get way too wide when you start with the 6 inch ruler.

This process is pretty slow but I think that I will enjoy it once I have everything out to see!!’

The one problem that I have to solve is what to do with all of the pieces that are too small to fold this way but too big to toss into the scrap bin. For now I am just putting them aside and will think about it at the end.

I debated long and hard about what type of storage to use under the cutting table and finally opted for 4 drawer systems……

These hold all of my cut strips and leftover bits. I need one more small unit (like the one on the left) to finish the storage. I especially like that the units form a surface for the ruler rack to stand, making everything right at my fingertips. And, there is just enough space between the drawers to stand my light board!!

On the other side, I put a small shelf system that holds my cut scrap squares, and my bead and embroidery supplies. The basket will hold all of the scraps that need to be sorted and cut.

I built this IKEA drawer system with the idea of using it to store all of my thread…..

….. but it didn’t end up being the best solution for my Gutermann threads so those will stay as the are right now (in plastic cases on the left). The top works perfectly for a small ironing station.

However, I LOVE having these drawers close to my machine. The top drawer has all of my bits and pieces……

One has my quilting rulers…..

And one has all of the cone threads that had previously been hanging on the wall….

There are still several drawers that are empty, but I am sure that I will find a good use for them before long.

This is how my sewing station looks…..

This is my new ironing table.

The original ironing board belonged to my Grandmother and it is SO sturdy!!! I was mentioning to one of my friends that I was planning to build a new top for an ironing surface and she said “I have one that I don’t need anymore…..do you want it!!!”. It works wonderfully!!!

I am pleased with the flow of the work stations……

I am thinking that it will be super easy to move between ironing, cutting and sewing.

I have partially finished the design wall, but ran out of oomph so it will wait until a later date.

The list of things to finish up is HUGE and I know that it will be much later before I get it all together, but I am happy with this basic setup.

Now…..to work….the real kind and not the fun kind!!!