Bo’s Mountains

When I heard that our friends, Ruth and Austin, were expecting their first son, I knew that I wanted to make him a quilt.  I asked Ruth to be thinking about color combinations and to have a look around on the internet for pattern ideas that she liked.

She responded with the colors blue, red and gold and found a very simple, sweet pattern that she liked.  Her comment was that “they loved mountains” and that was why it had appealed to her.

I started the quilt in the usual way by pulling way too many fabrics out of the box and then weeding them down to the proper number…..

IMG_3095

Now I had to figure out the size of the flying geese (aka mountains).    I have to say that I was NOT at my brightest and best during this process and it ended up being a lot of trial and error, but eventually I had the strip put together……

IMG_3127

As I had sewed each triangle, I ended up with “bonus” triangles that had been dutifully sewn into more half-square triangles and then into more geese…..

IMG_3129

My thought was to include these geese somewhere in the body of the quilt, but I simply couldn’t find an arrangement that I liked……

IMG_3134

OR…..IMG_3139

so I moved back to the original design……
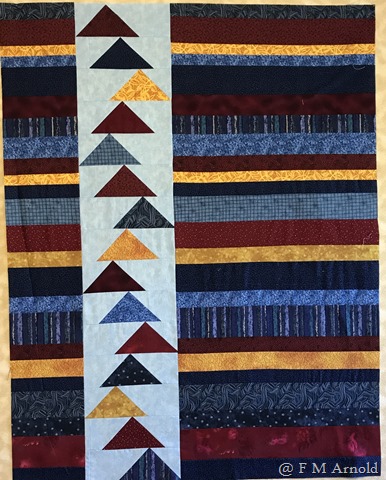
IMG_3142

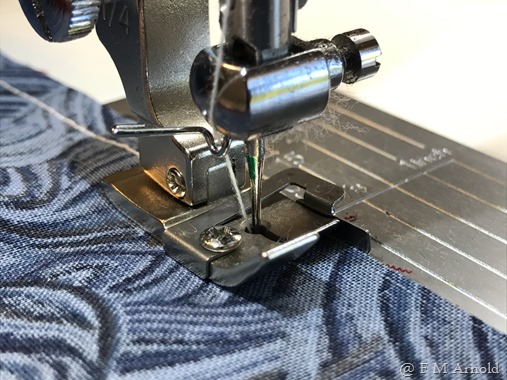
I wanted to keep the strips as straight as possible so I used my 1/4 inch foot to do the piecing.  I LOVE the little edge that guides the fabric….IMG_3141

I then spent time debating about whether or not to add a border, but eventually decided to leave it simple.

After putting together the backing (while STILL trying to use the extra flying geese), I was ready to quilt.  Since I wasn’t sure exactly how I wanted to quilt it, I followed the advice that I always give to my classes and started with what I knew……   straight lines down the mountain/geese backgrounds…..IMG_3163

But where to go next……  I knew that the family loved hiking and especially fishing and I was sure that Bo would spend much of his life participating in these activities, so I felt that his quilt had to include references to those things.   After much thought I decided to split the larger section into strips and quilt each one with a different design, starting with mountains……
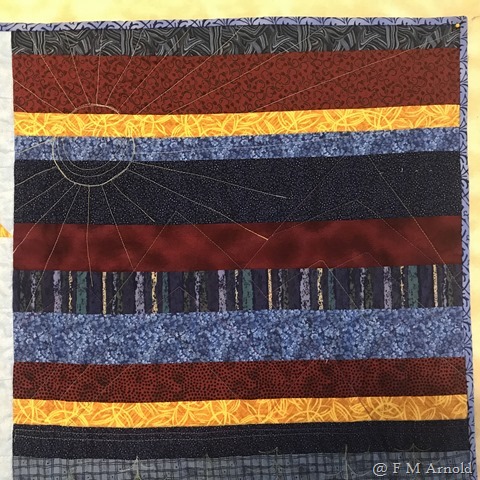
IMG_3489


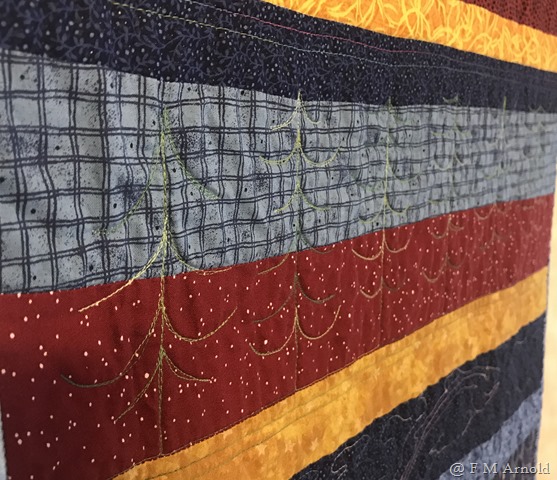
…..followed by a line of trees……IMG_3490

…..a stream of trout……

IMG_3492

….a field of flowers……IMG_3494

….and ending with a few more trees.

I was happy with the back……IMG_3500

….happy with the finished quilt……

IMG_3488

….and even happier when I got to present it to the boy himself…..
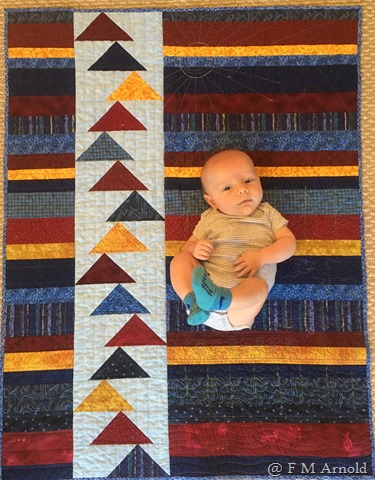
IMG_3519

Michael and I wish only the best to this very special family…..IMG_3508

(Now I just have to figure out what to do with those extra flying geese!!!)


A quilt for a Leap Baby……


One of my daughter’s best friends is expecting her first baby and since I had made her a quilt when she graduated from High School AND when she got married,it was a foregone conclusion that I was going to make the new baby a quilt.

The problem began with the fact that they had decided to NOT find out if it was a boy or girl so I really didn’t have a good idea of what color to head for.   I got onto her “wish” list and noticed that most of the colors were whites, beiges and greys…..OK, that is the first clue!!!  

Then I saw a couple of stuffed animals……a giraffe and an elephant.   ANOTHER clue!!!

In the back of my mind, I started remembering a pattern that I had saved from some magazine, MANY years ago…..

image

I saved the pattern as a jpg and pulled it into PowerPoint so that I could size it and print out the enlarged pattern.

I had so much fun working with the design, trying to keep the colors a bit muted…..   DSC06960

At this point, it needed so large borders so I decided to add a scrappy one…..DSC06962

I had a marvelous time with all of the quilting, especially adding texture to the animals….

DSC06965

I am very happy with the finished quilt…….

DSC06963

and the Mom-to-be seemed happy too…..

946118_10105141385194700_7343138350782762989_n

Catching up a bit….

The last two weeks have been crazy busy!!   I had the privilege of speaking at the Hall County Quilter’s Guild one Monday and then teaching a one day Machine Quilting Workshop on the Tuesday.   It is so much fun to visit different guilds and meet new quilters!!

Even with everything else, I have been able to finish the piecing on the Pinwheel baby quilt.

I have had to be SUPER careful with the piecing because every single non-matching point would show terribly.   Consequently, I meticulously planned which direction each seam would go and pinned like I have never pinned before…..

DSC03438

As I took each piece off of the design wall, I made sure that each corner was pinned in place…..

DSC03465

Then as I sewed the pinwheel points, I sewed another line just outside my original stitching….

DSC03468

….which meant that I had some wonderful extra pinwheel parts!!!

I used those extra bits and made a bunch more pinwheels and then  started playing with border ideas…..

DSC03472

After about an hour or so, my eyes gazed across this piece of gradation fabric from Caryl Bryer Fallert…..

Large_0292359

When I put it up on the design wall, I knew that it was the way to go….

DSC03475

The only problem was that I didn’t have very much of the gradation, so some very careful cutting and piecing ensued!!!   Eventually, the top was finished….

DSC03477

I quickly put together a back…..

DSC03478

….and now just have to do the quilting!!    I am thinking that I will do some “circle-esque” designs in the plain blocks to echo the design in the fabrics.

Hopefully I can get back to this one early in the week!!!!

Progress…..

I have a friend from my Church who is a wonderful artist and designer.  Her name is Karla and she specializes in repeat designs, having several wallpaper lines and also a number of other great designs on the market.   You can check out her blog here.

Well, she and her husband are having a baby girl.  As a matter of fact, she is at the hospital RIGHT NOW!!!   So exciting!!

When I told Karla that I wanted to make her a quilt, she said that she had two yards of fabric printed at Spoonflower and would I like to use it in the quilt.  It is a wonderful repeat design with fun colors and I was really excited to work with it……

DSC03390


I started out by picking other fabrics to go with this one…..

DSC03390


I had been considering patterns.   Karla likes more traditional designs so I was thinking about a pinwheel quilt, however, when I got the fabric, I felt like the scale of the print was too large to cut into a lot of smaller pieces so I got onto EQ and started playing.

I came up with this idea and thought that it would be perfect…..

DSC03392

However, when I started laying out the pieces, I didn’t like how it was looking….

DSC03398

My non-quilting friend Charlene looked at it said that all she was seeing was the green fabrics when I really wanted to highlight the pinwheels.

The next day I put on my thinking cap and started drafting more pinwheel block, in larger sizes this time.

I also cut the greet squares down to a smaller size and the result was…..

DSC03413

SOOOO much better.

Now I have to work on the outside borders and decide if I am going to add the triangles on the side or leave those off and play with the borders instead.

I did have one epiphany during this process.   I realized that accuracy is going to be super important when I actually start sewing so I tried to fold the squares in half VERY carefully.  

As I was cutting down the green squares, I was opening up the fold, cutting the square down to 2 inches and then meticulously re-folding in half.   Then I grabbed for a ruler and accidentally picked up on that a friend had given me recently.   It is the  Eleanor Burns “Quilt In A Day” Triangle Square Up ruler…..

10959633


I was able to leave the triangle folded and use the ruler to square it up……DSC03410

It was SO much faster…..

DSC03411

So, since the baby is being born as we speak, I had better get busy and figure out the borders so that I can start piecing…..and fast!!!

Quickie Teddy Bear Quilt

This past weekend I made a quick baby quilt for a friend of mine.  She was wanting something with a teddy bear and I thought that this little guy was perfect._1291467

As I got ready to add the borders, I simply could NOT find a fabric that I liked for the borders, although I was pretty sure that I wanted to use a light yellow inner border _1281456

I also knew that I wanted to make it a bit longer, so I planned to make the bottom borders a bit wider than the side ones.

After about an hour of going thru my fabrics and deciding that I simply DID NOT have the appropriate fabric, I made a quick trip to my local quilt shop (fortunately only 1 mile away) and, as usual, they had the perfect fabric!!!

Scan_Pic0038 Once I had added the yellow borders and then put this fabric on the outside, I felt that it needed something else so I ended up adding the 1 inch blue border.

_1291460 Here is a detail of one of the cute bees……

_1291463

I had a wonderful time making this simple, sweet quilt!!!!