While at my Guild Retreat, I decided that I would try it again with some variations.
My original thought was to figure out how to make the lines twist and turn but I finally realized that I could buy a pattern for that so why did I need to reinvent the wheel!!
Actually…….I was just being lazy but the excuse sounds better!!
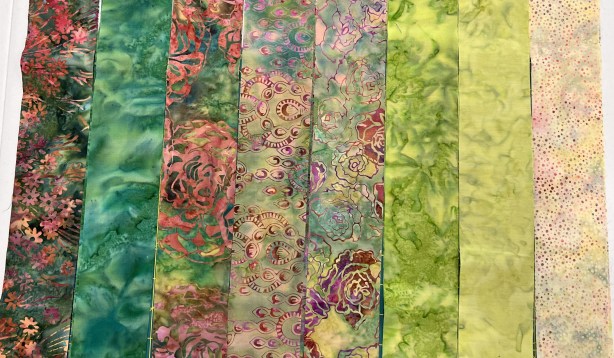
I found a jelly roll in one of the many bags of fabric that I had brought to the retreat and picked out two sets of fabrics…..
These gorgeous pinks…..
…and these luscious greens…..
I sewed each set together into a strata and then started sub-cutting…..
I did not keep any particular order for the cuts….they were all different sizes. But, I was careful about cutting the same size strip from each stratum.
Now came the fun part of laying out the strips…..
It was interesting to see how much difference it made when the strips were sewn in different orientations!!
At this stage, it was bedtime so I left this pinned to the design board….
When I left you yesterday, the strips were all sewn together into a tube and ready to start the “bargello–ing” process…..
The next step was to cut the “tube” up into various sizes of strips but my first issue was how to make the tube flat and even so that my strips wouldn’t be wonky!!
I thought about it for a while and decided to fold the tube in the middle of one of the strips rather than on a seam line. I used a ruler to make sure that the first fold was exact across the entire strip…..
Once I had the tube even, it was time to make the cross-wise cuts. I started at one end with a 3″ cut, followed by 2.75″, 2.5″, 2.25″, 2.0, 1.75″, 1.5″ and 1.0″. Then I started going back up again, increasing by a 1/4 inch each time…..
Now I could lay out the strips and see the movement…..
Even though I am only seeing half of it here, I LIKE it!!
Now comes the fun part!!
On each strip, I had to take one of the seams apart……
so that the squares moved up or down in each column….
There was one misstep but it was easily fixed!!
I added numbers to all of the strips……
….and started the sewing process…….
It was a bit slow because I had to stop and line up EACH of the diagonal seam lines. This was made easier because the strips had been ironed to opposite sides so the seam allowances were ALWAYS facing opposite directions!!
I did figure out a way to use both hands to align the seams with my left hand on top and my right hand on bottom……
After each seam, I carefully pressed the strips, allowing the seam allowance to migrate to the wider strip.
I didn’t take long to put the strips together……
I had a small portion of the strip tube left, so I cut out two more 2-inch strips and added them to each of the sides……
It needed some borders and, although I only wanted to add one, it really needed two. I finally succumbed and added two!!
I do like this first Bargello quilt and am looking forward to making more with each being a little more complicated than the previous one.
Stay with me and we will see how far this goes before I poop out!!
Our guild has announced the December challenge, and it is BARGELLO!! The twist is that we are supposed to think back to March and April of 2020 and express our feelings in this quilt….through colors, designs, etc.
I have known about Bargello quilts for a long time but have never made one. But first, what is Bargello???
I heard the term MANY years ago when I was in the Needlepoint phase of my life. Yes, I have not ALWAYS been a quilter!!
Pieceworks Magazine said this…..
“The origin of the name bargello is cloaked in legend interwoven with threads of history. According to one story, during a time of hardship in the fourteenth century, a Hungarian noblewoman devised a stitching style for peasants to use on their embroideries, which consumed scarcely any wool on the back of the fabric. In fact, in 1383, Princess Jadwiga of Hungary (1374–1399) married into the Jagiellos, a Polish and Lithuanian ruling family. Her dowry contained numerous pieces embroidered with Hungarian point, and she taught the technique to the ladies of her court. Some of her needlework still exists, as do records of her work for the church and the crown. The technique came to be called by her husband’s name, Jagiello, which became bargello.”
Okay, that is how it got its name, but exactly what is it?
I refer you to the “bible” of embroidery stitches…..
This much-loved and well-used book now lives in my studio after many years of being thumbed thru by my Mom!!
These examples of Bargello appear….
Okay…enough history. Let’s get to the quilt-making!!
I want to design my own quilt for this challenge, but before I can do that, I need to understand what makes them tick. And, to understand, I need to make a few of them. So, I started with a basic design.
I picked 16 fabrics from my 2.5-inch scraps and laid them out in a pleasing order…..
Since I was using scraps the strips were not the same length so I picked the shortest piece and trimmed the others to match…..
I added number pins to the strips to make sure that I kept them in the correct order…..
This didn’t help me not to make a mistake but it did help me to recognize the mistake quickly and fix it before going further!!
I began sewing strips together, starting with numbers 1 and 2…..
After they were sewed…..
…..I pressed the seam allowance to the odd-numbered fabric.
I kept going with the various sets, always pressing to the odd fabric…..
This process didn’t take long and before I knew it, I only had one seam to go,,,,,
When the strip set was sewn and pressed, the back looked like this…..
….with each seam allowance ironed opposite to the previous one. This is important later on!!
The next step was to sew strip #1 and strip #16 together…..
….leaving me with a tube of fabric.
At this point, it was WAY past my bedtime so come back tomorrow and we will finish up this simple Bargello quilt!!