…..SIX new Westalee rulers designed to make wonderful wreath/circular designs!!!!
I immediately pulled out the first one and started playing!!! My first choice was the Spin-E-Fex #11…..
I was happy to see that each ruler came with a long strip of grip tape!!
I started out with the one of the simplest designs that can be made with this this ruler…..
This was quilted by placing the more rounded point at the center of the block…..
….and stitching all the way around the ruler….
When you get back to the center, you simply line the ruler up on the next registration mark……
….and sew again!!
The second design that I made used the same ruler but alternated which end was placed at the center…..
The final design used 16 registration marks and quilted each round with the ruler in the same orientation. I had one small slip-up but it still looks good…..
These are only a few of the designs that can be done with this one ruler…..and I have FIVE other new ones to play with after that!!!
As I have increased my stash of machine quilting rulers, finding a way to store them has become problematic. Originally I had them in the bottom drawer of the storage unit next to my machine. That worked fine, but it was almost impossible to find the ONE ruler that I wanted to work with.
I put the question on the “Quilting with Rulers” Facebook group and they provided a number of possibilities but none of them was the perfect solution. Then I started searching on Amazon and found the perfect solution for the smaller rulers…..
They fit well and I noted the type of ruler on each of the tabs so they will be easy to find and easy to return to their spot…..
Even better is that the files can be securely closed…..
….and fit flat in my drawer…..
The few longer rulers fit well on the other side of the drawer.
This post contains affiliate links. I am a participant in the Amazon Services LLC Associates Program. I may earn a small commission if you purchase thru the links provided here. It does NOT change the price that you pay for any items you buy.
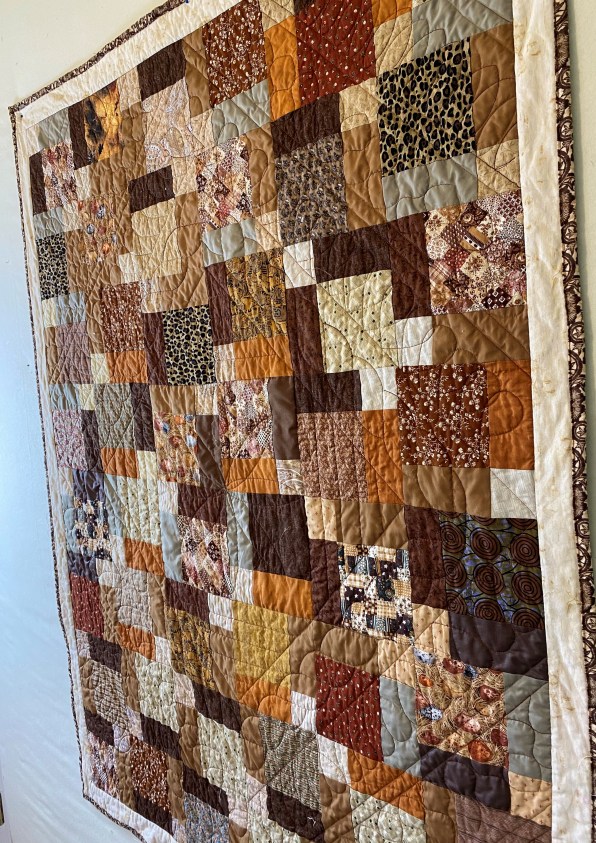
In an effort to continue the practice of using rulers for Free -Motion quilting, I brought another top home from our guild Charity bee…..
I hung it on my design wall for a few days and fairly quickly decided exactly what I wanted to do!!
I started with a big flower in the center and then started adding diagonal borders flowing out from the middle. The reason that I wanted to do borders was because of a Christmas present that I received last December……
…..the Westalee Border Sampler Template set.
I spent a lot of “treadmill time” watching videos about how to use these rulers and found them to be extremely simple and effective!!
The first border that I quilted was the Continuous Heart…..
Next was the Braid…..
Then came the continuous loop
…..and finally the continuous fill pattern……
The final quilt design was pleasing and I did learn a lot in the process…..
I did learn one other thing with this project. When I quilted the first big flower in the center of the quilt, I had trouble with the foot dragging on the seams. But, when I moved the foot up higher, then the tension started messing up. I thought back to the last project (Meadow Art) and remembered that I had successfully changed the bobbin tension many times and it produced no dire effects, so I increased the bobbin tension with my quilting and it fixed all of the tension problems.
One other comment……..
As I have been watching videos and learning about the various rulers, I have noticed that the Westalee company goes for accuracy. Each ruler has lots of registration marks designed to help you keep everything in line.
The rulers designed by Angela Walters seem to be designed for fun quilting…..not that you cant be accurate with them, but they are designed for you to get on with the job!!
I can see where each type of ruler can be useful and actually like that I have options depending on what effect that I am trying to convey.
Of course, the only problem is that I can easily start accumulating quilting rulers in the same way that I do with fabric or threads and THAT is definitely a ……
As I was working on the charity quilt and practicing free-motion quilting using rulers, I played with using a straight ruler for stitching in the ditch.
Previously, I had felt like it would not be easy to keep the stitching IN the ditch, but I was pleasantly surprised by the results……
I can see this being especially helpful when I need to travel from one area on the quilt to another one!!