Finishing the quilt from “you know where”!!

If you have been reading this blog for the last little bit, you have heard the saga of the Christmas pineapple quilt. To make a long story short…..

  • I kept changing my mind about how to make it
  • It doesn’t have a “hook” and I think that it is pretty boring
  • I used my new Wool Pressing mat and ended up being allergic to it. Consequently, I was also allergic to the quilt top!!

Continuing on, I sent it to a friend to quilt and she had problems with it too. First of all, she had tension issues and had to take out a lot of quilting. THEN, she wasn’t happy with the backtracking on the pantograph and wanted to re-do the ENTIRE thing. I said ABSOLUTELY not!! It was at this point that Michael gave it the name of the Quilt from “you know where”!!

So, the goal for today was to get it trimmed and get the binding put on, and I DID IT!!

I started out by making yards and yards of binding, using lots of strips of Christmas fabrics……

Once the binding was made and ready to attach…..

….it was time to square up the top. I had planned to use the laser square but realized that there wasn’t any border on the edge so basically I just “squared” it up based on the edge of the piecing. It may not be exactly square, but it will be finished!!!

As I was sewing all of these bits and pieces together to make the binding, I kept thinking of all of the joins that I would have to miss at the corners. And, sure enough, it was the very first corner that I came to…..

ARGH!!!! I cut some of the strip off and reattached the rest of the binding and off I went again!!

In case you haven’t figured this out, I was really ready to get the quilt finished and was putting the pedal down when I was sewing the long stretches, and then…..

Of course I ran out of bobbin thread…..about half of a side back!!! Will I NEVER finish this quilt!!!

As I finished sewing the first pass on the binding, I realized that I don’t know what color of thread to use when I sew the binding on the top. I normally try to use something that matches so that the stitching doesn’t show but, since I had used lots of different fabrics, that wasn’t possible. Finally, I noticed that the quilting had been done with a creamy gold thread so I used that for the binding. It worked well and, before I knew it, I had finished the quilt.

It immediately went into the washing machine to get rid of all of the things that I was allergic to and then off to be displayed on the bed…..

It will be a great addition to our Christmas decorations and, most importantly, I can put it in the FINISHED column!!!

Pineapple Upside Down Quilt

Well, I have finally finished all of the piecing for the never-ending pineapple quilt, but it has come at a cost.    Let me explain….

When I was at the retreat and working on these blocks, I started having an allergic reaction to some unknown substance.  I thought that my bed was probably previously occupied by some cat-fur covered individual and that I was picking it up from the bedspread.  However the symptoms weren’t the same as I normally get with cat hair.  Instead,  the skin around my mouth and lips became red and swollen….weird!!!   When I returned home, I took an immediate shower and promptly washed all of the clothes that had been at the retreat, and the allergy symptoms went away.

But then, a week later I started working on the quilt top again and, low and behold, my allergy symptoms returned.

I was racking my brain trying to figure out how the supposed cat hair could have gotten onto my quilt top and wondering if I needed to stop working on it.    Then, as I was steam pressing a seam on my Wool ironing pad, I realized that there was a smell coming from it and realized that fumes were also rising from it.  I started to wonder if this product was causing my allergies.   I stopped using it immediately and the symptoms started to disappear again.

They resurfaced briefly when I was handling all of the blocks that had been meticulously ironed on the wool surface!!

So, it looks as if I am allergic to something that resides inside the wool pressing mat.   I am so disappointed as I loved the way that the mat worked for pressing pieced seams but it simply is NOT worth the allergy!!  I will probably give it one more test in a few weeks just to be sure but I want to be completely symptom free before I do so.

Now, back to the pineapple……

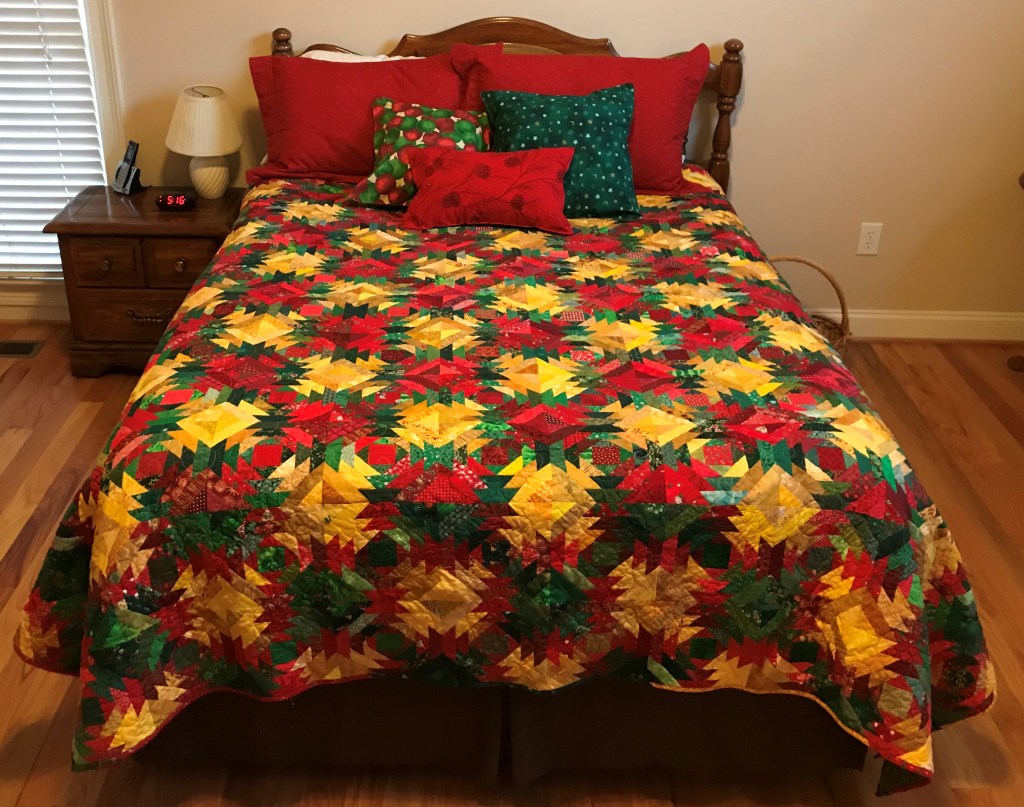
The plan for this quilt was to have something to use as a bedspread on my Queen bed during the holiday season, so I sized it to fit like a bedspread.  But when I laid it on my bed, I really didn’t like it!!IMG_8448.jpg

The original plan was to have a yellow border separating the center from the border, but it  didn’t look good to have the border falling off of the edge of the bed.  So, I decided to skip the border and simply add the next set of slightly different colored blocks directly onto the main section.

This is the result…..

IMG_8459.jpg…and to be honest, I am not fussed with it!!!   The pillows here are the back of ones that are currently on the bed but knew that something was going to be needed to break up the monotony of the top.   In the long run, new pillow shams will help tremendously.

I think that this quilt does not have a “hook” to it and seems pretty boring to me, but it will suffice to be on the bed for the month of December!!

And, look how many strips I had left over…..

img_8451-e1557445393226.jpg

I dont know WHAT I was thinking, but I will never start something like this without a plan again!!!

I am thinking that I might use the Non-Christmas Red strips in a Quilt of Valor….maybe with some white strips interspersed….but that is for another time.

Back to the pineapple again…..But now the problem of how to quilt it….

First…..I wasn’t planning to do a lot of special quilting on it…..it doesn’t need ANY more design.

Second…….I am now concerned about having my hands all of the quilt top that has been ironed on the wool pad.

Third……I REALLY didn’t want to spend days quilting on something that I didn’t like that much!!

SOLUTION…..contact my friend Sherry and ask her to quilt it for me.   I seldom quilt by check, but this is a good opportunity to do just that!!  I felt SO relieved once that decision was made!!

Now I needed to make a back for the quilt and decided that it was a good opportunity to get rid of many of those Christmas fabrics that I have had for YEARS and will probably NEVER use for anything.  It took all of one day to put the back together and I did make a dent in my Christmas stash, even using a panel that was langushing in the bottom of the box.   I dont have a large enough area to lay it out, but you can get the idea here…..IMG_8463.jpg

So, on Tuesday it goes to the quilter and I can move on to something FUN and EXCITING!!!

I hate that I am not happy with a quilt that I put so much time and effort into, but the nice thing about this quilt is that I have happy memories of the many hours that I worked on it at our guild retreats.   Those hours of fun and fellowship will add greatly to my enjoyment of the finished product.

Oh….does anyone want to buy a wool pressing mat….I have one going cheap!!!!

IMG_8293.jpg

Just make up your mind already!!

Over the last few years I have been slowly working on a Christmas Pineapple Quilt that will be big enough to be a bedspread during the holiday season. It has been a SLOW process as I have only worked on it at our Guild Retreats, and, let’s face it, much of that time is spent talking and eating….with a little bit of sleeping thrown in for good measure!!

But, the Pineapple blocks lend themselves to mindless sewing and that is exactly what I have wanted!!

When I first started this project, I spent quite a bit of time designing the perfect combination of blocks…..

dsc07243.jpg

……but when I laid it out, it looked really muddled and you couldn’t see any defined pattern. It was disappointing but I wanted to keep sewing so just continued to make blocks.  When I got home, I tried even more layouts…..

dsc07276.jpg

….and MORE layouts……img_8281.jpg


So, another year rolled around and I changed my mind AGAIN about how I was going to set the blocks, and made TONS of Red and Green blocks and cut out COPIOUS red strips to use in the new design……..

img_8279.jpg

Unfortunately, when I pulled it out last week, I couldn’t remember exactly what my plan had been so I had to start over yet again!!!   I THINK that I now have a good plan although I did realize that I had planned it to be 16 inches too big!!   Obviously, the Math side of my brain shut down after April 15th!!!  

Anyway, I leave on Tuesday for another guild retreat and I want to finish as many of these blocks as I can and JUST GET THE QUILT ON THE BED!!!!

I have cut all of the pieces, and bagged them up in order of use……

img_8286.jpg


Operation “FINISH THAT QUILT” commences at 10:30 Tuesday morning!!!


.


Whole lotta quiltin going on…..

This past week I have tried to find time to work on quilting the Queen size Pineapple.

I enjoyed quilting the long, straight lines leading from the edge into the red highlight area….

…and as much as I tried, they ended up being basically symmetrical around the quilt.   It just looked better that way!!!

I wanted to highlight the red area and Michael suggested circles, so circles it was…..

You cant see a LOT of the quilting, but may be able to see the blue lines where I marked the concentric circles…..

The final step was to decide on a design for the borders.   Once I decided WHAT to do, I decided that this was a good time to try using a ruler.

When I bought the machine, I purchased a Ruler Foot as well…..

A ruler foot is different because it has a deep circle around the needle which bumps up against the ruler.  The needle is a perfect 1/4 inch inside the circle.

When I first got the machine and had played with it, I had trouble with skipped stitches and was NOT happy with the results.   After a bit of Googling, I discovered that the problem was that the foot was not sitting close enough to the fabric.  AND, after examining the foot, I discovered that there is a screw (just above the spring) that pushes the foot down.   After making this minor adjustment, I was ready to go…..

Since I wanted the grid to be 1 inch, I am placing the 3/4 inch line on the previous line.   When the 1/4 inch on the foot is added, I have a wonderful1 inch grid.  Although I marked the grid on the first set of lines, future marking has only included extending the corner lines into the border and adding the perpendicular line that marks where the line makes a 90 degree turn.

I have finished 1/2 of the border and, unfortunately, ran out of thread, but a trip to the store on Tuesday will fix that!!!

More to come!!