Monarch Continuation

On the weekend I posted about the quilting for the Monarch piece. You can check it out here…..

Now it was time to put the finishing touches so here we go……

The first step was to add the leaves and stems to the piece.

I decided to use all 5 of the leaves that I had made but thought it would look good if one of them ran off of the quilt…..

I pinned them in place…..

….and sewed down the middle of the leaf so that each one floated over the surface of the quilt…..
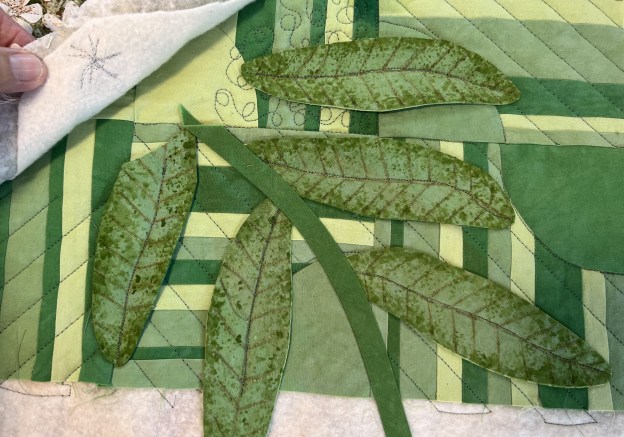
Next, I added the stem and stitched it in place…..

I had to do a bit more quilting on the background of the milkweed……

At this point, the flower looked okay…..

…..but it needed more flowers to fill it in further. I had already made some double-sided flowers that I was adding at the end, but I realized that I needed MORE!!

But there was a problem….

This was all of the white fabric that I had left…..

….and remember that I can’t use any other fabrics

……and there wasn’t time to order more!!!

WHAT TO DO?

Come back tomorrow…….

……………………………………………………………………………..

Do you struggle to decide what to quilt in your blocks? If so, check out my FREE series…..

Click HERE for more information

Background First

The first project that I worked on at my guild retreat was the Monarch Challenge that I had started at home. You can read about the process up to this point in this post…..

When I left you, I had started making thin strip strata and cutting them into squares. My first step was to finish this process…..

I liked how it looked, so went back and started adding the 1/4-circles in each of the corners…..

You can note here that each block layout matches the design that I had drawn.

I THOUGHT that I done a good job of pinning each circular part in the correct corner of each block, but apparently, that was NOT the case.

When I finished piecing I couldn’t get them back into the same orientation, so this is what I finally decided on…..

I was very frustrated that I had messed up the piecing, but finally decided since much of it will be covered with other designs, that I wouldn’t sweat it too much.

Personally, I blame the camaraderie of the retreat but, honestly, I would have probably done the same thing if I was sitting in my studio by myself!!

As I said “goodnight” to my fellow quilters, I was already starting to think about the next steps!!

Come back tomorrow for more……

Challenge piecing….

On Thursday I told you about the start of my “two for the price of one” challenge!!

When I left you, I had cut and pieced the first set of duet strips for the background squares…..

But, I wasn’t happy with them.

I wanted the blocks to have lots of strips in them to add interest….

…and these were simply TOO wide!!

So, I started cutting the strips down and re-sewing them together again.

I knew that this would use even more fabric so at this point…..


Please tell me that you do this too!!

I kept adding strips one at a time…..

….until I had a strip set that was the width that I needed.

Now it was time to cut the squares and this took a bit more planning…..

The unfinished squares need to be 5.5 inches and I am going to piece a curve in the corner. Since I know that I may lose a bit of size with piecing the curve, I wanted the squares to be a bit bigger than needed.

BUT, since I am working with fat-quarters and still want to make the best use of the fabric, I needed to know the maximum number of squares that I could get from my strip set.

That number was 3 squares out of the “almost 18-inch” strip.

Since the strip wasn’t quite 18-inches, I settled on 5-7/8’s inch squares.

Yes, that is getting a bit picky, but the sizes need to be exact to produce the needed 20-inch quilt!!

And it got even crazier after that as I started adding the curves…..

Come back next week for more!!

…………………………………………………………………………………………………….

If you have an interest in ruler quilting, check out this online course…..

Click HERE for more information

I’ve made a start….

Last week, I posted about my idea of turning two challenges into one quilt…

…and this week, I have made a start!!

The first thing that I needed to do was make the strip sets for the background blocks…

I only had 3 fat-quarters in the needed greens so I knew that I was going to have to be VERY precise in my cutting and planning!

I trimmed a minimal amount to even up the edges…

….and cut a set of strips out of each fabric. They varied in width from 1-inch to 2-1/2- inches.

I matched the fabrics into duets….

….and sewed them together, being REALLY sure of my 1/4-inch seam allowance…..

I even chose to piece with a Bottom Line thread which is 60 weight thread. I have never used this before but it seems to be working well.

OKAY….the first set of strips are sewn…..

Am I happy with them?

Not so much!!!

Come back on Saturday to see the next moves!

. . . . . . . . . . . . . . . . . . . . . . . . . . . . . . . . . . . . . . . . . . .

In this blog, I post stories about creativity, techniques, tools of the trade, and lots more about the wonderful art of quilting. If you are enjoying these posts, please subscribe to be notified of each new blog as it becomes available.

Time’s up…..

Tuesday was my BIG deadline day!!!

And I made it…..YIPPEE…..

So yesterday, I had a bit later start to the day and worked more in my office, but in a much more relaxed manner!!

And then at 4:00pm, I decided that it was time to do something else…..

SOMETHING FUN…..

SOMETHING INVOLVING FABRIC!!!!

I have two challenges quickly approaching……

The first is the Monarch Challenge from Cherrywood Fabrics….

….and the second is a “Drunkard’s Path” challenge in my local guild…..

The question is WHEN am I going to find time to make two quilts?

The answer is NEVER…..however, I MIGHT be able to make ONE!! I am thinking that I can use the monarch challenge fabrics but make the background in the Drunkards Path design.

What do you think???

The Monarch Challenge has a size limitation of 20 inches. Fortunately, the guild challenge doesn’t have a specified size.

What if I start with the background and do it in a Drunkard’s Path design? Maybe something like this…..

My biggest concern with this plan is that I have a limited amount of fabrics for the background (3 fat-quarters in various greens)……

….so I am doing a LOT of planning before I start cutting!!!

Stay tuned to see what happens next!!

. . . . . . . . . . . . . . . . . . . . . . . . . . . . . . . . . . . . . . . . . . .

In this blog, I post stories about creativity, techniques, tools of the trade, and lots more about the wonderful art of quilting. If you are enjoying these posts, please subscribe to be notified of each new blog as it becomes available.