Four (actually 5) more blocks….

Yesterday I posted about quilting the first four blocks of my friend, Diane’s sampler quilt.

Here are the next ones……

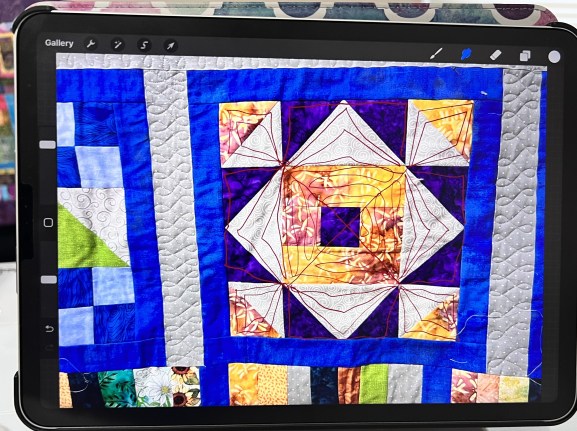
These triangles called out for point-to-point arcs…..

….but the FUN happened when I added in a loopy meander…..

If you have read my blog for very long, you will know that ALL of my meanders eventually turn into LOOPY ones!!!


I used more Point-to-point arcs for the next block, although I could have done better on the spacing!!!

To fill in the background, I quilted four feathers that curved around the point!!

I am SO thankful for Angela Walters’ FMQ Feather Challenge. I went in knowing NOTHING and came out feeling okay about feathers!!

Here is the wrap-up post…..


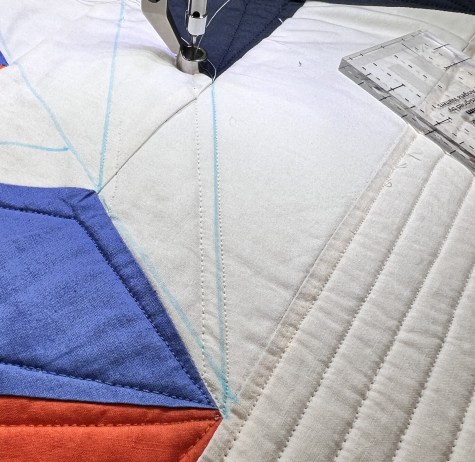
Next, it was time for some more Echo and Arc designs…..

I wanted the inside of the triangles and chevrons to be 1/4-inch inside the block and not be a slanted Dot-to-Dot design, but I did NOT want to break thread every time.

Instead, I sewed a short “entryway” into each of the shapes…..

I don’t think that detract from the design and sure made it easier to execute!!

The last one for today is a simple block with an overall clamshell design…..

It took a bit of time to figure out how to do the edges, but I think that it turned out okay!!


Since we are on a roll, let’s do one more block!!!

I started out with arcs in this “Sawtooth Star” block…..

….. but added some straight lines to fill in the spaces…..

I really like how this traingle looks!!!

So……we have seen 9 of the 12 blocks. Since the next few days will be full of holiday fun, come back next week as we finish the quilt!!!

If you enjoy this blog, please share it with your friends!!!

Thank you…….


Sampler Quilting Fun

Back in August, I posted about finishing a quilt top that was started by a friend who had recently passed away…..

I then sent this on to another friend who was going to longarm quilt it.

BUT, the more that I thought about it, I REALLY wanted to custom quilt this top so I requested it back again.

As I started thinking about patterns, I first took photos of each block individually and pulled them into “Procreate” on my iPad. One night I spent a couple of hours doodling on the blocks and trying to get ideas of how to quilt each one.

I start out by quilting the inside sashing so it would stabilize the quilt while I worked on it. I posted about this quilting design……

As I sat down to do each block, I would pull up my ideas on the iPad that was sitting next to the machine….

….pick a thread for the block……

…and get to it!!!

In this first block, I used only a straight-edge ruler and kept things pretty simple, using lots of Dot-to-Dot designs…..

ONE DOWN…..ELEVEN TO GO!!


The next block I kept REALLY simple…..just straight lines following the “Square-in-a-Square” layout….

I did add one extra bit to the center and quilted a flower in the middle…..

Notice that I made that square smaller before I added the detail.


The third block stayed simple, but I switched to an arc ruler (Angela Walters’ “Smiley”)…..

I quilted LOTS and LOTS of Arcs!!!


Block four used a bunch of arcs too…..

….but it needed something more in the background so I quilted a Paisley Meander…..


Okay….it is 1/3rd finished!!! Come back tomorrow as we look at 4 more blocks!!


If you enjoy this blog, please share it with your friends!!!

Thank you…….

1/4-inch mania

Yesterday I wrote about starting the quilting on “Star Explosion” and I left you wondering if I was CRAZY enough to quilt 1/4-inch lines in the center background.

You all knew it…..the answer was YES!!!!!

Once the outside background was finished, I had to decide on the internal quilting. I knew that I wanted to stitch it “to death” so that the star would pop out more which meant 1/4-inch lines!!!

My biggest concern was which way the lines should run. I finally decided to draw “imaginary” lines at the four corners and the change direction in each quadrant.

As I quilted, I found that I needed a registration line to help me out…..

Once I had quilted along that line, I could easily use the ruler and the foot edge……

…..to quilt the next line……

For more information on this process of quilting 1/4-inch lines, check out this blog post…..

I made a choice to NOT bury as many threads, but instead to travel between the lines. I figured since the travel portion was only 1/4-inch, it would not show as much!!

Interestingly, I found it harder to quilt the lines that were parallel as opposed to the ones that were running from point to point. Consequently, I drew a LOT more registration lines!!

I was thrilled to quilt the VERY last line and, after binding it, took it to the washing machine to get all of those blue lines out!!

When I laid it out to dry, my eye immediately went to this block…..

Now HOW did I miss that!!!!

It was quickly fixed……

I did play a bit of “thread-chicken” and was pleased to see a few yards left…..

By the way, I used two of these 225 yard spools, which means that there is over 450 yards of quilting in the background alone!!

I love the finished quilt…..

….and honestly enjoyed every step in its making.

I have trouble believing that I designed it from scratch!!!

It is now entered in the Modern Quilt Guild “Ruby & Bee” challenge……keep your fingers crossed for me!!!

Ready….Set….Quilt

Yesterday I wrote about basting the “Star Explosion” quilt.

Today it is time to talk about the quilting process.

As usual, I had TOO many ideas at the start so I put a photo into ProCreate on my I-Pad and practiced drawing some of the designs. The first design that rose to the surface was using a “Dot-To-Dot” (as Angela Walters calls it) design for the stars……

With this design, you start at one point and stitch to a point inside the diamond and then back out to the other point. Then repeat on the other side!!

I wanted the quilting to be symmetrical so I measured and marked the inside points on each diamond……

….and then stitch to the points and back…..

Each one of the diamonds needed to be stitched separately and with the appropriate color….

The stars were easier to do because I could work from the center out and not have to break thread as often……

Once all of that was done, I had to figure out the background fabrics!!

I went back to Procreate and started playing with straight lines…..

I liked this idea…..

….so started with the outside lines.

On a whim, I decided to quilt them at 1/2-inch intervals…..

After tieing off about 50 of these, I started to wonder exactly WHAT I was thinking!!!

But, even with all of the extra work, I loved how it looked….

Come back tomorrow as we finish up the quilting.

As you wait, ask yourself…..”Would she REALLY be crazy enough to quilt 1/4-inch lines?”

Quilting the Curly Q..

Today I want to talk about quilting with the “Curly Q” ruler from Westalee.

I have had this ruler for a couple of years but had never spent time playing with it and YESTERDAY was THE day!!!

Here is my review of this ruler……

As I say in the video, I am not sure that this particular ruler is worth the work….

….although I do like this design a lot……


If you have used this ruler, PLEASE let me know your favorite designs!!!!