Playday!!

Yesterday I had another free studio day and was able to continue working on my Botero-inspired piece. When I wrote about this project several days ago, I mentioned that I was scared of this piece and that is still very real, but I am slowly…..oh so slowly…. feeling better about it!!!

When I stopped last week, I had done a lot of thread work…..

Now it was time to add something other than thread.

My first choice was to add some wool leaves and ended up using a needle-felting process to make the leaves……

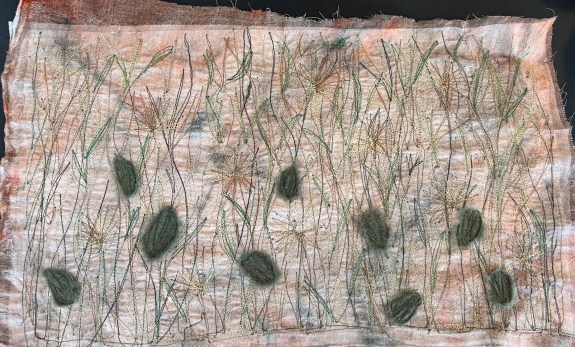
I added some more that were lighter in color…..

….which made me realize that the bottom leaves were too dark. DRAT!!!! Instead of taking them off, I simply added some light-colored wool roving and stitched over the darker ones. It worked great!!

Next, I decided to play with some couching, using various bits of yarn that I have floating around. This was where the morning ended……

I filmed a video showing the needle-felting process and the couching work. I hope that you enjoy it!!

Later yesterday, I was able to do the fabric painting and make some other decisions about the piece so be sure to come back for more!!

Back to the Sadie Background

Okay…..Ya’ll don’t laugh at me!!

After my last post exclaiming vehemently that the background was FINISHED…..

….I kept looking at it on my wall and the blue/green/brown BLOB on the left was killing me!!!

I couldn’t STAND how it looked.

And you all know what I did!

I got out my paint and my trusty sea sponge….

…and I went over that entire area with a light yellow…..

And NOW, I feel that it is finished…..

….at least the painting part.

Now I need to play with embellishments and see what else I can add to the meadow area.

You guys are going to be SO tired of this quilt before it is finished!!

Thanks for hanging in there with me!!

Sadie’s Background….Iteration #4.5!!

Well, after 4 tries, I think that I am finally happy with the background for the Saddle-Billed Stork collage.

Yesterday, I posted about painting this background……

As I looked further at it, I realized that I wanted to add a bit more shading to the two blue-green areas and also some more definition to the meadow in the foreground.

I decided that the best way to fix the meadow was using my trusty sea sponge and made a video to show you the process. If you have never worked with sponge painting, it is fun, easy, and adds SO much texture to the painting….

This is the final view…..

I am not super happy with the dark blue/green on the top left, but I think that I can work on it more with the quilting.

However, I AM super happy with the meadow area…..

It is going to be so much fun to add threads, thin pieces of fabric, and other yarns to make this area stand out.

Stay tuned for LOTS more!!!

Inktense Pencils for the win

As many of you know, when I am at the gym on the Elliptical or Treadmill machines, I watch Youtube videos and learn LOTS of new things. One day I even convinced myself to buy a sit-down longarm…..that was an expensive gym day!!

But back to current findings!!

On this particular day, I was watching videos about using Inktense Pencils on fabric. Now this one wouldn’t cost much since I already had a set of pencils and sticks that I wanted to learn about….

Well, it did cost a bit because the video suggested using a fabric medium to set the paints…

I started out with dry fabric and used the side of the block to scribble in some color….

Since this was going to be the background, I wanted it to form a mottled wash so I started using a sponge brush and water….

Hmmm….maybe that was TOO much scribbling!!!

I kept adding water and scrubbing the fabric, and finally came to a color wash that I was happy with….

Now it was time to add the flower design. I first drew it lightly on the fabric using the black Inktense pencil and then started adding color…..

At first, I was drawing on the fabric and then coming back in with fabric medium…

But sometimes I would dip the brush in the medium and then brush it across the sticks to pick up color and then paint it on the fabric.

Eventually, I will get a video posted of the process!!

Before long I had the design painted and even added a bit more color to halo the flower…..

I added two borders….

Then it was off to the machine to do a bit of quilting and binding…..

And, just like that, I had a quick gift!!

I can’t wait to explore these further!!!

Fun times await…..

I love quilters!!!

They are some of the most generous people around. I have met very few who weren’t willing to share their stash, their tools and supplies and their expertise with anyone who needed it.

As an example, I was contacted by my friend Pat asked if I was interested in some paint supplies that she would never use. Naturally, I couldn’t turn down an offer like that!!!

But, I was totally surprised when I opened the package and found all of these Shiva Paintstick sets…..

…. a series of stencils that look to be SO much fun……

….AND a pattern and rubbing plates for a Christmas quilt……

When I add in the stencils and rubbing plates that I ALREADY own……

…..I am thinking that there is going to be some FUN creating going on soon!!!

Stick around to see!!!