Splitting Rectangles!!

When I was at International Quilt Festival back in November, I purchased a new ruler from Deb Tucker….. SPLIT RECTS….

I had been wanting to play with “Split Rectangles” and NOW was the time!!

As usual, her rulers and instructions have everything that you need, including instructions for how to layer the fabrics when cutting…..

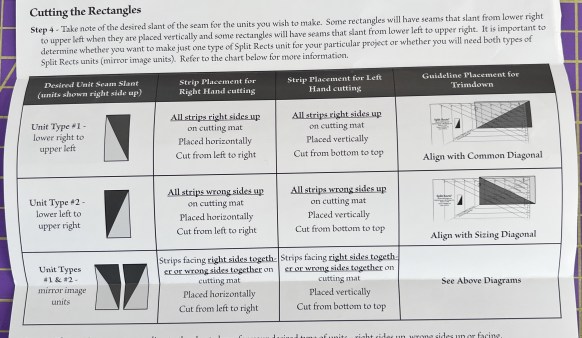
I struggled with this part….even with these great instructions!!

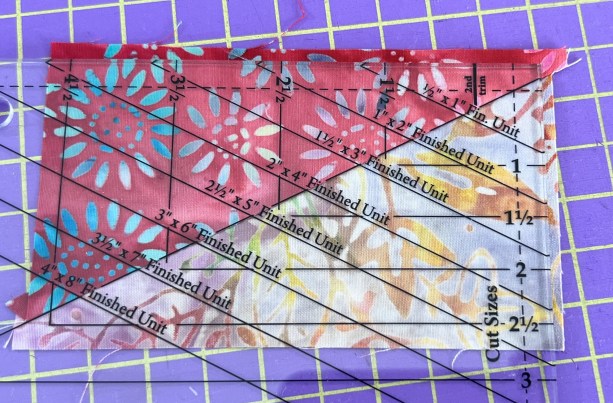
The first step was to decide on a finished rectangle size (2×4 in my case) and look at the ruler to determine the width of the strips needed…..

So…..5 inch strips!!

I layered them together……

First step was to even off one end…..

….and place the ruler even with the cut end…..

Make the cut…..

Flip the ruler around, lining it up with the special marking…..

Make another cut…..

Now to the machine…..

You line the triangles up in this manner…..

….and sew a 1/4-inch seam along the edge…..

AND LOOK…..

Now it is time to trim them to size and, as usual, Deb has provided everything that you need!!

First step is to line the diagonal seam up with the ruler mark…..

….and trim two sides…..

Then you turn the block and align the outer edges with the finished size….AND trim….

The end result is TWO perfectly shaped Split Rectangle blocks….

And it was SO easy!!

Now that I have learned HOW to make them, I need to figure out HOW to use them in a quilt!!

Come back for more!!


…………………………………………………………………………………………………….

If you have an interest in ruler quilting, check out this online course…..

Click HERE for more information

Quilting Economics!!

Before you completely tune out, I am not talking about Economics in the normal sense of the word but, instead, about the “Economy” block.

OR, as I call it….. “Square in a Square” block…..

I had posted previously about a stack of 6-inch squares that I had procured from our Charity Bee and was determined to make quilts from. This was my first quilt…..

…and now it was time to make another one!!

When I was at the International Quilt Festival back in November, I laid down a bit of cash for a series of rulers from Deb Tucker. One of the rulers was the Square-in-a-Square block…..

…or as she calls it….. “Square Squared”!!

Like many of her rulers, this one is used in two separate steps.

First, you use one side to cut the inner square….

Since I am making a 6-inch finished block, I am using the largest of the squares.

Now you look at the chart printed ON the ruler to see what size the cuts need to be for the setting triangles….

Following these instructions, I cut my squares at 4.25-inches, and then cut them on the diagonal to make triangles….

Moving to the machine, I sewed one triangle onto opposite sides of each square. In her video she suggested that you sew from the cut square side rather than the triangle side…..

This was really helpful to keep things lined up better, particularly when I was sewing the second set of triangles.

Once the first two are sewn on, it looks like this…..

Those dog ears bothered me, so I clipped them off…..

I pressed to the triangles and was left with this…..

Now it was time to add the second set of triangles…..

…..again….sewing from the cut square side…..

It really didn’t take long to piece the block….

But now it needed to be cut down, which meant using the OTHER side of her ruler.

The first step was to line up the ruler over the block, making sure that all four corners matched the 6-inch markings…..

You trim one side and then turn the ruler to trim the other…..

The result is a perfectly sized block…..

Now I started laying these up on the design wall…..

….and honestly, it looks fairly boring!!

I liked this arrangement a lot better…..

…but now I have to find something to add to the alternating blocks!!

Come back tomorrow to finish the quilt!!

Cutting 60-degree diamonds

Yesterday I was talking about getting organized to make my “Diamond Explosion” quilt and was pleased to find that I could piece the 60-degree diamonds easily.

Now it was time to cut the real fabrics and get started!!

I knew that I could cut the diamonds just using my regular straight ruler….I had done it back in May…..

….but it wouldn’t be as easy since I needed to cut the fabrics one at a time, rather than having them stitched together.

I really like Deb Tucker Rulers and decided to purchase her 60-degree wedge tool…..

Using this tool, I can cut out strips of fabric and then cut the diamonds easily from the strips!!

I settled on a 3-inch finished diamond which meant that my strip was cut 3.5-inches.

The first step was to make the initial cut to start the diamond shape. To do this, I placed the ruler on the strip, being sure that the lines were parallel to the cut edge of the strip…..

A quick slice, and we were ready to go…..

Next, I placed the ruler so that the 6.5-inch mark was at the point I had just created (6.5….because it was 2 times the 3-inch finished size, plus 1/2 inch for the seam allowance)….

Another slice…..

…..and I had a diamond……

As I pieced, I ended up needing some half diamonds and went back to the ruler for those.

In this case, the ruler was placed on the 3.5-inch line……

…..which meant that the top point was missing…..

And, NO….that was not a mistake!!

Having the point clipped off meant that it was SUPER easy to line the piece up when I was ready to sew it in place…..

Once I had a bunch of diamonds cut, I immediately started piecing……

…and then realized that I had other pieces that should have been added BEFORE I sewed these!!!

So, I will leave it here……with seam ripper in hand!!

Come back next week for more of the diamond piecing odyssey!!!