One of my favorite things about quilting is motivating others and helping them in their quilting journey. As part of this endeavor, I LOVE to present programs and workshops to groups and guilds around the world. All of my programs work well with Zoom meetings, and I would love to speak to your group.
Since I seem to be working in alphabetical order, let’s look at the Applique category. I always find it interesting that both turned applique and raw-edge applique are included in the same category.
Regardless, here are a few of my favorites.
Since many applique quilts are filled with flowers, this one stood out as being different…..
“Toronto Architecture” by Keith Dommer
Note that each of those pieces are finished with a piped edge. That is a LOT of piping!!
There are so many wonderful touches in this next quilt….and I apologize that I failed to get the name of the maker. IF you recognize the quilt, please let me know the details so that I can add them here….
Not only is the applique impeccable, but the quilting adds a new dimension….
….and there are some sweet touches too…..
I am a sucker for daisies……
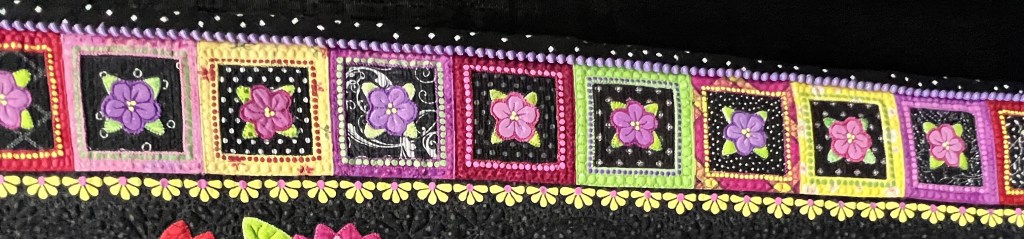
“Daisy Dots” by Lynne Taylor
Look at this fun border….
This quilt truly appealed to me….
“My Favorite Indigo Blue and KUMIKO” by Chiyoko Yoshimori
It is such an imaginative way to use bias binding!!
AND, it got me thinking about planning a hand applique with Celtic Applique or something similar!!
Isn’t this fun!!
“A Crowd of Strangers” by Jill Kerttula
The Third-Place quilt was one that truly caught my attention…..
“A Crowd of Strangers”by Jill Kerttula
There are SO many things about this quilt that were interesting, starting with the floor…..
….and continuing to the individuals in the view…..
The Second-Place ribbon went to…..
“Wild Rose” by Noriko Kido
It was exquisite in the piecing, applique, and quilting!!
The Winner of the Category was…..
“Coming Home” by Lyn Keogh
Again, the details were well done and the workmanship was exquisite!!
We met Lyn as she stood with her quilt and loved her interaction with several students who were asking questions about the quilt, particularly about her inspiration for the quilt…..
Lyn Keogh talks about the inspiration for her 1st place quilt
She was a kind and humble woman and we enjoyed talking with her.
So….that is the Applique Category……
Tomorrow I will tackle a special Exhibition called “Athletes”! Come back for some amazing quilts and an interview with their maker!!
.
…………………………………………..
If you don’t want to miss my personal tour of the International Quilt Festival in Houston, be sure to subscribe…….
This past weekend, I presented two methods for preparing pieces for hand applique. First I tried a product from Alex Anderson, then I tried making the templates from layers of freezer paper.
Now let’s try template plastic.
The template plastic is heat resistant, and my first step is to trace the images onto the plastic, but turned them over and numbered them on the backside…..
That means that as long as the numbers are facing me on the backside of the fabric, they should be going in the correct direction.
Let’s get them cut out……
It is important not to have any little divots in the plastic as the fabric will conform directly to those, but you can use an emery board to clean up the edges….
There was one reason that I was hesitant to use template plastic. I don’t like that it simply “sat” on the backside of the fabric and wouldn’t stay put. I got tired of it sliding around as I tried to turn under the edges.
But, what if I placed a tiny bit of glue on the back of that template, and then stuck it to my fabric….
The next step was to carefully clip up to the edge of the template, especially around the curves….
Now I was ready to turn the edges under. I used the “Magic Sizing” technique that I talked about in Sunday’s post. Here is a video of the process. I switched to my travel iron which made it much easier…..
I have to say that this petal looks almost perfect….
I did two more petals and then made some comparisons. The top row was using the fusible paper from Alex Anderson. The middle row was using freezer paper. And, the third row is this template plastic……
The jury is definitely in… I’m going to work with template plastic!!!
So I need to get busy!
Since the stems were basically just straight lines, I decided to go ahead and use the templates that I had cut from Alex Anderson’s paper…..
I was very careful to cut these out CLOSE to the template so that the seam allowance wasn’t too big. I used the Magic Sizing technique and the stems were soon ready to go…..
…..although there were a few burned fingers along the way.
So, now I need to finish prepping the pieces and get started sewing.
I am really looking forward to having this to work on at night…..it sure beats snoozing!!
One of my favorite things about quilting is motivating others and helping them in their quilting journey. As part of this endeavor, I LOVE to present programs and workshops to groups and guilds around the world. All of my programs work well with Zoom meetings, and I would love to speak to your group.
Yesterday I talked about preparing applique pieces using the product from Alex Anderson, but I wasn’t happy with the results…..
WHAT TO DO!!
In a previous life, I had done some appliqué using freezer paper as my base so I decided to return to that.
With this technique, you use the freezer paper template and fold the fabric edges over it.
I traced the design for three of the blooms onto the paper side of a piece of freezer paper….
I then stacked up three layers of freezer paper….
and ironed them together using a cool dry iron….
I cut the pieces out and found that since I had used THREE layers of Freezer Paper, the template was nice and stiff…..
I ironed the shiny side of the freezer paper template onto the fabric…..
and then cut them out with a scant quarter-inch overhang.
Now it’s time to see how these edges turn over and if I can get them smoother than I did with the paper from Alex Anderson.
Since I don’t particularly like using a glue stick, I’m going to try using the magic sizing trick….
…..that I learned from Karen Kay Buckley.
Since you don’t need much of the spray, I sprayed a small amount into the cap……
And then dipped a stencil brush in…..
Note here that NOT MUCH IS NEEDED!!!
Next, I brushed the sizing onto the fabric edges….
(My concern here is that the paper is going to start losing its stiffness because of the liquid.)
I used the tip of my iron to carefully work around the pattern, pressing the edges in and holding the iron there until it dried…..
I found that the Freezer Paper DID hold its shape!!
Once I had gone around the entire petal, I turned it to the front and put the iron on top of the whole thing……
And look…..
This is the nicest-looking petal I have seen so far!!
And yes, I realize that the point isn’t perfect but I can tuck that little piece in when I’m actually doing the appliqué.
Let’s keep going.
The second one worked well but on the third one, the paper started bending a little bit. I think I used too much magic sizing on it, but I simply put the iron on it and let it dry, and then started over again with a smaller amount. It seemed to work fine.
This one has a few more bumps in it, but again I’m thinking it’s because the paper got wet……
However, these three are certainly better than the ones I prepared yesterday……
While this technique worked better than the first one, I still had issues with the paper becoming saturated with Magic sizing and starting to lose its integrity.
SO I guess that means I need to do one more test and try the Heat-resistant Template Plastic …..
Come back Tuesday for the results!!!
Be sure to subscribe so you don’t miss a single post!!
In this blog, I post stories about creativity, techniques, tools of the trade, and lots more about the wonderful art of quilting. If you are enjoying these posts, please subscribe to be notified of each new blog as it becomes available.