Long Weekend fun!!!

Even though every day sort of melts into the other days, it was sweet to have an OFFICIAL 3 day weekend, and making it more fun was the fact that I spent almost the entire time in my studio!!!

Last week I visited the Charity Bee from our guild and picked up a quilt top with the idea that I was going to use it to further practice ruler machine quilting. It was the perfect quilt as it was smaller (33×40) and had 20 six inch blocks for me to play with. I decided to do most of them using different techniques and was so pleased with how they turned out.

I started with the easiest one…..the Square spiral that I have already shown here…..

After that I used a few of the rulers for their “intended” purpose……

The I just started playing around with the rulers. If I got stuck and didn’t know how to continue with one ruler, I would pick up another one and add something with it……

When I got to the sashing I had fun playing with Angela Walter’s ruler named “Chevy”. Here is a video of the process that I used to quilt the sashing….

After I had finished all of the quilting, I realized that this particular sashing design added another design element to the quilt which made me SO happy…..

For the borders, I quilted each one using a different technique and ruler and have made a video with each. I will post those over the next few days.

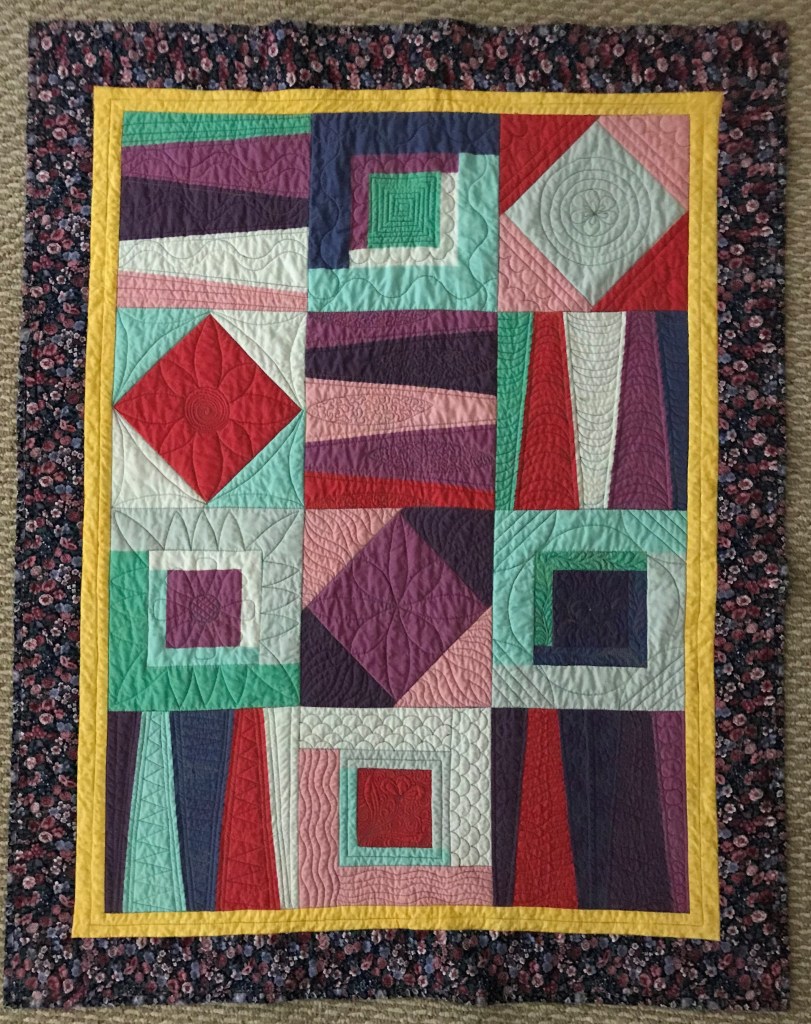
This is the finished quilt…..

It is sweet and cuddly and I am happy to know that some young child will enjoy the comfort that can only come from having a quilt of your own!!!

AND….many thanks to Sue L. for allowing me to quilt this top that she so lovingly pieced together!!!

It was an “ARGGHHH” sort of day!

On Saturday, I had one goal….finish quilting a piece that I started several years ago. I had been excited to use some of my new-found ruler technique and Thursday I had tried it out on one of the borders. I didn’t do any measuring nor really try the pattern so it was an unmitigated disaster!!.

On Friday night, I patiently pick out ALL of those stitches including all of the places that I had traveled over previous stitches.

When I started working on it again, I decided that I would do some practice and figure out the sizing of the design and do it right. This photo is three different tries with various spacings……

Once I thought that I had a good feel for the design, I tried it on the quilt. The design looked OKAY but not great and, when I looked at the back, I could see that the tension was horrible, so I picked it out AGAIN!!

Now I moved back to a practice piece and started trying every ruler that I could find and every 5 to 10 inches the thread would jump and wrap around the needle and, of course, cause a huge thread nest. Believe me, there were MANY spicy words spoken!!

I was describing what was happening to my husband, Michael, and had the thought that I needed to go thru my list of settings and see what was different. What I found was this……

The ruler foot has a spring at the back with a thumb-screw on top.

This determines how close the circular foot is to the fabric. If it is too close, it binds the fabric against the machine and it can’t move. If it is too high, the fabric moves around too much and the needle and bobbin thread cant nest properly and THE THREAD GOES HAYWIRE!!!

HURRAY….I figured out the problem.

At this point, there was no way I was going to work on an actual quilt so I spent the next 30 minutes just quilting all over my practice piece. This is what frustration looks like…..

At lunch, Michael mentioned that he needed to make a stand for a piece of steel that is used to protect equipment that he needs when doing firearm reviews. As we talked about possibilities, I started channeling my Dad (who loved to do projects like this) and thinking about how to build one from leftover lumber in the garage. Now the challenge was on!!!

I got all of my tools out…..

….and yes that is a quilting ruler!! I mean, what else does a quilter use when she wants to draw a straight line!!!

In a little over an hour, this was my accomplishment…..

It works perfectly and at least I accomplished something for the day. It is always amazing how the act of creating something makes my day!!

Tomorrow I will tackle the borders again…..maybe……or maybe I will start a new project!!

Stay tuned!!

Ruler Machine Quilting – Day 2

To quote Herman’s Hermits…..”Second verse, same as the first”!!

Today I drew out two 6.5 inch squares (because that is what fit on the practice piece) and did two more Square Spiral designs. The first was a 3/4 inch spiral and the second a 1 inch spiral…..

The only problems that I had were in one corner and I believe that was because I was right at the edge of my fabric and couldn’t get a good hold to help move the fabric properly …..

For these long lines of quilting, I have been using a ruler that I purchased at our last guild quilt show…

It is made by “Angel Oak Stitchery” and you should check out their online store for more well made rulers.

At the gym this morning I watched two videos….one by Angela Walters showing how to use her ruler named “Sid” (gotta love that she gives each of her rulers a name)!!!

There are a few things that I really like about this ruler. First of all, having all of the registration lines is amazingly helpful. Secondly, the lips on the outside of the rule (at the bottom in the photo) help to line up exactly 1/4 inch away from where you want to stitch…..

Sid is upside down here…..sorry

So if I have this mark lined up in both places then I know that I will be stitching directly on the line as I move down the ruler. This makes traveling over existing stitches so much easier and accurate.

The final thing that I like about Sid is that he has a rough surface on the back side which helps to grip the fabric as you quilt. On the other rulers that I own, I have had to add my own non-skid tape to it.

The second video that I watched while I Eliptical-ed (is that a word) was from Natalia Bonner. She showed another straight line design for borders and I decided that I would give it a try.

The first step was to draw out my faux quilt

Ignore the horizontal line on the right!!

….consisting of 2 four inch blocks, a 1.5 inch inner border and a 3 inch outer border.

I made a few registration marks just so I could tell when the edges and centers of the blocks would be and then started sewing, using SID this time.

The thing that I found hardest initially was to figure out where to hold the ruler to make the needle end up in the right position…..

How do I hit that blue mark???

….but it did get easier with practice.

I started with the design that Natalia had demonstrated…..

….and then kept adding on and on and on and on……..until I ended up with this design…..

Except for a few thread breaks, the entire piece was quilted in one continuous session.

What did I learn……

  • using the markings on SID made easy work of keeping the lines straight
  • I need to figure out how to keep the spacing correct when using straight line fillers. This was easier when I spaced them 1/4 inch apart because I could use the ruler foot as my guide…..
when I could see the last sewing line just outside of the ruler foot that means that it is a correct 1/4 inch.
  • I often struggle with how to turn the corner on a border and really like this corner treatment…..

Okay…enough practice for the day!!! Now I need to get started on quilting a few REAL quilts but will certainly feel more at east to add in some straight line designs in as I go.

Ruler Quilting Practice

For the last few years I have kept saying that I needed to learn more about using rulers for Free Motion Quilting. When I have done this practice time in the past, I have simply pulled out my rulers and played with them a little and said….well that was fun!!! But I never really LEARNED anything.

I have now purchased a series of rulers from Angela Walters and am watching many of her videos as I excitedly await their arrival. At the gym I watched the video where she talks about using a straight ruler to quilt a spiral pattern in a square. Since I already own a straight ruler, I decided to give this a try today.

I started out by making 6 practice pieces using some low quality cotton fabrics and batting. Then I drew an 8 inch square on one of them……

…..sat down at the machine and started playing!!! The first step was to quilt around the outside of the square and then quilt from the corner to 1/2 inch past the next corner…..

With the first few rounds, I chose to mark where the ruler would fall along the line. In this case the ruler was placed 3/4 of an inch away from the corner. Because of how the ruler foot is built, this means that the needle will fall at the 1/2 inch mark.

I kept working my way around the block and was able to finally stop marking each corner which saved a LOT of time.

This design is really good for practicing because it makes you use the ruler in all of the four orientations…… in front of the needle, behind the needle, to the right of the needle and to the left of the needle……

I was relatively happy with how this first practice block turned out…..

What did I learn from this first block…..

– there are a LOT of lines in an 8 inch square when you space them 1/2 inch apart!!!!

– GO SLOW…. and don’t worry about having to stop and reposition your hands.

– CONCENTRATE!!!! ….or you end up crooked lines, lines at the wrong angles and stitching that goes beyond the line.

Okay….that was fun. Let’s do it again with 1 inch between the lines…..

I went really well until I got well into the center and then I lost concentration and sewed one line wrong……

So here are my errors on the second try……

I am still happy with this first practice piece and I have already learned a lot. AND, I am thinking that I might use this design on one of the next quilts that I have in the queue to quilt.

I think that I will try this a few more times tomorrow and see if I get better with it!!!

Practice, Practice, Practice

When I teach my “Beginning Machine Quilting” workshop, the best piece of advice that I give to new Free Motion Quilters is to Practice…..PRACTICE….. PRACTICE!!!!

Earlier this year, I decided that I wanted to “up my game” in the FMQ department so finally realized that I needed to follow my own advice!!!

I started this project back in May and first blogged about it HERE. As I had some free time on the week prior to the IQF show, I determined to get this project finished!!!!

I was pleased as I started using the rulers again and have found that this is my favorite one….

It has a straight line on one edge and a slight curve on the other and it is so versatile!!!

I enjoyed using one of the “petal” rulers to add some interest to this block….

And, for this block, I just played around with several rulers to see what type of design I could come up with…..

One of my favorite (and fastest) designs was this block…..

I started by marking alternating dots at specific intervals…..

….and then used the ruler to quilt back and forth between them (and this is a better photo of my favorite ruler)…..

Back in the summer, I purchased a set of circle rulers and this was my first try at using them. They were interesting and I think that they will be helpful, but I will definitely have to get used to how they feel!!! They are pie shapes with a small hole at the top of each one.

You place a thumbtack in the hole and then quilt around the circle…..

It worked well, but I had to really concentrate on how to hold the ruler and to remind myself that I didn’t have to press down on the thumbtack as that caused the quilt sandwich to stay in one place and not slide!!!

This is how the circle block ended up…..

….certainly not perfect, but something that I think I could learn to do!!!

Here is finished quilt…..

I truly enjoyed my practice sessions and hope that this quilt will find a good home thru our Guild’s charity work.

Now it is time to push myself and try something new (that I am scared of)!!!! Will I do that or will I go into displacement activity…..only time will tell.