Sampler Quilting…..FINISHED!

Last week I presented two posts about FMQing a fun sampler quilt.

Today, let’s get it finished up!!!!

For this first block, I started out with the “Squiggy” ruler to design some outlines….

….and then used “Petunia” to fill in some petals…..

It ended up a little funky but I really liked the finished block…..

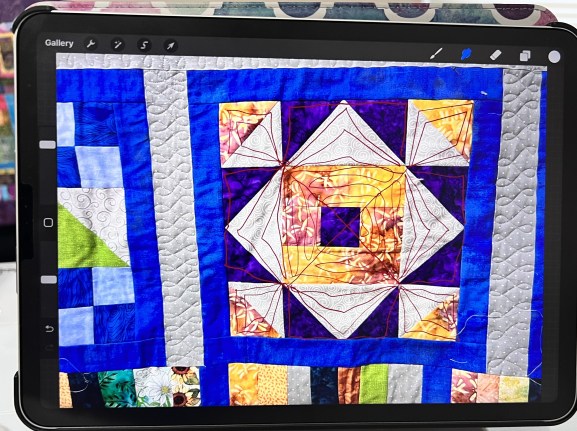
I had left these last two blocks for last because I simply couldn’t come up with an idea of how to quilt them…..

I wanted to exaggerate the diagonal in both so started by using a wavy ruler to quilt down the center of the first block and then echoed it several times…..

After I got tired of waves, I switched to a straight-edge ruler and added some straight lines on the diagonals.

Then is it was more waves and finally more straight lines……

It was super easy, fast, and fun!!!

I used the same principle for the last block, quilting half the blocks in a wave and the other half in straight-lines……

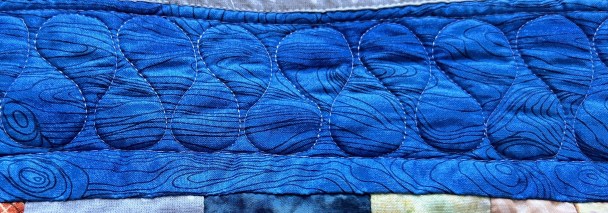
I wanted to finish the quilt with a Ribbon Candy design but didn’t want it to be so wide. To fix the problem I used the straight-edge ruler to add lines 1/2-inch from each edge and then quilted Ribbon Candy in the center section…..

Here is the finished quilt……

This has been a fun process to quilt this project. I found that it was easy to come up with designs to use and the actual quilting was a breeze.

I have spent so much time practicing that it was good to actually QUILT something!!!

Now I can’t wait to finish the next top so that I have more to quilt!!


In this blog, I post DAILY stories about creativity, techniques, tools of the trade, and lots more about the wonderful art of quilting. If you are enjoying these posts, please subscribe to be notified of each new blog as it becomes available.

Four (actually 5) more blocks….

Yesterday I posted about quilting the first four blocks of my friend, Diane’s sampler quilt.

Here are the next ones……

These triangles called out for point-to-point arcs…..

….but the FUN happened when I added in a loopy meander…..

If you have read my blog for very long, you will know that ALL of my meanders eventually turn into LOOPY ones!!!


I used more Point-to-point arcs for the next block, although I could have done better on the spacing!!!

To fill in the background, I quilted four feathers that curved around the point!!

I am SO thankful for Angela Walters’ FMQ Feather Challenge. I went in knowing NOTHING and came out feeling okay about feathers!!

Here is the wrap-up post…..


Next, it was time for some more Echo and Arc designs…..

I wanted the inside of the triangles and chevrons to be 1/4-inch inside the block and not be a slanted Dot-to-Dot design, but I did NOT want to break thread every time.

Instead, I sewed a short “entryway” into each of the shapes…..

I don’t think that detract from the design and sure made it easier to execute!!

The last one for today is a simple block with an overall clamshell design…..

It took a bit of time to figure out how to do the edges, but I think that it turned out okay!!


Since we are on a roll, let’s do one more block!!!

I started out with arcs in this “Sawtooth Star” block…..

….. but added some straight lines to fill in the spaces…..

I really like how this traingle looks!!!

So……we have seen 9 of the 12 blocks. Since the next few days will be full of holiday fun, come back next week as we finish the quilt!!!

If you enjoy this daily blog, please share it with your friends!!!

Thank you…….


Sampler Quilting Fun

Back in August, I posted about finishing a quilt top that was started by a friend who had recently passed away…..

I then sent this on to another friend who was going to longarm quilt it.

BUT, the more that I thought about it, I REALLY wanted to custom quilt this top so I requested it back again.

As I started thinking about patterns, I first took photos of each block individually and pulled them into “Procreate” on my iPad. One night I spent a couple of hours doodling on the blocks and trying to get ideas of how to quilt each one.

I start out by quilting the inside sashing so it would stabilize the quilt while I worked on it. I posted about this quilting design……

As I sat down to do each block, I would pull up my ideas on the iPad that was sitting next to the machine….

….pick a thread for the block……

…and get to it!!!

In this first block, I used only a straight-edge ruler and kept things pretty simple, using lots of Dot-to-Dot designs…..

ONE DOWN…..ELEVEN TO GO!!


The next block I kept REALLY simple…..just straight lines following the “Square-in-a-Square” layout….

I did add one extra bit to the center and quilted a flower in the middle…..

Notice that I made that square smaller before I added the detail.


The third block stayed simple, but I switched to an arc ruler (Angela Walters’ “Smiley”)…..

I quilted LOTS and LOTS of Arcs!!!


Block four used a bunch of arcs too…..

….but it needed something more in the background so I quilted a Paisley Meander…..


Okay….it is 1/3rd finished!!! Come back tomorrow as we look at 4 more blocks!!


If you enjoy this daily blog, please share it with your friends!!!

Thank you…….