Over the last few days, I have enjoyed showing you the photos I took of my quilts at the local Botanic Garden.
This last set was probably my favorite!!
There is a small sculpture garden called the “Garden of Imagination” and it features children enjoying the nature around them……
I decided this would be the perfect staging area with the “children”……
And the teacher deserved a quilt as well……
While in this area, I was approached by a woman from Chicago who was on a teacher’s retreat. She was also a quilter and we enjoyed a few minutes of discussion about our passions!!! As always…..quilters are the BEST!!!
Now, let’s change tracks and talk about the reason that these photos turned out so well!!
A few months ago, I purchased an online I-Phone Photography course from the “I-Phone Photo Academy.” I am leary of purchasing these sorts of courses, but I had seen a lot of very well-done, FREE, videos from this company and decided to give it a try.
I am SO glad that I did!!!
The first several lessons were about the photo functions that are specific to the I-Phone and I will need to watch those videos over and over again to get them all in my mind.
The rest of the videos have been about framing photos, about looking at the subject from different sides and angles, and about taking photos that are perfect as they are taken…..without cropping!!!
The photos that I have shown over the three days have only a minimal amount of cropping and I am happy with that new insight!!
I will share the first tip that was presented in the videos because it was KEY to taking all of these amazing quilt pictures!!
It’s all about how you hold the camera!!!
His suggestion is that, if you are right-handed, you hold the camera in your left hand, with your thumb and little finger on each side of the phone…..
He suggests carrying the phone in this position when you are looking for photo opportunities……
When you are ready to take a photo, lift the phone up and use your right thumb to press the shutter button…..
It sounds silly, but it is a much more comfortable angle and the camera is held super steady so you don’t get out-of-focus pictures.
But, back to the course……
Emil Pakarklis is an excellent host for this series. He films in beautiful Latvia and his quiet manner gives information that you need, in a way that is easy to learn.
I would HIGHLY recommend the course to anyone wanting better photos from their phone!!
Now I just need to get to my studio to make more quilts so that I can have more quilts to photograph…..
Normally, I take a standard photo of the quilt hanging on my design wall……
I attempt to photograph it straight and then crop close to remove any excess wall.
Let’s be honest, this is about as boring as it gets!!!
As I mentioned in yesterday’s post, I recently spent a lovely 3 hours photographing three quilts in an outdoor setting…..the Georgia State Botanical Garden!!
After leaving the “tunnel” area, I came on a kids fort with a rope wall…..the perfect place for a baby quilt to hang……
I tried valiantly to hang it without pins, but ended up having to press two into the rope to keep it from sliding as I photographed. I was SUPER careful to remove the pins and take them away with me!!
In this area there were even more mushrooms and they provided a great backdrop to some “low-down” photos of one of the folded quilts…..
I looked behind me and saw three climbing rings that worked perfectly for a “group” photo…..
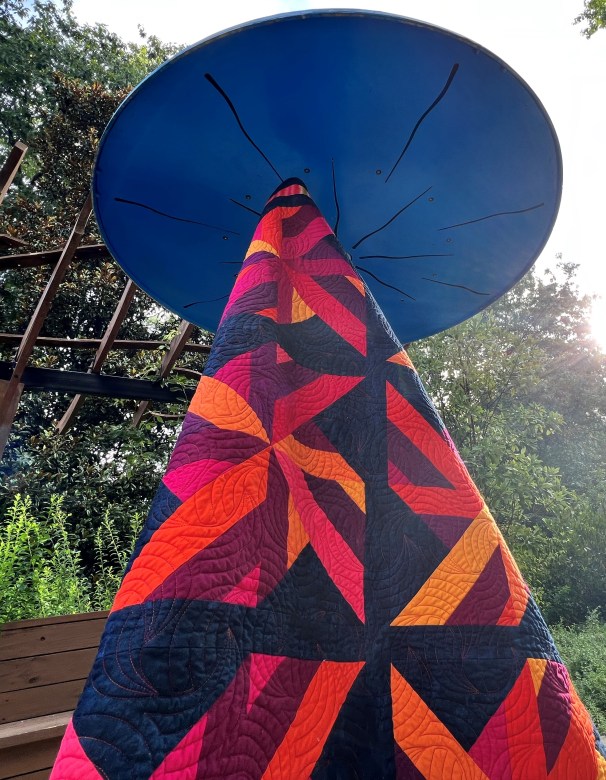
The sun really shows the colors shining thru, almost making them appear luminescent!!
One last fence in a handicap parking area was my last backdrop in this area….
I absolutely love the trees in the bakground!!
At this point I was hot, sweaty and ready for a cool drink…..
…..but there was still one more setting to visit…..
Stop back by on Tuesday for photos from this area.
I will also share information about an online I-phone photography course that has greatly improved my photos.
As I scroll thru the “Quilters’ of Instagram” photos, I am amazed at the variety of ways people find to photograph their quilts.
I was not only amazed and intrigued but wondered if I could produce some of the same results.
Last Thursday was the day to try!!!
Not really having any idea of what I was doing, I looked online for suggestions. After a bit of research, I gathered up all of my supplies, including tripods, camera (well, I-phone really), step-stool, towels, drop cloths, big clips, pins, and masking tape.
Oh….I almost forgot….I grabbed three of my last finishes…..
But where to go?
The obvious solution was to visit the Georgia State Botanical Garden which is about 20 minutes from me. It opened at 8:00am and my plan was to be there and ready to go!!
I headed first for a children’s area and had fun playing with Lady Bugs….
and mushrooms…..
The benches in the background were the bane of my photos. I couldn’t get away from them. So, instead, I decided to make use of them…..
It was here that I met a sweet woman from Greenville, SC who insisted that she take my photo…..
I moved further down the path and found this amazing tunnel…..
Wouldn’t it be fun to put a quilt in the middle and take a photo around it? Unfortunately, that required a second set of hands!!
Then I started wondering if I could hang the quilt on one of the tunnel walls?
The answer was……YES…..
As I was looking around for other areas to hang the quilt, I spotted a hole in the wall on the other side……what happens if I film THRU the hole……
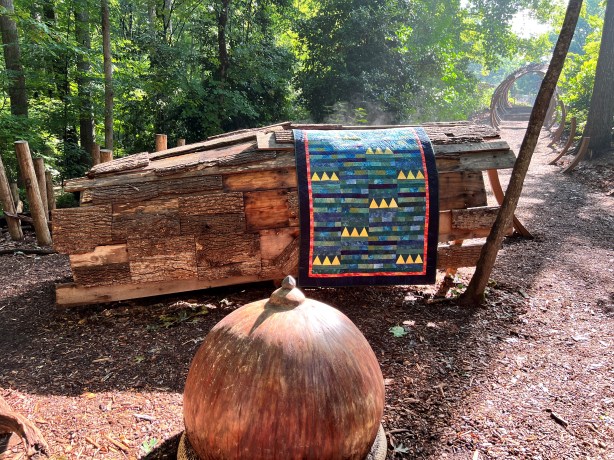
The next “A-HA” moment occurred a few more steps down the path where I found a small wooden tunnel designed for kids to climb thru….
The coolest thing about this tunnel was that steam was pouring off of it and I love the foggy look that some of the photos had……
It was amazing that the quilting showed up so wonderfully in the natural light…..
I sent this photo to Sheila (the quilter) to say “THANK YOU!!”
There were also some concrete “acorns” scattered about and it was fun to find ways to include them in the photo…..
And, of course, there was ANOTHER tunnel, and more photos…..
I had a little fun adding a “prop” to the scene…..
This post is already long enough, but there were TONS of other great spots for photos and, believe me, I took advantage of ALL of them…..
Come back tomorrow for more fun photos, including using some statues as props!!!