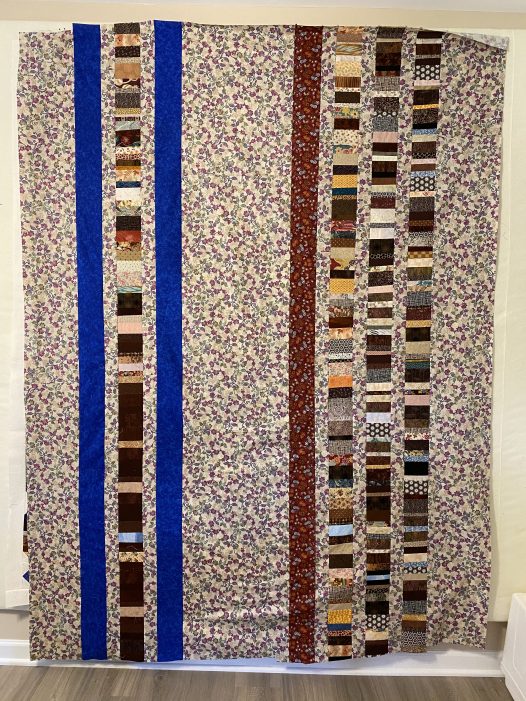
As I started cleaning up my leftovers from the Brown Strip quilt, I realized that I had TONS and TONS and TONS of strips that I had cut and never used…..
I knew that they would just languish in the scrap drawer so I took things into my own hands and started piecing them together to make FOUR strips that would fit end-to-end on the back. I added some other solid strips and ended up with this as a back…..
I was running out of the main fabric and was getting desperate as I finished the last outside strip. I ended up piecing FOUR 2.5 inch strips together to make it long enough…..
Count them….FOUR seams!!!
Now….what can I start next to avoid having to think about quilting this!!!!
In my last post, I took you thru the creating of the inside of my Brown Scrap Strip quilt. As I mentioned there, I made WAY too many brown strip sets and was determined to not let any of them go to waste…..
So, it was imperative that the border contain as many of those strips as I could cram in. I started with laying them out end to end but that was just BORING!!!
Next I thought about the block design….
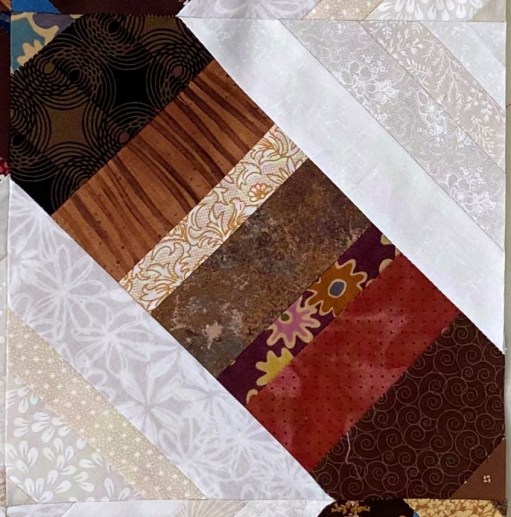
….noticing that the brown came to a point in each of the blocks.
HMMMM…wonder if I could emulate that in the border??? I made a few test blocks and decided that I had hit on the answer…..
I also made the decision to put a 2 inch background strip as the first border so that the striped border would float.
The only problem with this design was figuring out how long each of the strip sets needed to be to reach the edge of the quilt. TOO MUCH MATH…. So, I did the next best thing and decided to make them different sizes so I could “fudge” it to fit.
I would love to say that the process of making these border blocks was well thought out, the fabric sizes were properly calculated and cut. But, the truth of the matter is that I cut big, sewed and trimmed to size!!
I used the Essential Triangle Tool to cut the initial points and used my trusty painters tape to mark the edges of the strip so that the points were always in the middle of the strip…..
I love this measurement on one of my smaller rulers. It made trimming the point super easy.
To finish the top, I added another strip of background fabric to finish the “float”.
And at last the final seam was sewn…..
…and I was able to hang the finished top on the wall and step back to admire it…..
Of course the next question is how to quilt it….. but that decision can wait for a while….
In the last few posts you have seen bits and pieces of the brown strip-pieced scrap quilt that I have been working on. Now it is time for…….(in your best Paul Harvey voice)……THE REST OF THE STORY!!
Back in September of 2018 I had rotator-cuff surgery on my right shoulder. I knew that I would probably have some time to sew but would be limited in what I could do so I wanted to work on a project that could be cut out and ready to go. I saw this design…..
“Scrap Lattice” by Heather Kojan
….in the September 2018 issue of Modern Patchwork. Sadly this magazine went out of business just after I joined!!!
I was pretty sure that I would be able to push fabrics thru the sewing machine and would be able to iron with my small travel iron…..
So….I spent the week prior to surgery pulling out brown scraps and cutting them into 4.5 inch pieces.
After the surgery I was indeed able to do the piecing even though I had to make sure that my arm didn’t move too far out of the sling…..
But, when I put it up on the design wall…..
….it looked too dark and foreboding!!! It definitely needed something to lighten the color AND the mood.
At this point, I wasn’t able to use my arm to cut fabrics, so I had to put the project away.
Later, I went back to it and cut tons and tons of additional fabrics, adding MANY new colors…..
And then it was put away….to become a dreaded UFO for about 18 months!!!
I had planned to work on it at our May Guild Retreat which, of course, was cancelled!! 😞
But this summer has proven to be the perfect time to get back to it. It was something that I could sew on happily without having to do much planning or thinking about it. It was one of those projects that didn’t take up too much of my brain!!!
For some reason, in the original planning I had decided that I needed 80 blocks and that the quilt would be 8 x 10. Bu that would have been much larger than the Lap quilt that I was going for. Unfortunately, I didn’t realize this until AFTER I had made over 75 of the blocks!!!
With all of the brown strips made, it was time to think about the corners. In the original pattern the author had use crumb piecing to create the corner triangles. I was NOT interested in that!!!
I made one block using just one background fabric…..
….but it looked pretty plain. So, I was going to have to find something else to bring some sparkle to the blocks.
I decided to create strip sets and cut the triangles out so that there is modified courthouse step look to it.
I would love to say that my process was super accurate but the truth is that I cut everything bigger and just cut the block down to size at the end. I used my 12.5 inch ruler to cut the corners, marking the line with painter’s tape…..
The brown strip sets were cut down to 4.25 inches in width and a triangle was sewn to each side. After a few calculations, I marked my square ruler to show where it should like up against the stripe (the 2nd blue tape)…..
After making this first cut, I used the rule to square up the block to 8.5 inches.
As I started laying these out, I was super excited to see the sparkle that was appearing in the triangle areas….
As I was happily sewing along on my brown stripe quilt, I started noticing that some of the stitching tension wasn’t great……
I worked thru the list of all of the usual suspects….
re-threaded the top
re-threaded the bobbin
adjusted the tension dial
cleaned out the bobbin area
put a few extra drops of oil in the proper areas
But it did not improve!!
I finally decided that it had to be the needle. For the last two years I have been using Superior brand Titanium coated needles…..
Because of their durability, I do not change the needle nearly as often as I used to. Here is what Superior has to say about them……
“With Superior’s Titanium-coated needles, you will hear a different sound when sewing (a soft, constant thud, thud, thud) when the needle is getting dull. This is because the thin layer of titanium-nitride coating is wearing off. Every time the needle penetrates fabric, there is a microscopic amount of wear on a needle, no matter what it is coated with (nickel, chrome, or titanium).
There are many other cues of a dulling or dull needle that are more recognizable, such as skipped stitches, the top thread shredding, and/or puckering while stitching. If your thread starts to behave strangely and you are experiencing these types of problems whereas you weren’t before, chances are that your needle should be replaced.
So, I replaced the needle and….magically…..the tension issues went away!!!