Let’s try more geometrics

Let’s start with an apology….for those of you who follow this blog, you probably got 2 or 3 notifications this morning!! There was a glitch in the post. I tried twice to correct it and then decided that I had to start from scratch!! In re-doing the post, I found a photo that had an error!! So….sorry for all of the emails!!

Yesterday I shared two of my favorite designs in this week’s FMQ challenge from Angela Walters. Today, I have two that I DIDN’T like and two that I DID!!

Let’s start with the NO designs….

The first one was a triangle design where some are filled in…..

My problem was that I could NOT figure out where to go next so that I didn’t get myself stuck. Plus, I was not that excited about the design even when I was looking at the one that Angela had quilted herself!

The second design started with a closed-in shape that will filled in with various filler designs….

This might be fun if I was filling a huge area but it didn’t appeal to me.

IF I did try it, I would probably pre-mark my sections so that I knew where I was headed next.

But there were two that I did like…..

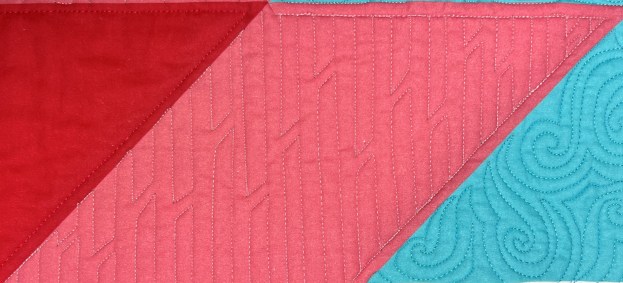
Interestingly, the first one was triangles (again) but these seemed easier to place….

….although I see now that there is one parallelogram hiding with the triangles.

I chose to use a ruler for these lines and I really do like the look. It takes quite a bit of time to work so I would only use it in smaller areas.

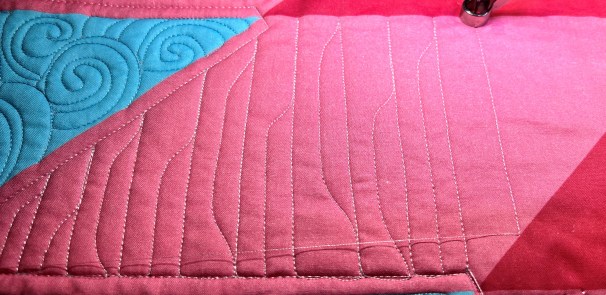
The last design is my favorite from this set. It is worked in the same manner as the “Back and Forth” design that looks like this…..

The difference is that the lines are further apart and the turns are angled rather than curved.

This was another design that Angela didn’t demonstrate, so I had to decide for myself how I was going to quilt it. Since it is similar to the above pattern, I worked it in the same manner, starting with a column of “columns”……

…..and then filling in the other side working my way back down the column…..

I really do like this design and think that it would be great in areas where I wanted straight lines, but maybe not COMPLETELY straight lines!!!

I also used a ruler for these lines which made it easier to keep the lines straight and meeting with the previous column.

So that is it for the geometric designs challenge.

Now I am a full two weeks behind but I am not going to try to catch up. Instead, I am going to take my time and try to learn as much as I can!!

Merging Lines is fun!!!

As I mentioned last week, I have stopped trying to keep up with Angela Walters in her newest challenge…. “Free Motion Fillers”. She has been FLYING thru the designs this time and it was simply too much to try to do all of them in one week. Fortunately, all of the videos are on her website so I can go back to them at any time!!

This week I have continued to work on the “Geometric” FMQ designs and found one or two that did NOT tickle my fancy, but found several that are definitely keepers!!

The first one for this week was “Merged Lines”. This is a design that I have seen Angela talk about and it always looked super complicated.

Initially I had trouble figuring the pattern out and literally followed Angela’s steps one at a time. I would watch 15 seconds of the video and then quilt it the same way….watch another 15 seconds and then quilt…….another 15 seconds and then quilt!!

At some point, I had the AHA moment where I understood the design.

Don’t you love it when that happens!!

Also, I was trying to quilt it side to side, but when I switched to a vertical orientation it worked so much better!

Here are the steps…..

Quilt a line that follows one of the edges and then have it veer off at some point…..

This veering leaves an area that you are now going to fill with lines that echo the line that you just quilted……

When you hit a previous line, you simply travel along that line and then repeat the echo until the entire area is filled in……

You then travel outside of the furthest line that you have quilted and start the process over again!!

I can see using this design when I have large areas to cover. I stitched my section at 1/4″ so there is a LOT of quilting in it, but you could easily open it up more and get thru an area pretty fast.

Here is the final……

I LOVE IT!!!!

In this section of the challenge there are TEN different designs to try but Angela only demonstrates seven of them. The other three are in her pdf handout but there is no actual instruction.

At first this frustrated me and I was really concerned about trying designs that I couldn’t see in action.

BUT, as I got to those designs, I found that they were simply variations of one of the other designs and that I could probably figure them out if I tried!!!

The first one was “Blended Lines” and I could see that it was going to work a lot like the “Merged Lines” that I just showed.

After thinking about the design a bit, I stitched my first line from one side to the other, traveled just a bit back over my stitching, and then veered out to one side……

I traveled a bit past the veered line and stitched another line all the way across. This time I traveled a bit further on the line and then veered again. I also had the option to veer BACK to the line before I reached the other side.

The only problem that I hit was that I SHOULD have started the design at one corner and had it flow all the way across the diamond. Instead, I started right in the middle and had to break thread and then work on the other side. This meant that my straight line had to be further away…..

……so that I had a place to insert my “veered” line…..

This is how it looked……

Both of these designs are DEFINITELY in my “use again” folder!!!

Come back tomorrow and I will present two more favorites and two that I will probably NEVER use!!

Let’s Swirl…..

Swirl means to “move in a twisting or spiraling pattern”, and that sounds like a great idea for Free-Motion-Quilting. BUT, it is one of the hardest patterns for me to figure out!!

When Angela Walters announced that week two in her “Filler FMQ Challenge” was based on swirls, I groaned loudly and started dreading the week!!

As usual, once I got into the design and started listening the Angela’s instructions, I relaxed, the quilting got easier and it ended up being a fun afternoon at the machine!!

I did this week backwards, starting with the variations and ending up with the swirl meander…..

I really struggle with this design, especially how to make it move freely around the area. I often end up with all of the swirls in a line and all of the curves going in the same direction!! SIGH!!!

My first problem is that I overthink the initial curve….maybe practice will help that!!

The first variation is the “Swirl Hook”…..

….EVEN HARDER for me to figure out!! I did find that it was important to echo the hook in the correct direction, but this just doesn’t look good to me!!!

Sadly, the next two designs were even worse!!!

I couldn’t keep the concentric swirls spaced evenly and THEY…..WEREN’T….ROUND!!

The “uneven concentric swirls” were hard to maintain, especially making it look as if I MEANT for them to be spaced differently……

Things got better when we added some pebbles into the mix…..

I think that having a place to stop one swirl and head into the next one makes it easier for me to fathom.

The “Elongated Swirl Meander” was okay, but I had done it before, so that helped…..

I had learned the “flower meander” in a previous challenge and it was definitely a favorite (I actually started with it)…..

….and the “Wavy Line Meander” is easy and I like how it looks…..

But, this weeks challenge was not ALL gloom and doom!!

There were two designs that I loved!!

The first was an elongated swirl that had a large “pebble” at the center of the swirl. I love how the other quilting made this circle pop out…..

The last design was not even in the video, but her diagram showed how to quilt it. I may not have done it EXACTLY right, but I love the open feel of it……

These last two are designs that I will DEFINITELY use again…..hopefully often!!!

All in all, there were TEN designs this week so I guess feeling a little overwhelmed was to be expected!!!

BUT….the takeaway message here is that, eventhough I didn’t feel good about my quilting, the final product looks great!!!

The other thing that I realized was that I felt rushed when I sat down to quilt and didn’t spend the time and energy needed to do a proper job……. I’ll try again next week!!!

Free Motion Filler fun

This week I was able to make a start on the Angela Walters “Free Motion Fillers Challenge“. Most of you know that I LOVE the way that Angela teaches, really appreciate her challenges and ALWAYS, ALWAYS, ALWAYS learn something new!!

This first week was no different!!

The first week was all about Circle Filler designs…..

We started out with basic pebbles….

I have been quilting those for a long time so picked a small area to practice them on.

Next, came Bubbles….ie, pebbles that are different sizes…..

I love how this one looks but I have trouble spacing my larger pebbles evenly around the block. It might be good for me to mark those in before I start quilting!!

Then we switched to a design where you start with stipple quilting and then throw in a loop (pebble) every so often…..

I do another version of this design which I find a bit easier. Mine uses less stipple and more loops…..

One of the hardest variations for me was overlapped circles….

I found it REALLY hard to keep the circles a similar size!!

Again, I have a version that I call “Bad Hair Day”. It is less “standard” but gives a similar feel…..

Next was my FAVORITE design and one new to me….an Echoed Pebble…..

The idea here is that every so often you make an echo line inside the pebble. I found it an easy pattern to do!!

The hardest one for me (and probably the filler that I will NEVER use) was an oval design.

I found this one very hard to work thru and to keep even as I went. When Angela works this design, she “travels” around every one of the ovals but that was too much traveling for me. Instead, I rounded the corner and then backtracked to a good starting place for another oval.

AGAIN…..this version was NOT for me!!

I will post a review later, but I am enjoying using my new suspension system. It made a lot of difference to the “drag” associated with FMQ.

I finished this first lesson just in time to watch the next one…..WHEW!!!!

NEW PROJECT!!!

Yesterday I received a package from “Quilting Is My Therapy” and THAT is always a good thing!!

This time it contained the next installment of Angela Walters’ Free Motion Quilting challenges ….”Free Motion Fillers”.

You don’t have to purchase the fabric to do the challenge, but I love working on pieces that she has designed so I always buy the whole shebang!!

The panel is amazing…..

….as are the “Glide” threads that go along with it……

The challenge starts on June 21st and I am anxiously awaiting the first lesson.

Those of you who read this blog regularly know that I do a lot of FMQ and feel comfortable with most designs so you might wonder exactly WHY I am doing yet another challenge.

I don’t think that you can ever learn too much, so signing up for another FMQ challenge will simply help me to improve my skills further, and improving is always a good thing!!

It’s not too late to join the challenge. Check out her website for more information.

I can’t wait to share the things that I will learn!!