Yesterday I showed you all of the cheesecloth that I had dyed, but now what was I going to do with it??
I started videoing this process, but after I spent about 10 minutes just staring at the area and not really doing anything, I decided that it might be a fairly BORING video……

I kept on picking up pieces of cheesecloth, laying them on top, and then saying…..”nope”!!

I had an “AHA” moment when I laid this piece over the painted fabric……

OKAY…..that can be my starting point!!
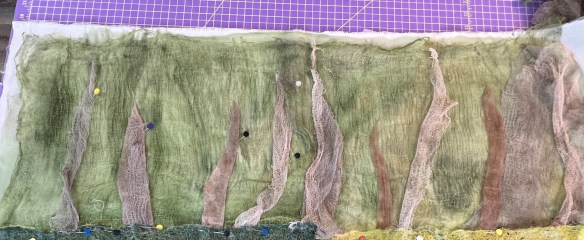
My first thought was to start with the tree trunks that were coming up from the meadow so I cut off a piece of brown/grey and laid it down…..

Then I added some more……

…being careful to wrinkle the cheesecloth up so that it wasn’t just a flat piece of fabric.
Okay….I was on a roll now!!
It didn’t take long to get all of my “tree trunks” in place.
Since some of the straight pins were getting in my way, I decided that it was time to permanently attach these tree trunks.
I once again used my “applique quilting foot” which does a wonderful job of keeping the edges in place as I stitch…..

I thought about the palm trees that I had seen when we were in this area and remembered that they had a rough texture to them, so I added a bit of filler stitching in as I went…..

When I placed Sadie over the top, I was thrilled with how it was looking…..

Now to add more!!
I looked at the picture and realized that there were more brown trunks on the right-hand side of the photo so started throwing even more cheesecloth at it…..

I had worked REALLY hard to get a super dark green cheesecloth, but when I added it to the piece, it was way TOO dark!!

I fixed it by over-painting it with some lighter green…..

…and eventually putting light cheesecloth on top of it…..

It didn’t take long to get all of the cheesecloth in place…..

And look at how much I had left over……

If you need dyed cheesecloth…..shoot me a message 😎😎 !!
We are nearing the end of this project, so be sure to come back tomorrow as I work thru the thread painting and quilting of this great quilt.
. . . . . . . . . . . . . . . . . . . . . . . . . . . . . . . . . . . . . . . . . . .
In this blog, I post stories about creativity, techniques, tools of the trade, and lots more about the wonderful art of quilting. If you are enjoying these posts, please subscribe to be notified of each new blog as it becomes available.


