Some Intentional Thread of my own….

On Tuesday, I reviewed a book called “The Intentional Thread”

As I was reading thru it, I started thinking about a project that has been in my “to-do someday” list for many years.

Let me tell you about it!!

In 2012, I gave my Mom a Mother’s Day present that had some assembly required…..

Unfortunately, this didn’t particularly appeal to Mom and this was what I found when I cleaned out her house after her passing…..

The first thing that I did was to add to the tree…….

But then, I didn’t know much else to do!!

Over the years I would pull it out and add a few stitches.

But after spending a few hours with “The Intentional Thread”, I was motivated to do some more.

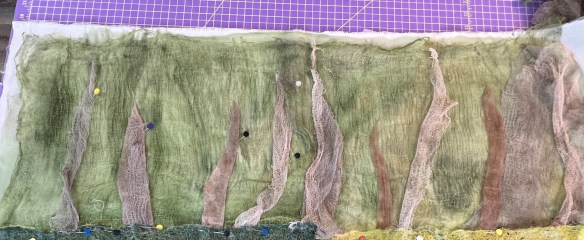
After a few hours, it looks like this…..

There is still a lot to do and I really have to be in the right frame of mind to work on it, but I am excited to have pulled it out again.

It is especially enjoyable to work on something that I know my Mom put stitches into as well!!

Oops…that reminds me that we had started a quilt together before she passed…..

I should probably move that up a few notches on my To-Do list as well!!

One of my favorite things about quilting is to motivate others and help them in their quilting journey. As part of this endeavor, I LOVE to present programs and workshops to groups and guilds around the world. All of my programs work well with Zoom meetings and I would love to speak to your group.

You can find out more at this link…..

Let’s start stitching!!

We are coming to the end of the “Sadie, the Saddle-Billed Stork” project.

Today we will start the thread painting and quilting.

The first thing that I had to do was attach the “thread grass” to the background….

I had to be careful that I was covering all of the edges…..

If I needed a bit of extra grass, I used some of the offcuts that I had from making the grass….

Once they were stitched in place, you couldn’t tell that it had been patched.

At the top, I was careful to tuck the cheesecloth under the grass…..

Everything was now ready for Sadie to make her appearance….

I pinned her on and immediately started thinking about how I was going to thread-paint her…..

I realized that I was scared to start the thread painting and began by only doing simple things, like stitching around every one of the feathers and every section of her body. That was okay but wasn’t enough!!

I finally decided to go all in and spent the next several hours happily stitching…..

When I was happy with the stitching, I basted the quilt and started quilting.

Since I had laid down so much thread on the top, I decided to keep the quilting simple.

The meadow was quilted in a simple wavy line……

I loved the texture that it added to the piece.

I did change the quilting along the two “path-type” areas…..

The leaves had already been heavily thread painted so the quilting just outlined them further.

I added vertical squiggly lines in the background trees too.

It was a BLAST to quilt and I look forward to showing you the FINISHED quilt…..

Come back tomorrow!!!

In this blog, I post DAILY stories about creativity, techniques, tools of the trade, and lots more about the wonderful art of quilting. If you are enjoying these posts, please subscribe to be notified of each new blog as it becomes available.

Now what??

Yesterday I showed you all of the cheesecloth that I had dyed, but now what was I going to do with it??

I started videoing this process, but after I spent about 10 minutes just staring at the area and not really doing anything, I decided that it might be a fairly BORING video……

I kept on picking up pieces of cheesecloth, laying them on top, and then saying…..”nope”!!

I had an “AHA” moment when I laid this piece over the painted fabric……

OKAY…..that can be my starting point!!

My first thought was to start with the tree trunks that were coming up from the meadow so I cut off a piece of brown/grey and laid it down…..

Then I added some more……

…being careful to wrinkle the cheesecloth up so that it wasn’t just a flat piece of fabric.

Okay….I was on a roll now!!

It didn’t take long to get all of my “tree trunks” in place.

Since some of the straight pins were getting in my way, I decided that it was time to permanently attach these tree trunks.

I once again used my “applique quilting foot” which does a wonderful job of keeping the edges in place as I stitch…..

I thought about the palm trees that I had seen when we were in this area and remembered that they had a rough texture to them, so I added a bit of filler stitching in as I went…..

When I placed Sadie over the top, I was thrilled with how it was looking…..

Now to add more!!

I looked at the picture and realized that there were more brown trunks on the right-hand side of the photo so started throwing even more cheesecloth at it…..

I had worked REALLY hard to get a super dark green cheesecloth, but when I added it to the piece, it was way TOO dark!!

I fixed it by over-painting it with some lighter green…..

…and eventually putting light cheesecloth on top of it…..

It didn’t take long to get all of the cheesecloth in place…..

And look at how much I had left over……

If you need dyed cheesecloth…..shoot me a message 😎😎 !!

We are nearing the end of this project, so be sure to come back tomorrow as I work thru the thread painting and quilting of this great quilt.

In this blog, I post DAILY stories about creativity, techniques, tools of the trade, and lots more about the wonderful art of quilting. If you are enjoying these posts, please subscribe to be notified of each new blog as it becomes available.

Glide Thread Surprise

I have recently begun using Glide Thread for my free-motion quilting.

If you haven’t used it before, Glide is a 40-weight Polyester thread with a slight sheen to it. I am smitten!!!

But, one thing that I didn’t like was that there wasn’t a way to tie the loose threads down so my thread storage was a mess……

…..or was there??

One day I was completely fed up with the mess so decided that I would use a craft knife and cut my own slit in the base of the spool, giving me a place to clip the threads in place.

As I started to make the first cut, I felt the base move!! That’s not good!!

But as I continued messing with it, I found that the base “rolls” down…..

And look….there is even a notch that the thread slides thru as you roll it in place…..

Once the ends are rolled around, you simply pop the base back up again…..

Doesn’t this look better?……

I should have known that a quality thread manufacturer would have taken care of this detail!!!

Did you already know this or am I just an unobservant gal???

If you enjoy this daily blog, please share it with your friends!!!

Thank you…….

Stabilize me!!

A month or so ago, I posted about finishing up a Thread-painting that one of my friends had started…..

It was stabilized with a super-heavy backing which made the stitching easy to do.

Unfortunately, it meant that the piece could not be quilted so I ended up just turning it into a piece of wall art.

NOW I am planning to make a similar one for myself……

….but I can’t figure out what type of stabilizer to use.

I visited my local JoAnn’s and found tons of different types of interfacing!! Completely overwhelmed, I picked four types to bring home and try.

I planned my test pieces so that one section was sewn straight on the backing fabric and one section was on a piece of fabric that was fused down.

Here are my results……

The first was Pellon 931 which is called a” Fusible Midweight”.

Stitching on the fused fabrics worked okay, but there is definite puckering on the other side….

Next was Pellon 987 which is a “White Fusible Fleece”….

. I had great hopes for this version as it would give the piece a bit of texture. Alas, there was TOO much texture……

….but not TOO bad.

Next was Pellon 808…. “Craft-Fuse”…..

This one was the worst for distortion……

Finally, I tried Pellon 80 (Heavyweight Stabilizer). This one is different because you SEW it in rather than fuse it on…….

This provided the least amount of distortion…..

All of these stabilizers worked well on the areas where another fabric had been fused to the backing but this one was the only one that worked equally well with just one layer of fabric.

I think the fact that it isn’t physically attached (fused) gives it room to shift a bit.

The thing that I don’t like about this stabilizer is that it is thick and will definitely turn the piece into an art piece rather than a quilt.

So, that is where I stand right now and I could really use your help…..

What stabilizers do you use??