Starting the Challenge

I posted on Thursday about my idea of using the Cherrywood challenge as a memorial honoring my Dad.

To start with, I needed replicas of his ribbons and awards. I did some searching and found a great store called the “Armed Forces Super Store”. There I was able to find ALL of his ribbons, awards and insignia……

….along with buttons that would fit the time period.

Next I needed to find a “pattern” to use to create the jacket. So, I started scouring photos of WWII army uniforms and finally found one that I thought would work…..

I then pulled this photo into “Canva” and started adding parts of other photos, ending up with this idea……

I made a line drawing of this photo and enlarged it to the size that I wanted (or so I thought)….

But when I laid the ribbons and buttons on top of this pattern, I realized that the scale was off and the uniform needed to be smaller.

I finally realized the the problem was because I had “zoomed in” too much on the uniform and that I needed to back away and use more of the uniform to fill in the space. More along these lines….

This is what I took to the retreat to work on!!

Now there were two problems….

Firstly, Dad’s uniform would have been a browny/olive green color and that particular colors was not in the fabrics that I could use. After a lot of thought, I decided to use the dark grey (almost black) fabric instead……

The second problem….. I only had a Fat Quarter to work with!!

My plan was to make the uniform 3-D, with the lapels, pockets and epaulets being loose on the top. BUT, that was going to take a lot of fabric!!

So, before I started cutting fabric, I decided to test my pattern on muslin, and IT WORKED…..

The next morning I decided to throw caution to the wind and start using the challenge fabrics, starting with the first lapel…..

It worked well, although, in an effort to save fabric, I I did use the light grey on the back of the lapel!!

I added one pocket and side of the jacket…..

….and then the other lapel and jacket side….

At this point, I realized that I would struggle to have enough fabric, so hopped online and ordered another 1/2-yard of the fabric.

I think that this is a good decision because I really need the jacket sides to be a bit wider and then also need fabric for the sleeves.

The only other thing that I have done to date is make the necktie. It was fun to stuff the “tie” portion with batting to make it 3-D…..

I don’t have a great color to use for the shirt so I am planning to add some color to one of the other pieces of fabric to change the color slightly. Apparently that is allowable in the challenge!!

So now I sit waiting for the fabric to arrive!!

After that, I need to finish the uniform and then decide on the rest of the quilt!!

.

.

. . . . . . . . . . . . . . . . . . . . . . . . . . . . . . . . . . . . . . . . . . .

In this blog, I post stories about creativity, techniques, tools of the trade, and lots more about the wonderful art of quilting. If you are enjoying these posts, please subscribe to be notified of each new blog as it becomes available.

Remembering

I have finally started thinking about my Cherrywood Challenge….which is due VERY soon!!

YIKES….

Just to remind you, the challenge is Poppies….and uses these wonderful fabrics…..

When I think of Poppies, I remember the lapel flowers that everyone in any British country wears during November….the month of remembrance…..

I kept trying to come up with another idea but my mind would not leave this one alone!!

Then I started remembering….

Remembering my Dad and his service during World War II…..

Wasn’t he handsome!!

Remembering his Service Record that I found when I cleaned out Mom’s house….

Inside I found his decorations…..

….and his Insignia…

He was a Medic and proudly wore the Caduceus.

I started researching his record and found that he had been awarded…..

  • Asiatic Pacific Campaign Military ribbon with 2 stars
  • World War II Victory Military ribbon
  • American Campaign Military Ribbon
  • Army Good Conduct Military Ribbon
  • Good Conduct Medal

It made me so proud of his service and I started wondering exactly how I could use this challenge to honor him!

I am excited about this idea and especially that I can make a quilt that will have a personal meaning and not just a challenge entry!!

Over the next week, I will keep you updated on the decisions that I make and the progress on the challenge.

Thanks for sticking with me as…..

.

.

…………………………………………………………………………………………

Subscribe to my mailing list and receive this free pattern for “Dancing Squares”…..

You can sign up HERE……

My Guild is “Pretty In Pink”

As you know, our latest guild challenge was “Pretty in Pink” and this was my entry…..

….but you already know that because you toiled with me thru the process!!

Here are the rest of the amazing quilts in the challenge…..

The Best Use of Color award went to Pat S.

Innovative Design award was given to Sharon R.

…and Best Overall Design was awarded to Rosie C.

Here are the rest of the quilts and their makers….

Mary G made this from a design that her granddaughter found…..

Pat S ALWAYS makes more than one challenge and this kaleidoscope was her second….

Scott M used some old blocks and transformed them into this quilt…..

Barbara R. gave us this pink dahlia…..

….while Betsy V provided this darling flower and bird…..

Mai W and her sister made this “Home for the Holidays”, complete with real lights on the roof…..

Jan G framed a wonderful embroidery with some fun blocks…..

I apologize for not remembering who made these last two, but I love the Chenille….

Finally, this very sweet tulip applique. Look at the embroidery that was added to the rick-rack….

Our guild stepped up and accepted this challenge and the quilts that came from it were perfect, perky and most importantly…..

We haven’t heard what our next challenge will be but I can’t wait!!

.

…………………………………………………………………………………………

Subscribe to my mailing list and receive this free pattern for “Dancing Squares”…..

You can sign up HERE……

Let’s piece it…..

Yesterday I showed you my lazy-girl mock-up.

Now it was time to actually piece the squares!!

Since I was going to be working with smaller pieces of fabric, I decided that I would starch them before cutting. I like to use Magic Sizing, spraying the piece liberally and then ironing dry.

It made the fabric much stiffer and I think that it did help with the cutting and piecing!!

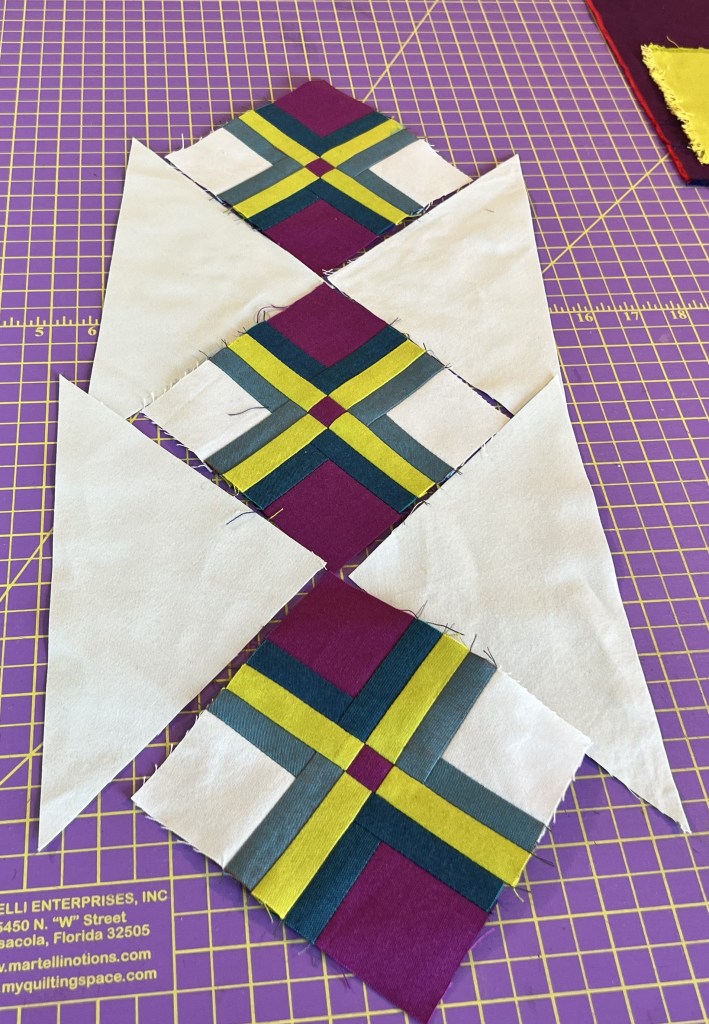
I started piecing the various sections…..

…..adding one strip at a time…..

Then I moved to the background sets…..

Before long I was ready to put the two sections together…..

In my original mock-up, I used a blue small square in the center…..

….but I had the thought that a red/maroon one might be better…..

I was right!!!

Once I had all of the squares made, it was time to add the background triangles……

One of my big concerns was that the threads from the color fabrics would shadow through the light-colored background fabric…..

To combat this, I did some extra trimming after each seam was sewed.

First I pulled back the seam allowance…..

….and trimmed the offending fabrics/threads off…..

Now I don’t have to worry about shadowing!!!

So here is my basic design…..

Next step is to decide if I need to add more squares….or maybe two “half-squares” on each end.

I think that I will plan the quilting next to see what other piecing I need to add.

Come back tomorrow for the planning process!!!

.

…………………………………………………………………………………………

Subscribe to my mailing list and receive this free pattern for “Dancing Squares”…..

You can sign up HERE……

Lazy Mock-up

Yesterday I shared my initial thoughts for the upcoming MQG Fabric Challenge.

Now it was time to make some decisions….. and it was the day before we were leaving on a 7-day overseas trip!! The bags were packed and ready to roll, the house was cleaned up, my studio was immaculate, and I had time on my hands.

Like any good quilter, I started a new project!!

I wanted to make a mock-up of my ideas to see if they would work, but I didn’t want to sew!!

Glue sticks to the rescue!!!

I pulled one piece of the background fabric and drew a line from top to bottom to allow positioning of the pieces…..

I started cutting out each of the fabric pieces, dotting a little glue on the back, and sticking it to the background…..

In a short time, I had this set glued together……

Now I got lazy!!

Instead of making even more glued designs, I took the original to my photocopier……

….and quickly had a bunch to play with……

I now moved to the paper versions and “pieced” them together to give the full design…..

I then pulled a larger piece of background fabric and pinned the paper mock-up to it……

I wasn’t sure that I wanted the extra strips, so I pinned them on.

With this in mind, I headed out on my trip, still thinking about it as I toured around the wilds of Sweden!!

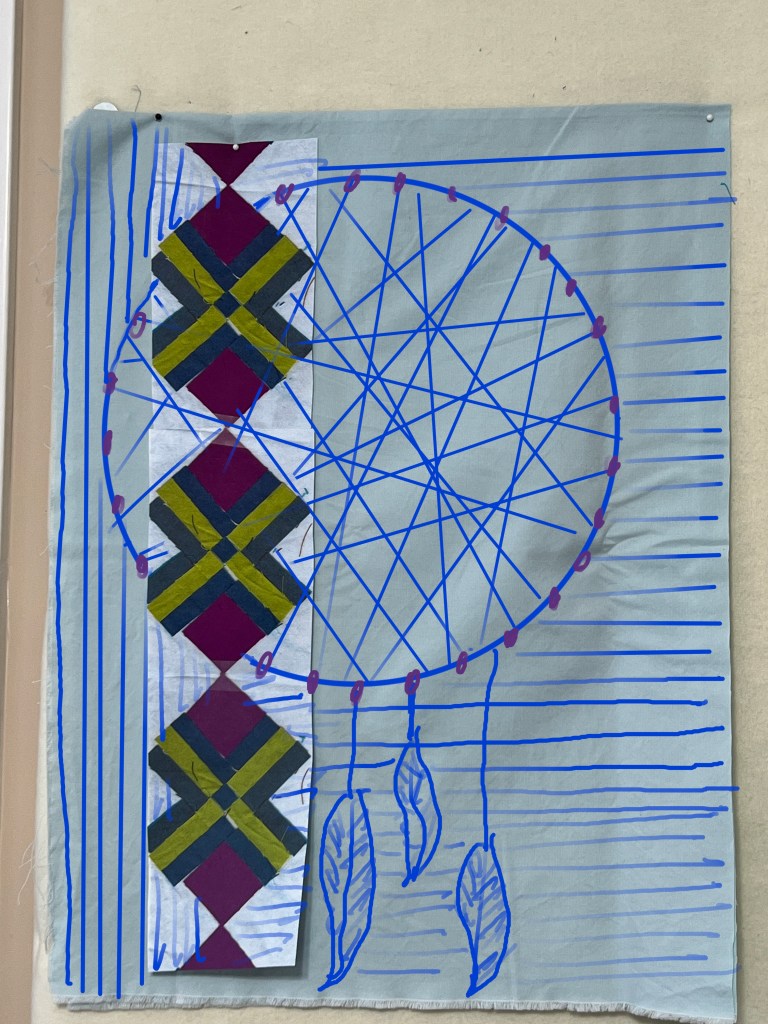
I also had an ulterior motive for making the mock-up before I left…. I wanted to play with quilting designs using Procreate on my iPad. These are two of the ideas that I hatched……

I really like the thought of using a Dreamcatcher in the quilting…..but more about that coming up!!!

This project is well on its way!!!

How do you mock-up your future quilts?

.

.

…………………………………………………………………………………………………….

If you have an interest in ruler quilting, check out this online course…..

Click HERE for more information