At our local guild quilt show….way back in 2019……I had purchased two S-curve rulers from a company called Angel Oak Stitchery.
Thinking that I KNEW how to use them, I set out to quilt a border on my Angela Walters’ Ruler FMQ Challenge quilt. This is what happened…….
By the way, if you heard that horrible noise that my machine was making in the video…..it needed to be oiled. A few minutes of my time and a few drops of oil and it was purring away again!!!
But, back to the S-curve……
I was happy with how it looked in the border, and two of the corners lined up perfectly……
Alas, the other ones were not as good!!!
I realize that I need to start planning those corners better and thinking about them long before I actually get to them!!!!
I am happy that I can add this ruler to my repertoire of usable designs!!!
Almost two years ago, I purchased a set of oval rulers but had never really figured out what to do with them. I decided that the Angela Walters’ ruler challenge quilt was the place to find out!!
I was working on this block and thought that a circular(esque) design would be nice……
After quilting the initial oval, I used the arc to quilt inside the shapes as well, first quilting around one side of the oval…..
….and then the oval to the other side and quilting the rest of the petal…..
I like how this looks and it was SO easy….
I am loving learning how to use the different rulers in my drawer!!!
I have had so much fun quilting the baby quilt that I showed yesterday It was amazing to be able to quilt it quickly and to use so many of the designs that I have been learning this year, including a few rulers as well!!
The easiest way to show you is with a video, so…..enjoy……
As I was looking at photos to post, I found a before and after and realized just how much difference the quilting makes……
Before
After
AND, yesterday I received a photo of sweet Emily Ann enjoying her quilt…..
Does it get any sweeter than this????
In the video I mentioned FMQ Boot Camp. If you are interested, check out this video…..
One of the things that I have learned from Angela Walters Ruler-FMQ challenge is the importance of taking a large space and turning it into something special.
The best way to do this is to make the area smaller and split it into different motifs.
In this case, I was filling in an empty space on the Ruler-FMQ challenge.
I started by using an arch edge to make three passes across the sides of the blocks…..
Since the ruler was smaller than the side, I would stitch to the middle of the ruler and then move it over to meet the other corner.
After I made one pass around the block, I used the 1/4″ foot to free-hand two more passes, adding a teardrop in each corner…..
I then used a Westalee ruler to create a motif in the center of the square…..
I really like the final result…..
As I look at it now, I am thinking that it might be fun to add some back-and-forth squiggly lines inside those outer arches.
I will wait until I quilt the borders and then decide if it needs more.
Last week I posted about the difference between rulers that are designed for EXACT measurements and those where it is easier to fudge a bit to make things work.
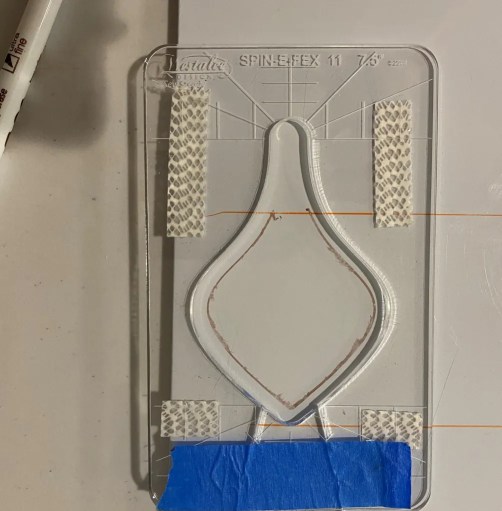
I posted this on a “Quilting with Rulers” Facebook group and a wonderful discussion ensued concerning the different types of rulers. One of the comments was that they hated the rulers that were designed for only a specific purpose, such as the Westalee Spin-E-Fex ruler series.
Well, that got me to wondering if those types of rulers could be used for other purposes….maybe even for a border.
I decided to test my theory, starting with the Spin-E-Fex #11 ruler. Used in its “proper” manner, it looks something like this…..
….but what would happen if I used it on a 3-inch border. I started out on my whiteboard to try a few different ideas…….
I placed the ruler so that the quilting line would fall just below the top of the border and traced around it once…..
When the “needle” met the bottom of the border, I stopped and moved the ruler over, and went around again. This was the result…..
Now, don’t get me wrong…..I love how this looks but it is a LOT of quilting for one border!!
So, let’s try something else……
Next, I quilted around it once, “stitched” along the border about an inch, and repeated the design…..
I like that better.
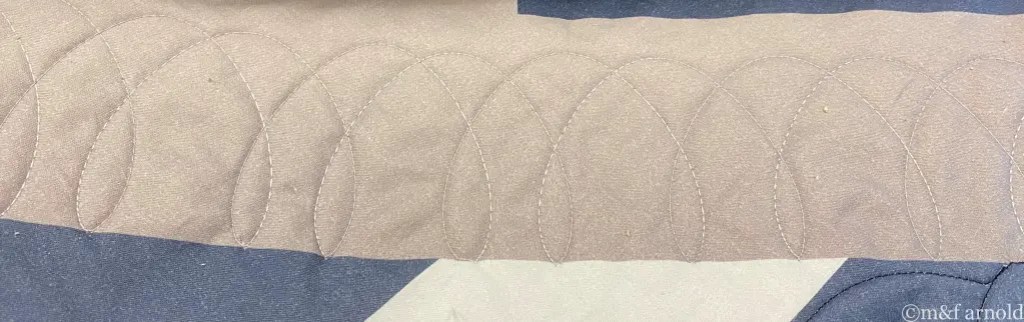
But, when I pulled out the border that I wanted to quilt, I decided to try yet another ruler….the Spin-E-Fex #16…..
I tried it out on the whiteboard…..
….and set to work on my quilt.
After the first pass, it looked like this……
OKAY….it has possibilities, but it needed something more.
How about moving the ruler over a bit and making a second pass……
And the last step was adding an echo along the top to completely fill the border…..
So I guess that answers the question as to whether or not a ruler only has ONE purpose….the answer is NO!!!!
Now I need to spend time with all of my rulers and figure out other ways to use them….glad it isn’t a busy time for work right now!!!
Do you use your rulers in new and different ways??? Please tell me!!!