Our area of Georgia was so fortunate because Hurricane Helene passed over us quickly and with very little damage.
However, we did lose power for about 12 hours.
This was not unexpected so I had a plan for what I was going to work on when I couldn’t do anything else!! I was going to start building the final pattern for my HI (Holiday Inn) quilt!!
As I thought more about it, I decided that the best thing to do was to design 1/4 of the circle and then enlarge it as needed for each circle.
So, in my studio…..with 4 open windows providing light, I started the drawing process…..
I used the tools that are useful for my mandala preparation….
…..and fairly quickly had 1/4 of a circle done…..
Next, I wanted to draw the arcs on the end of each wedge…..
After trying to freehand it, I pulled out a compass and drew it more mathematically!!
I kept working in the semi-dark until I had a good pattern for the circles…..
Now I need to play with the designs and figure out how to quilt the “mandala” portion of the piece. I took a photo, opened it in Procreate on my i-Pad and started playing with designs….
It was lunchtime, so I headed downstairs to find something to eat. I found my husband sitting in the lighted kitchen fixing his lunch.
WHEN DID THE LIGHTS COME BACK ON??
Michael informed me that they had been on for about 20 minutes, but in my window-lighted room, I had NO idea!!
It was an enjoyable way to spend time in my studio and I have now officially “made a start” on this quilt!!
……………………………………………………………………………..
Do you struggle to decide what to quilt in your blocks? If so, check out my FREE series…..
Many years back my church was meeting in a school gymnasium and we desperately wanted something to add a bit of softness to the stage, so I made a series of “quilt-like” banners.
None of them had batting or quilting. Basically, they were a quilt top attached to a heavy upholstery fabric to help them hang straight.
This was the first one. There were actually two just alike….
I used an idea from a book that I had at the time and didn’t have a pattern. It was so much fun to figure out the piecing layout.
This was the last set that I made…..
But this post is about the second set…..
I loved the stained-glass look of these two banners!!
When the church no longer needed them, I was asked if I wanted the banners back….
Of course!!!
The first set has now been gifted to another church in Boston and the 3rd set has been used in the children’s area of our church.
BUT…..what should I do with these last two????
I have some ideas but would love to hear what you think……
.
.
If you enjoy this blog, please share it with your friends!!!
One of my favorite things about quilting is motivating others and helping them in their quilting journey. As part of this endeavor, I LOVE to present programs and workshops to groups and guilds around the world. All of my programs work well with Zoom meetings, and I would love to speak to your group.
The other day, my daughter called and started a question with “Please say no if you don’t have time!“
And I know all of you are yelling at the screen….. “SAY NO….SAY NO!!“
But being a good mother (don’t ask my kids for their input), I listened to her question.
One of the couples that she and her husband are closest to are about to have their first baby.
Do you know what’s coming?
She asked if I had time to make a baby quilt, and of course, she would pay me for my time and materials.
We agreed that I would do it if I could, but that I didn’t have to give her an answer right away
Well, you know what happened. Jenny told me that their theme was boats and whales. Of course, I had to Google it
One of the images that I found was a pattern called Explore” by Magic Little Dreams
It looked relatively easy, at least in that 2-inch picture on my screen, so I sent it to my daughter and asked if it would be appropriate…….
She answered in the affirmative.
I purchased the pattern and was horrified to realize that it was a pieced design and that there were 400 pieces in the baby quilt.
Not only that, most of the seams were angled, and the design would not work well if those seams didn’t line up perfectly!!
I drew out two of the blocks to solidify my suspicions….
At this point, I was shaking my head and saying…….
I really liked the movement in the quilt, the sprinkling of fish along the way, and the very cute whale at the bottom. So, how can I simplify it ??
My first thought was to make the design bigger so that it didn’t require as many pieces of fabric. But there would still be angled seams that would HAVE to match.
My second thought was to fuse those fabrics down rather than piecing them.
WE HAVE A WINNER!!
I loved the movement the designer had achieved with the pieced blocks, and decided to emulate that with smooth curves … And Wonder Under, of course!
I decided to design the quilt in the same manner that she had, putting two sets of blocks together, and having the waves undulate between those two sets of blocks.
OKAY….I simplified it somewhat. What else can I do?
Instead of making the quilt interior 40 inches wide, I chose 30 inches, and instead of 50 inches tall I went for 40.
If I kept her 5-inch width, I could do three sets of two blocks to make each row of the design,
But that would still mean that I would have to sew these blocks together, making sure that all of the curves met up perfectly.
NOPE!!
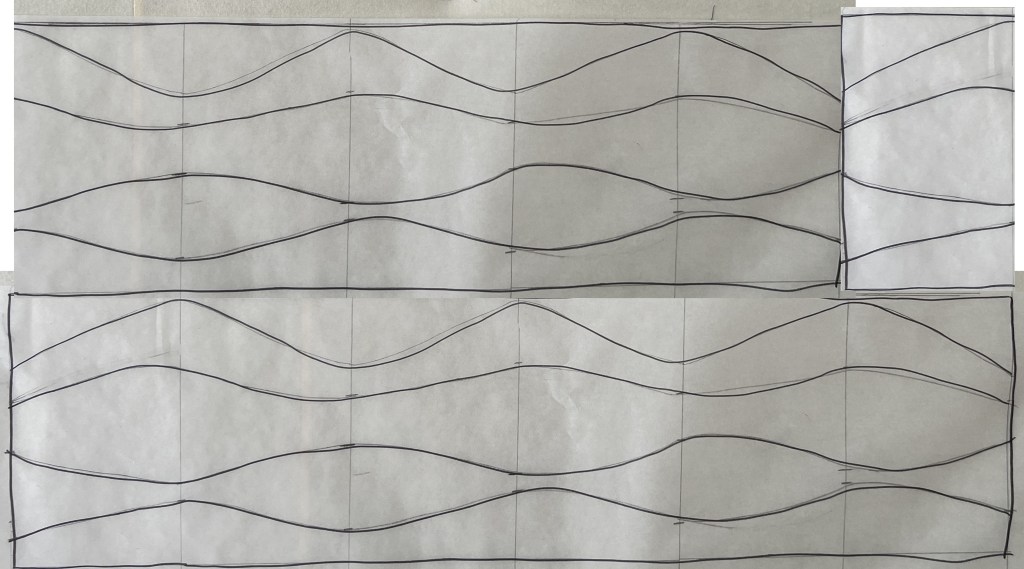
OK new plan… Let’s make it in strips that are 30 inches wide, and make the strip set 8 inches tall, something like this……
As I look at what I’ve drawn, I am thinking that the middle strip needs to be a little narrower.
I will offset these as she has done in the pattern to give more interest to the waves.
I think that THIS quilt is entirely doable!!
SO…..
Is this the same quilt?
Not really, but the idea came from her design and I will ALWAYS give her credit!!
Is it a quilt that I can finish by the September deadline?
Absolutely!!
Of course, I immediately started pulling fabrics…
….but, if I am going to keep this cute for a baby, I think that it needs some solids and surprisingly, I don’t have many solid blues! So even though I prefer to work from my stash, I’m thinking that a trip to the fabric store is in my future…..after all…. my daughter is paying!!🤣🤣
If you enjoy this blog, please share it with your friends!!!
On Sunday I left you with two blocks that I had played with…..
(Too bad didn’t make them the same sizes!!!!)
As I thought about what I could do with this type of design I decided to go “old-school” and play with paper cutouts!!
Since I was using Powerpoint (not too old school) to print out the blocks, I decided that I would size the smaller block up so that they were all the same size…..
I quickly cut them out…..
…and it was time to play!!!
My husband laughed at me as I sat in my chair…..
…trying design after design.
The first one that I came up with was this…..
Wow….I REALLY liked that…..
Do I need to look further???
Of course, the answer is YES, and the following emerged too…..
This one offsets the blocks and although I do like it, I am not sure how I would piece it……
This is fun…..
How about if I just use one of the blocks…..
…but maybe border it with the other ones…..
Then there is this one……
….or this one……
….or this one…..
Now….where am I going from here…..
I have no idea but I will definitely take you along for the journey!!!
If you enjoy this blog, please share it with your friends!!!