On Friday I added a few more lines of stitching to the Meadow and declared the background to be finished……
…..and then decided that I wanted to darken some parts of the sky a bit……
I am ready to start adding the embroidered flowers, but feel like I need a bit more instruction before I start them. To that end, I have ordered a book TWO booksto teach me how to do the machine embroidered flowers, but they wont be here for another 10 days or so…..
……SO…. I am placing the Meadow on hold until then!!!!
I am sure that I can find something else to work on between now and then!!!!
Yesterday it took a long time for me to get up the courage to start sewing on the background that I had prepared. Elle, one of my readers, left a comment yesterday saying that it did look good the way it was but that I should be fearless and keep on going. The word FEARLESS sparked my courage and that simple comment helped to get me upstairs and sitting at my machine!!! Isn’t it amazing what a tiny bit of encouragement can do!!
I started out with some thread that was similar in color to the background and placed a few grass lines…..
It didn’t make a lot of difference to the picture but it gave me more confidence.
Next I moved to another darker green gradation thread……
There seems to be a bit of depth starting to happen.
Next step was to add some thin satin stitch lines which meant a change to my Viking machine…..
I was concerned about how this machine would handle the thickness of the fabric but it performed beautifully……
The final step for the day was to move back to my Juki and add some brown foliage and boy did that make it pop…..
I was doing the work on my Juki as free-motion and I found that there were several areas where the thread would shred, probably because of paint build-up. Fortunately, I didn’t really mind if there were some thread nests…..
Today I will continue to add some other lines and may try a few flowers but I may wait until I receive a book that I ordered first.
Before I started painting, I added a few more couched yarns to the top……
I was pretty nervous about applying the paint but once I had my dyeing apron on…..
…..I knew that I could do it!!!
I mixed up the two paints that I needed, adding quite a bit of water so that they were really thin…..
I also sprayed water over the top of the fiber art before I started painting. To apply the paint, I used three makeup sponges that were stuck together…..
Starting at the top, I began sponging blue paint…..
Then I moved to the green, using paper towels to blot up any excess paint…..
This is one of the interim looks for the piece…..
I kept on going, mingling the blue and green so that it didn’t look so much like a line between sky and meadow. I also mixed in some darker green, adding some highlights.
When I was finished with the actual painting, I added a few more details….. the daisies were lightly rubbed with a blue metallic paint…..
…..and a few darker highlights were added with a copper paint…..
This was the final result of the painting session……
I am quite pleased with it, especially liking the white highlights in the sky and the dark couched yarns.
Now I am off to learn about free-motion embroidery of the flower elements…..or maybe I will just leave it as it is!!!!
Yesterday I started on my new Meadow Art project and had SO much fun with it!!
As I started, I decided to stabilize the initial fabric base so that there wouldn’t be too much scrunching up as I added stitching. I used a thin fabric with fusing on one side and ironed the two pieces together …..
The fabric was sized at 14×19 inches, although it looked a LOT bigger than that when I was staring at a blank canvas…..
Following the instructions, I started tearing strips of fabric, making sure that I had lots of strings on the edges. You know, the things that we normally HATE when we tear fabric…..
I also cut/tore burlap, flannel and silk and added those to the mix. When it looked balanced…..
…. I took it to the machine and sewed each piece down, staying close to the torn edge……
Next, I started adding bits of trim and lace…..
….and went back to the machine to secure them to the background. At this point I realized just how much I like my Juki machine……
It is a workhorse!!!
After each step, I ironed the piece from the back, just to make sure that it stayed relatively flat…..
I failed to take a photo of the next step, but I used cotton thread to sew in some flower stems, grass and other linear elements.
At this point the instructions suggested putting a heavier yarn in the bobbin and sewing textural lines but I didn’t really want to mess with my bobbin so decided to switch to my other sewing machine and couch the threads instead. I had this thread/yarn in my stash……
….and thought that the extra texture might be nice.
My trusty Viking machine came to the rescue and I was able to use the couching foot……
…..to attach the yarn.
This is where I stopped on the first day……
….and I am really happy with the texture that has appeared. My only concern is whether the darker threads will be covered by the paint, but I think that I can make it work even if they don’t cover well.
The next step is to apply paint and then to start doing more embellishments.
On Monday morning I had planned to start with my new drawing/painting regime, but I had several errands that had to be done in the morning and simply ran out of time. Plus, I managed to lose the leaf that I had collected for my first drawing inspiration!! I did eventually find it, but decided that it was telling me that it was okay to put it off for a bit.
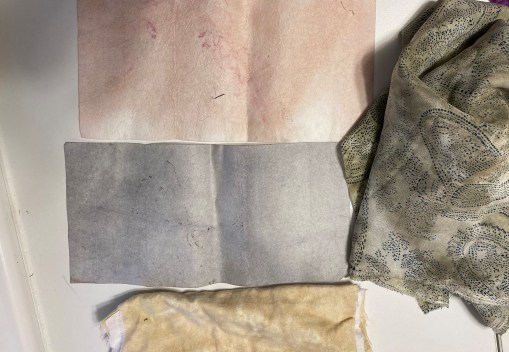
Since one of my errands was to a local art/craft/fabric store, I spent some time going thru the supply list for the Meadow Quilt and seeing what I actually had on hand.
I pulled out the box labeled…..
“Other” meaning non-quilting fabrics….you can see that I don’t own many!!!
I found an inspiring array of fabrics, including two pieces of “Color Catcher” that might work as well……
The printed piece on the right is probably a polyester so I will see how it accepts the dye before I use any of it.
I also found a white silk scarf that had come as a freebie when I placed a dye order many years ago…..
Then I moved to my box of laces and trims and began looking for pieces that could look like flowers or weed in the background. Remember that these will all be painted over…..
My favorite find of the day was a long piece of tatted Tricot loops that my Grandmother made……
It will be so much fun to include a small section of this in the project!!
As I head to the store today, I am going to look for “Daisy” trim that doesn’t have the green leaves in it, maybe a white burlap and some yellow tulle for the buttercups.
I did buy one thing from Amazon because I couldn’t find it anywhere around here…..horticultural fleece. If you are like me you are saying “W H A T”??? This is the lightweight fabric that you use to cover your plants during a freeze. I bought a HUGE piece of it but will only use a few inches….at least it isn’t expensive!!!