Learning about Jelly Rolls

I had made it thru 3 days at the International Quilt Festival without buying any fabric!!

On the last day, at the very last booth we visited, this Jelly roll just jumped out and grabbed me…..

The colors were so vibrant and I just knew that I could make a fun quilt with it!!

I found a pattern that I liked (more to come about that), opened the roll, and started fondling the fabric. The first thing that I noticed was tons of schmutz showing up on my cutting board….

I realized that this was coming from the pinked edges of the strips and I was NOT amused!! Although, I should have realized what was going on when I moved the roll from the background fabric….

Now I started wondering exactly how wide this strip was. I was surprised to find that from outside edge to outside edge, it was 2-5/8- inches…..NOT 2-1/2-inches!!

I knew that the 1/8-inch would make a big difference with the piecing.

WHAT SHOULD I DO?

Should I try to adjust my seam allowance to make up for the difference or should I recut all 40 of the strips??

Since I am already struggling with keeping my seam allowance consistent, I decided that I needed to recut them. I was thankful for the Accu-Quilt machine which made it much easier to cut two strips at a time…..

I know that I could have cut many more at one time, but it was too important to get the strips PERFECTLY in line and I could only do that in groups of two!!

Each cut left a small string of fabric and a bit more schmutz….

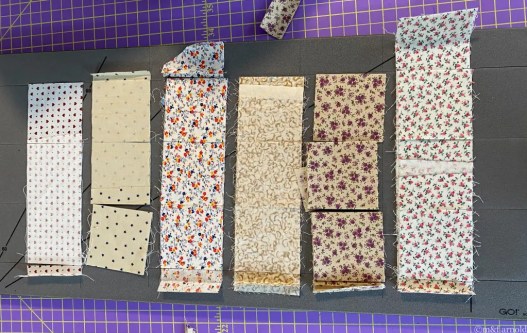
Eventually, they were all cut, leaving 40, perfect 2-1/2-inch strips AND a pretty pile of leftovers..

I really haven’t worked much with precuts and especially not jelly rolls, and I have these questions for you……

  • Is it normal for the “pinked” edge strips to be oversize??
  • Do you recut or adjust your seam allowance, or do you just not worry about it??

Thanks for any feedback. I am truly perplexed!!

Down the rabbit hole

I don’t do this very often, but recently I ended up “down Alice’s rabbit hole”….so to speak.

It all started out so innocently…..

I was getting ready to start working on the Saddle-Bill Stork collage quilt and remembered a package of scraps from a workshop that I had taken several years ago. This was important because they were black and white scraps and had “Misty Fuse” already applied to them. They would be PERFECT for my Stork collage.

As I looked, I pulled out a large box labeled “Miscellaneous Fabrics and Blocks”, being fairly certain that the scraps were there. Well, the bag was NOT in this box, but there was a bag of black and white fabrics, with a few reds thrown in for good measure…..

….. leftovers from a charity raffle quilt that had been made many years ago…..

Eventhough these fabrics didn’t have Misty Fuse on them, I pulled them out and started admiring them….

Now, what could I make with these lovely fabrics????

And before I knew it, I was DOWN THE RABBIT HOLE!!!

I decided that I wanted to turn the strip-pieced triangles into Flying Geese blocks and turned to the Accuquilt machine and the FG die that came with the machine…..

In a few short minutes, I was off and making flying geese blocks!!

Before long I had for strips of FG with spacers between them…..

But where are these geese flying to???

Come back tomorrow for more!!

Sub-cutting with Accuquilt

More Accuquilt Fun

As I was getting ready for my retreat and planning to work on my next scrap quilt, I realized that I was going to need a BUNCH of light-colored 2.5-inch squares.  

I had some already cut but not nearly enough.  What I DID have was a plethora (don’t you love that word) of 2.5-inch strips in the needed colors….

I had read that you can use the AccuQuilt to sub-cut strips into squares so it was time to try that out for myself!!

There is already one 90-degree line marked on the die, but I decided that I wanted a few more markings.  I used a fine-point sharpie and added cross-marks, at 3-inch intervals….

I then took each strip and laid it carefully on one of the lines and folded it back and forth as many times as I could…. 

Remembering, of course, that you really don’t want more than 6 layers of fabrics at a time.

I repeated this process for 5 more strips……

….and ran it thru the cutter……

It looked like this when it came out…..

….and VERY quickly, I had a nice stack of squares to use in my design…..

Yes, there was a bit of fabric wastage, but certainly not worth the time that I saved!!!

I am looking forward to using this process to cut more shapes as time goes on.  

Now that I think about it, I could lay 2-inch strips perpendicular across the 3.5-inch dye and quickly cut rectangles for flying geese…..

…or 4.5-inch strips across the 2.5-inch dye and make bigger rectangles…

…or use the angled markings on the dye to make diamonds….

….SOMEONE STOP ME!!!

Bottom line…..I think that my purchase of the AccuQuilt cutter has been a good one!!!

More Accuquilt fun!!

This past week, I was so excited when the other dies arrived for my new Accuquilt machine.

I have to admit that I have worried about whether this was a frivolous purchase….would I really use it enough to warrant the money paid??

The first task was to work thru my scrap basket and get everything cut out and stored. I was completely dreading this job since I knew that it would take several days to get it all done.

BUT…..using the Accuquilt strip cutting dies, I was able to cut ALL of these in just 2.5 hours…..

It was fun to see my dog-bed sliver pile at the end of the afternoon…..

The next day I spent another 2.5 hours and cut squares out of the smaller pieces.

But, the REAL test came when I needed to cut 120 patches for two upcoming blocks, and most of these were only 1.5 inches. It only took TWENTY minutes to cut all of these…..

You may notice a few threads on the white squares. I learned that sometimes stray threads get caught in the dies and cause this. Now I know to clean them out!!!

The job for today is to piece these two blocks and make them turn out exactly 10.5 inches…..wish me luck!!!!

It’s here!!!

Earlier this week, I succumbed to a long-thought-out plan and ordered an Accuquilt fabric cutter!!

I love working with scraps and spend so much time cutting them into usable shapes (squares and strips) and I find it harder and harder to tackle that large basket that is once again brimming over!!

I had to order the actual cutter from one store and the dies from another and naturally, they couldn’t both arrive at the same time!!

But I was so excited to open the box and find the cutter…..

It was so easy to set up…..

It came with one die (and the others haven’t arrived yet), so I decided that I was going to practice on flying geese blocks!!!

I cut the corner triangles first, simply folding some scrap fabrics over the dies…..

Placed the cutting mat over the top…..

…..and it was off…….

And look at how little waste there was…..

I sewed them together and quickly had 6 flying-geese blocks ready for some unknown project…..

As soon as the dies arrive, I will give the machine a good workout…..can’t wait!!!!

Also, the next International Block Swap has LOTS of 1-inch finished squares so I am going to wait until the dies arrive. That will hopefully make the piecing much easier and more accurate!!

I will be showing you more about it as time goes on…..