My husband Michael is a master of the written word so today we teamed up to present “TRADEWINDS”…….
Some see pinwheels held by children, others see windmills charged by Don Quixote. A final category of observers, see ever-increasing-colorful movement – movement caused by the wind, and captured by the warmth of deep reds, dark pinks, and tarnished yellows. Appropriately named “Tradewinds”, this quilt pattern reminds me of a 10-day sail through Australia’s Whitsunday archipelago. The splash of deep reds and dark pinks reflecting from Bottle Brush flowers on the island slopes, the coral beds’ tarnished yellows leaping up through the crystal-clear waters. Whatever sweet memories lurk, “Tradewinds” evokes their release.
Don’t you just love it when you finish a project, and especially when you feel like you did a good job!!!
This past weekend I spent several hours doing the last of the hand embroidery and yesterday I called the Meadow Art piece complete!!!
The final thing to do was to put it in a frame. I had bought a reclaimed wood frame from Amazon a few days back and was so excited to see it ready to hang……
This has been a fun project and one that has opened my eyes to ways of adding texture and depth. There is another design in this book that uses architectural designs and I can see lots of possibilities in it as well.
So what’s next??? Today I start quilting on the Brown Stripe quilt and then I need to look back on my “Inspiration Day” to see where I want to head next!!
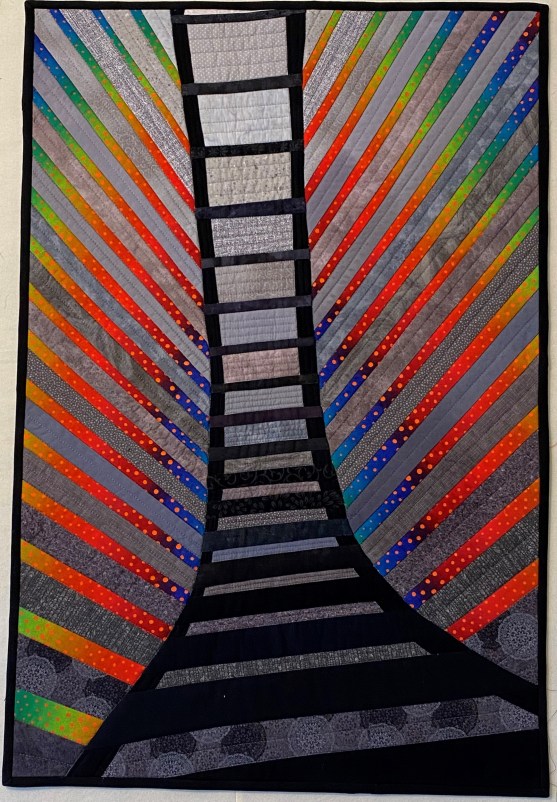
On Tuesday I finished the quilting on the Kew quilt and I could not be happier with the results…..
This quilt is a great example of the “fabric doing all of the heavy lifting”!!!
I spent one night trying to figure out how to quilt it and tried several designs that used curves or other designs but in the end, I went with plain old straight lines…..
Not this one
Nope
That will work!!!
I started to just free hand the lines but quickly decided that, if I wanted the lines to be straight, I needed to do some marking and that I should use the walking foot!!!
I had to make a couple of adjustments to my machine set up for quilting this…..
Firstly, I really had a hard time seeing the needle when I was stitching in the ditch so I kept adding lights until it looked like an airport runway…..
Even with the extra light, I still found it hard to stay in the ditch. I also debated about what color of thread to use on the ditch stitching in the colored strips but finally decided on a red variegation…..
The other machine set -up change was actually a funny one. I had been religiously using the thread cutter when I was sewing the strips together and found it TOO easy to hit that button when I was quilting!! My solution was to put a piece of tape of the button so that I wouldn’t hit it…..
It reminded me of the “NO” note that the astronauts put on Apollo 13 to ensure that this one button wasn’t punched accidentally…..
The binding went on smoothly although I moved outside to the deck to have natural light to do the sewing….my eyes are really getting bad!!!!
The final step was to clip off a few threads. This always makes me nervous as I am SURE that I will cut a hole in the finished top!!! To do this I use these sweet curved, spring-action scissors by Tooltron…..
They give a super close cut.
NOW….for the exciting news. I have been thinking a lot about what to call this quilt. My neighbor said that it looked like a roller coaster so I had been leaning that way but I also knew that I wanted the word “Kew” in it. So, last night we had our guild Show-N-Tell Zoom meeting and I asked for helped with the naming. One of our members, Terri, got this grin on her face and suggested “Bridge Over the River KEW”!!
THAT’S IT!!!!
So it is official…..”Bridge Over the Rive KEW” is finished!!
My friend Kris has two wonderful, well trained Sheltie dogs. They (and she) work with the local library in a program called “Read To Rover”. She and her daughter take the dogs to the local library and various kids come in a read to the dog….how cute is that!!!!
Kris likes to put a quilt down for everyone to sit on while they read. The problem arose that the only quilt she had was one with a lot of texture to it and the dogs couldn’t sit comfortably on it for a long period of time. One in particular would continue to shake his leg and move around throughout the reading time.
The solution…..a new quilt designed just for this purpose…..
I enjoyed picking the doggie fabrics and then combining them into a fun quilt.
I used miscellaneous left-overs and other fabrics for the back…..
The quilting is very utilitarian…..just enough to hold the layers together properly.
I am excited that this quilt can be a part of this great program….may it make for hundreds of hours of introducing kids to the fun of book reading and, of course, comfortable doggie tooshies!!!!