As I mentioned last week, I finished the “Free Motion Filler” Challenge from Angela Walters.
Once I decided to slow down and take my time with the practice sessions, I really enjoyed this challenge and learned so many new designs that I can’t wait to use!!
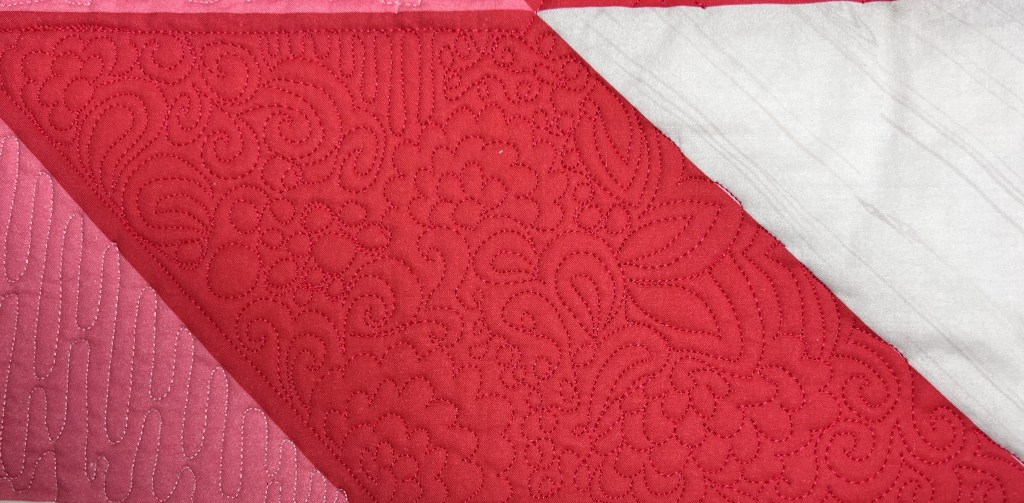
I mean…..how can you NOT like the textures here…..
This also gave me a good chance to try out the “dog grooming arms” that my husband bought me for my last birthday…..
I found that they really helped to hold the quilt up as I worked on it…..
I was originally concerned that I would spend all of my time re-clipping as I moved from area to area, but I didn’t find that to be a problem.
So….it was two challenges for the price of one!!!!
I think that it is now time for me to quit PRACTICING my FMQ skills and start actually USING them!!!
….make a wavy line and add a circle here and there!!!
She also suggested adding figure 8’s instead of just the circle so I will need to try that one!!
The next one was rows of Ribbon Candy……
I LOVE doing ribbon candy, and when you put them in wavy rows like this….oh my!!
I always have to stop and figure out where my first stitches need to head BEFORE I start stitching. I did this video of my “thinking”…..
I apologize for it being blurry, but I think that you can still get the idea of me having to trace it out several times before I start sewing. If I don’t do this step, I will get myself completely messed up….not for the first time!!
The next design was more wavy lines, but this time filled with arcs……
I did have trouble keeping the wavy lines parallel. You can see how I have veered WAY out at the bottom…..
I ended up going back up to the middle of the errant line…..
…..and re-sewing before I added the arcs.
I had a similar problem on the next one. These lines were supposed to be mirror images of each other…..
NOT…..SO…..MUCH!!
Next, I tried drawing guidelines to help me stay straight…..
….but those didn’t do the trick either!!
Finally, I physically drew in the lines…..
They really do change character when you add a “snowflake” design to them……
I am not sure why I had so much trouble with wavy lines this time. It may have made a difference that I was working on an area that had slopping slides and “felt” diagonal. At least, we will say was what happened!!!
Even though I struggled a bit with these particular designs, I DEFINITELY found ones that will go into my FMQ library!!
Come back next week as we finish off this challenge!!!
The first pattern in this quilting session was a squared-off Clamshell…..
This was fun, but a bit boring. But, it got more interesting when I made the bricks in all different shapes and sizes…..
The next design that I tackled was a basketweave pattern that is based on a clamshell. The difference is that you travel up the previous shell and then move to the next one, giving it a woven appearance…..
I did okay with the larger shells but had issues when I tried to make them smaller and make them echo the previous shell. I would DEFINITELY need more practice on this one!!!
Next was a simple straight-lined design with random stars along the way. I used a ruler to help keep the lines straight although I am not sure that it was necessary…..
Last week I had put off this next design because I didn’t think that I could tackle it. It was a simple mixture of designs and I just wasn’t comfortable with it……
OF COURSE, it ended up being my favorite!!!
The final design for this week was a feather meander. The first feather wasn’t great…..
….but I finally remembered what I had learned in the last FMQ challenge and did a much better job on the next feather…..
I enjoyed working this design in a larger area…..
Even though I wasn’t looking forward to this week’s designs, I ended up loving most of them!!
There is one more set of designs left to try and I can’t wait to tackle them!!!
This week I am working thru the “Favorite Fillers” week in Angela Walters “Filler FMQ Challenge”.
A number of these have appeared in previous challenges so most of it was simply practice rather than trying to learn new designs.
First of all, isn’t this a luscious color of thread…..
It was so much fun to quilt with!!
The first design is the leafy meander. When I used this design previously, I kept getting stuck in corners so I first drew it out on a whiteboard to see if I could remember how to avoid that…..
Stitching the design was easy……
….and I was very happy to end up on the other side of the block (without planning it)…..
Next was the Paisley Meander…..
Again, I have done this enough before to feel okay about it.
A bit into this block, I realized that I was having some tension issues…..
Doesn’t that give you a sinking feeling in your stomach??
I checked the back and realized that I needed to loosen my top tension a bit. That quickly fixed the problem.
I have actually struggled with tension on this project but I think the problem is related to the fabric that I used on the back. Since this was a practice piece, I used a “faux” batik that had been given to me. It looked okay but I don’t think that the quality was quite up-to-scratch!!
LESSON LEARNED!!
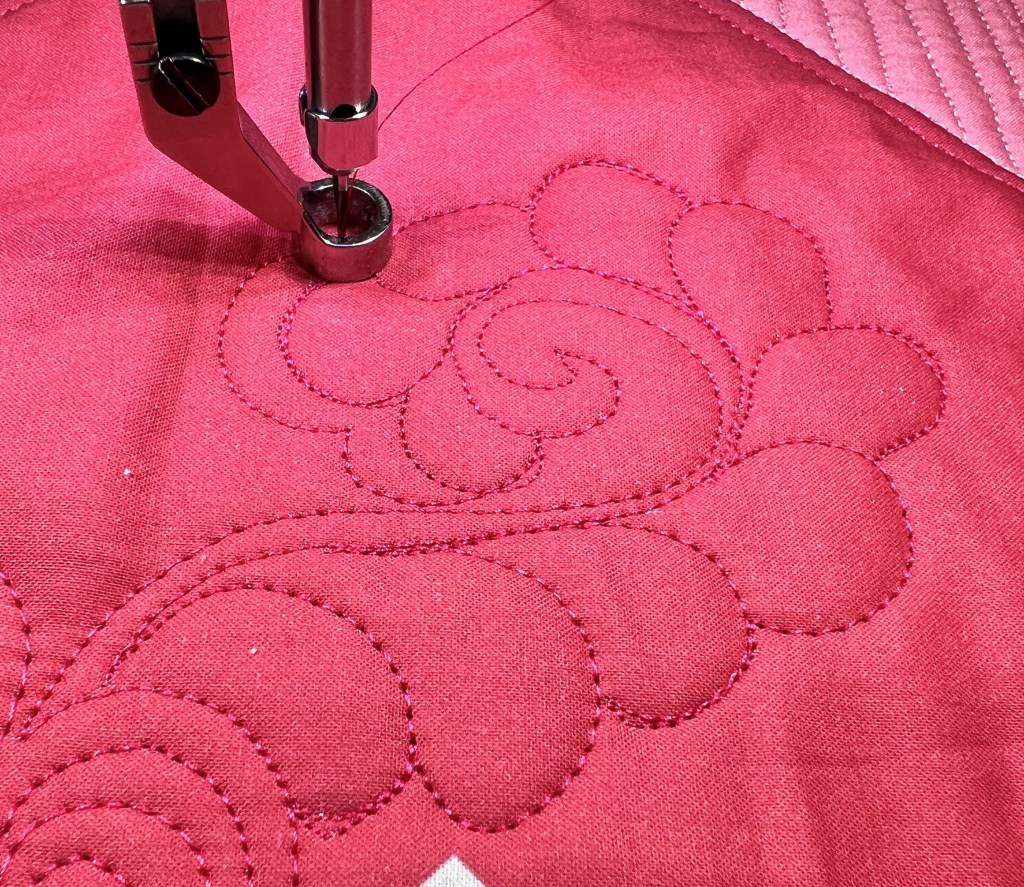
The next design was new to me!! You start by quilting a pod…..
….and then fill the pod….with peas in this case…..
Another pod just held a line running thru it……
I used a swirl to fill around the pods…..
This was a small area for this design but I do want to try it again in a much larger area!!
Next were clamshells.
I had done clamshells with a ruler before, but had never tried them free-hand.
It was a LOT of fun to bounce from top to top!!!
But the real fun came when we started stacking them on top of one another to make a pyramid….
Then the open areas were filled with elongated swirls, with another set of clamshells on top.
I am not super happy with the swirls and really struggled to make them flat so that I could add the second set of clamshells.
Again, I think that this pattern needs more room to grow into.
Wouldn’t it be amazing in a sky or BIG background?
At this stage, my brain was “quilted out” so I took a breather. Come back tomorrow for more of Angela’s “Favorite Fillers”!!
Let’s start with an apology….for those of you who follow this blog, you probably got 2 or 3 notifications this morning!! There was a glitch in the post. I tried twice to correct it and then decided that I had to start from scratch!! In re-doing the post, I found a photo that had an error!! So….sorry for all of the emails!!
Yesterday I shared two of my favorite designs in this week’s FMQ challenge from Angela Walters. Today, I have two that I DIDN’T like and two that I DID!!
Let’s start with the NO designs….
The first one was a triangle design where some are filled in…..
My problem was that I could NOT figure out where to go next so that I didn’t get myself stuck. Plus, I was not that excited about the design even when I was looking at the one that Angela had quilted herself!
The second design started with a closed-in shape that will filled in with various filler designs….
This might be fun if I was filling a huge area but it didn’t appeal to me.
IF I did try it, I would probably pre-mark my sections so that I knew where I was headed next.
But there were two that I did like…..
Interestingly, the first one was triangles (again) but these seemed easier to place….
….although I see now that there is one parallelogram hiding with the triangles.
I chose to use a ruler for these lines and I really do like the look. It takes quite a bit of time to work so I would only use it in smaller areas.
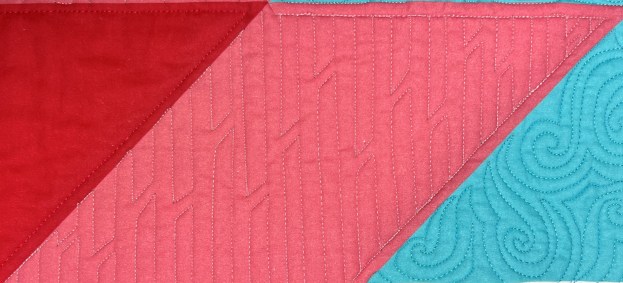
The last design is my favorite from this set. It is worked in the same manner as the “Back and Forth” design that looks like this…..
The difference is that the lines are further apart and the turns are angled rather than curved.
This was another design that Angela didn’t demonstrate, so I had to decide for myself how I was going to quilt it. Since it is similar to the above pattern, I worked it in the same manner, starting with a column of “columns”……
…..and then filling in the other side working my way back down the column…..
I really do like this design and think that it would be great in areas where I wanted straight lines, but maybe not COMPLETELY straight lines!!!
I also used a ruler for these lines which made it easier to keep the lines straight and meeting with the previous column.
So that is it for the geometric designs challenge.
Now I am a full two weeks behind but I am not going to try to catch up. Instead, I am going to take my time and try to learn as much as I can!!