The flowering of Botero’s Field

When last I left you, the Fernando Botero-inspired flower field had a lot of brown and green…..

….but like our backyard, was beautiful….but a bit boring…..

It was definitely time to add some punch to this field!!!

I started out by pulling more threads and yarns from my “stash”……

…..and couching them in as “pops” of color…..

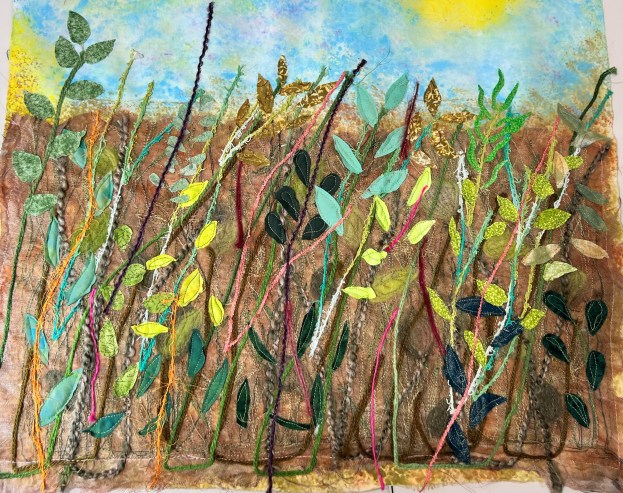
I was disappointed to find out that this specialty yarn….

…couldn’t be couched easily. There simply wasn’t anything for the needle and thread to get hold of!!

I added a few more threads and then decided that it was time to put some flowers in this field.

I pulled out a box of hand-dyed offcuts that had been gifted to me…..

….and started cutting circles (similar to the painting inspiration)…..

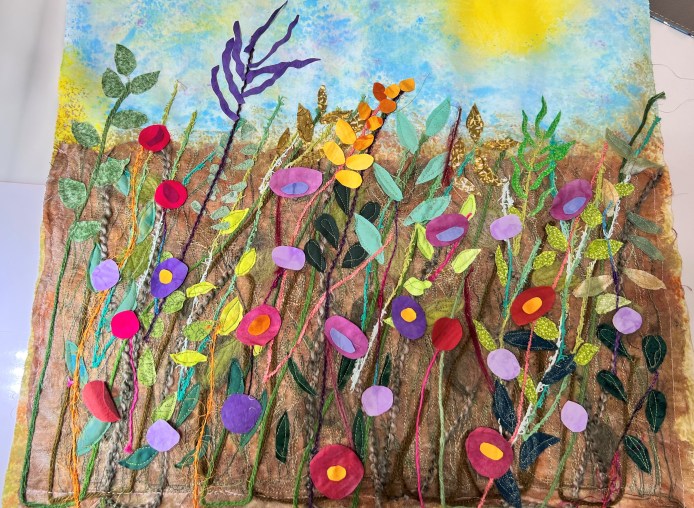
I liked how it was looking BUT…..

NOW I had to make some decisions….don’t you hate that!!

I had to decide exactly when I was going to start QUILTING on this piece. I was pretty sure that I wanted to flowers to puff a bit which meant that they needed to be quilted rather than thread painted.

I also debated about adding two battings to help achieve that puff and finally decided to add my usual “Hobbs Heirloom Fusible Batting” to the backing fabric and then put a fluffy polyester batting on the top…..

BUT, how was I going to quilt it with all of those pieces loose on the top?

The answer was that “I WASN’T!!

I did use a bit of wonder-under to adhere the purple, stringy flower at the top and it quilted beautifully…..

But, I did manage to knock most of the other flowers off as I quilted this one….

OKAY….this will be a case of “organic flower arrangement”!!!

I used tweezers to position some of the smaller blooms…..

….but most were just quilted where they lay…..

There were some happy surprises along the way, including this yellow center that scrunched up as I quilted…..

PERFECT!!!

I did truly enjoy having my new thread tower sitting next to me as I changed threads again and again and again!!

At the end of this session, this is where the piece stood…..

….and while I LIKE it, I am sure that it needs something else!! Right now it seems too messy and fussy…..too many disparate designs in the same space.

HMMMM….maybe I can fix that with some quilting….

MORE TO COME……

Travel Log Quilt #3

For my 3rd Travel Log Quilt, we have to travel to gay Paree!! In July of 2004, Michael spent a month in Germany teaching at one of the universities. We decided that the kids (Brian age 19 and Jenny age 17) and I would meet up with him in Paris for a week of sightseeing.

The trip was a lot of fun as we viewed many of the art galleries, especially enjoying the smaller galleries like the Monet, Rodin and Picasso. Of course, the biggest pull for the trip was the magnificent Eiffel Tower.

While on top of the tower we took lots of photos of the Paris skyline, enjoying the slightly hazy views….

After we were back at ground level, I took this photo of Jenny viewing the tower…..

A couple of years later, I decided that I wanted to make a quilt that was a mixture of photographs and fabric collage. This was the resulting quilt……

Everything above the trees was done with photos printed on fabric but the trees and everything below is from fabric.

Now, I like the memory behind this quilt, but I did NOT do the portrait of Jenny correctly. Her body shape simply isn’t right.

A few years ago I tried to fix it…..

….but it still isn’t right.

The problem is that I LOVE her hair but everything below that just doesn’t work.

As I have written this post, I am wondering about cutting off the quilt at her shoulders….

What do you think????

Thank you!!

I wanted to make something to send to Darlene, who had so graciously invited us into her home and family!! She and I had talked about an affinity for sunflowers so that made the idea a no-brainer!!

I first picked a background fabric and some 3 inch squares to play with…..

When I laid them out in the basic shape, I got excited about how it could look…..

I cut out the pieces and laid it out again before fusing……

Next I wanted to add a narrow border of some sort so auditioned several different possibilities….

….but none were that exciting.

Then I decided to pull out the color wheel and look for a color opposite to the background and found…..

Now that is an idea that I really like!!!

Then, I decided to only put it on two sides of the piece to balance it better.

Now it was time to add some oomph to the sunflower and I enjoyed enhancing it with machine embellishments and hand embroidery…..

The final touch was to quilt the background and add a binding…..

The red border is a little wonky (and for some reason it isn’t this noticeable in the actual piece) but, overall, I am happy with this quick and easy Thank you gift!!!

Just “Let It Go”!!

This is a story about a UFO….. one that had been around for 11 years!!

It started back in 2007 when Michael and I spent two months in Oxford, England while he was a Visiting Research Fellow at Oxford University. London was a mere 45 minutes by train so we spent as much time there as we could.

As we rode the London Underground, I became aware of how the people sitting across from me changed as the ride went on. At every stop someone would get off and someone else would take his/her place.

In October of 2009 these thoughts rose to the top of my brain and I decided to make a quilt with this idea. I spent a long time searching the internet for pictures of people to add to my train car and, using Photoshop, I was able to get an idea of what I wanted…..

Note….my proudest part of this photo is that I took another person’s legs and feet and added them to the young man on the left!!!

I started out using a machine applique technique where you prepare the piece for applique, glue it to the next piece and then zig-zag over the intersection with a mono-filament thread. After doing the first person using this technique I decided to switch to fusible applique.

Anyway….here is where it stood when I stopped working on it…..

And it has been weighing on my mind ever since!!!

Today, I pulled it out for the last time….determined to either finish it or scrap it…..and SCRAP IT won!!

These were my thoughts…..

  • My skills have progressed far beyond this first attempt
  • It is larger in format than I typically work on now.
  • There is too much difference in technique in the faces. The boy has very few shades while the woman (actually based on a photo of me) has too many shades and the little girl doesn’t work at all…..

The only part that I was REALLY happy with were the child’s hands…..

  • I would basically need to start over and I am not interested in doing that

As I thought further, I remember that I learned SO much when I started this project….first about using Photoshop and then about designing faces. I also over-dyed a bunch of the fabrics which was a first for me.

The bottom line is that it was a great project for it’s time but that time is past and it is time to….

No…. I have never seen the movie!!!!

So….all of the fabric came off of the wall and out of the project box and added back into my stash.

It was exciting to find all of the skin-tone fabrics that I had collected those many years ago…..

Many of these were hand-dyed by my friend Anita and it was fun to see all of her tags reminding her of the recipe for each of the pieces…..

Now that this project is out of my head, I need to figure out exactly what big project I want to work on next!!!!