A piece of old fabric makes a great tool….

For today’s “Quilting Tip Tuesday“, I am presenting a piece of scrap fabric. And, I am talking about something that isn’t a quilt-quality fabric….. maybe a piece of muslin or fabric that doesn’t have a close weave…..

And now I hear you saying “Exactly how is this a tip“?

Well, let me tell you….

This piece of fabric stays on my ironing board…..

When I accidentally iron over something that I shouldn’t, say the wrong side of Wonder Under, I grab this piece of fabric, lay it over the edge of my ironing board, and use it to wipe my iron.

Remember that my iron is HOT at this point. I have not let it cool first!!

This is done by simply holding my iron at an angle and pressing down really hard on the fabric…..

Now, there is nothing on my iron at this point in time, so it doesn’t look like anything is happening, but it will scrape any debris off of your iron without hurting it or damaging your ironing surface.

As you can see, this issue has happened more than once for me…..

The other thing I use this fabric for is when I am working with magic sizing, particularly when preparing appliqué pieces. (more about this process next Sunday)

Because the iron stays in one place for so long and there’s already magic sizing there, it is easy for the sizing to char, just a bit, leaving these unsightly stains…..

And isn’t it better for those stains to be on this piece of scrap fabric rather than on my ironing surface?

When your cloth gets too dirty, just toss it and replace it with something else.

So, here’s to an old piece of fabric and the things that it can do for you!!

………………………………………………………………………………………………………

On Tuesdays, I provide a tip, technique, or product review. Please subscribe to the blog to ensure that you don’t miss ANY of them!!

A new way to Franken-Bat

This post contains affiliate links. I am a participant in the Amazon Services LLC Associates Program. I may earn a small commission if you purchase thru the links provided here. It does NOT change the price that you pay for any items you buy.

Last week I showed you the new way that I had learned to make a Franken-batting……..

I was so proud of my discovery when several people mentioned that a product was made SPECIFICALLY for that purpose.

Introducing……

BATTING SEAM TAPE FROM KEEPSAKE QUILTING

Apparently, it works EXACTLY the way my method did but you don’t have to cut the strips.

If you want to try it out, it can be purchased HERE

I shouldn’t be surprised that someone had already thought of it…. wish that it had been ME!!!

…………………………………………………………………………………………

Subscribe to my mailing list and receive this free pattern for “Dancing Squares”…..

You can sign up HERE……

Fixing my leaves….

This post contains affiliate links. I am a participant in the Amazon Services LLC Associates Program. I may earn a small commission if you purchase thru the links provided here. It does NOT change the price that you pay for any items you buy.

When I left you on Thursday, I had made one of the leaves for my “Monarch and Milkweed” challenge but had run into a problem with quilting the veins…..

There simply wasn’t enough to hold onto!!

Then I started thinking about the washout stabilizer that I had used for a previous quilt It is a sticky-sided water-soluble Vilene that comes on a 10-yard roll. If you are interested, you can purchase it HERE.


SO…..I made four more leaves…..

…turned them and marked the veins…..

Next, I rolled out a small portion of the Vilene and peeled off the backing paper…..

The side facing up is now sticky.

I placed the leaves on top….

…and placed another piece of the Vilene over it…..

Now, I had another problem……I couldn’t see the veins that I had drawn!!!

I fixed that by using the wash-out pen and re-drawing the veins on top of the Vilene.

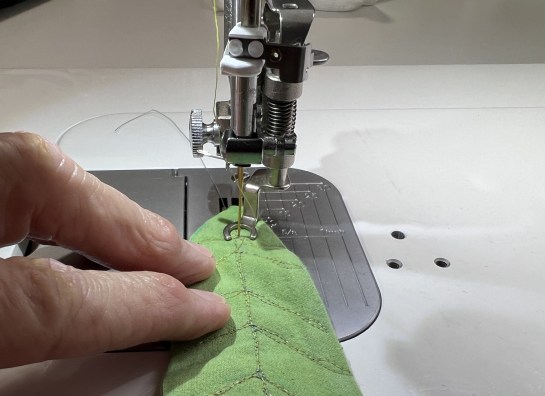
I also switched to my Sit-Down Longarm so that I could use the applique foot…..

The stabilizer held everything in place and it was SO very easy to stitch the lines now.

I cut out the excess stabilizer…..

….and pitched them into a warm water bath…..

Immediately, the water became murky with the sloughed-off stabilizer…..

YUK!!!!

I moved to another water bath and lightly scrubbed the pieces with my fingers….

The final water bath was completely clear…..

So now I had FIVE leaves to play with…..

The original one is second from the right.


I LOVE using the Vilene!! It has a fabric feel to it so it isn’t ‘slinky” like some stabilizers.

When I used it previously I sometimes had trouble with my needle getting gummed up but it wasn’t a big issue!!

So now I have leaves to play with!!!

I am getting excited about this piece!!!!

. . . . . . . . . . . . . . . . . . . . . . . . . . . . . . . . . . . . . . . . . . . . . . . . . . .

One of my favorite things about quilting is motivating others and helping them in their quilting journey. As part of this endeavor, I LOVE to present programs and workshops to groups and guilds around the world. All of my programs work well with Zoom meetings, and I would love to speak to your group.

You can find out more at this link…..

Recycle your practice

When I am machine quilting, I try to keep a practice piece next to me so that try out any new designs before I use them on an actual quilt. I am not worried about tension or stitch length….just about moving my hands to make the design.

As a consequence, the practice piece often ends up looking like this…..

….and although I just quilted a feather in pink, you really can’t see it among all of the other stuff!!

Instead of making a new sandwich, I chose to cut another piece of fabric the same size as this one…..

I simply pinned it in place at the corners, and…..

…l have a new practice piece where I can see EVERYTHING that I did wrong!!

Yes, the tension may be a bit wonky but it still works perfectly for me!!!

AND, if you want to keep that design, just take a photo of it and you will have it FOREVER!!

Are you in a rut with your machine quilting? Sure, you know HOW to do FMQ and you have 4 or 5 patterns that you do well. BUT, you are bored with those designs and need a push to try some new things. If so, please join “MOVE-IT…. a Free-Motion Quilting Boot Camp”!! I will take you on a FREE 10-week journey to learn new designs and become more comfortable with just MOVING IT!! You can sign up by clicking HERE

Are your rulers shrinking??

Did you know that your acrylic cutting rulers can get smaller over time??

As you make more and more cuts against the edge of a ruler, you eventually shave thin layers of acrylic, making the ruler less accurate as you cut further.

I make it a rule (no pun intended) to replace my two main rulers (24-inch and 6.5-inch square) every three or four years….

Hopefully, this helps my cutting to be more accurate, making my piecing more accurate as well….at least that is the way it is supposed to work!!

As you can see, I love using rulers from “Quilter’s Rule”.

What is your favorite ruler??

Did you know that many tools from your kitchen can move to your studio, making your quilting even more fun? To receive a free pdf featuring 5 such tools, please subscribe to my newsletter. You can sign-up in the top, right-hand column of this blog, or click HERE