Ocean background….

Last weekend I posted about learning to make the curved strips.

They were put together in a series of sets of 4 or 5 strips…..

When it was time to fuse these strips together, I knew that it was important to keep the strip sets straight. If they are angled in any way then sewing the straight lines together with cause the piece to be angled.

But how was I going to keep them straight!!!

Happily, I had an idea to use freezer paper on my ironing board to keep them straight…..

I first ironed a piece of freezer paper on the ironing board…..

…..and then drew parallel lines on the paper…..

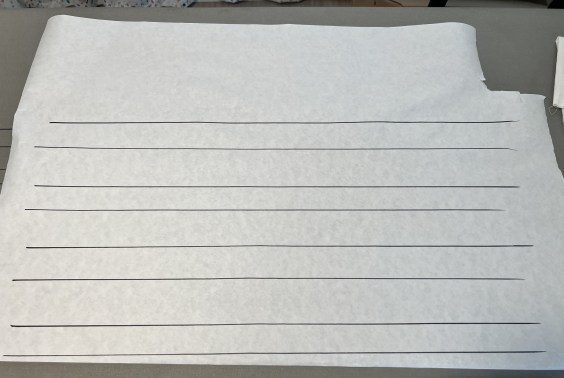
Now I had a guide to use to keep the strips straight!!

I moved each strip set to the ironing board…..

…..and split it up into strips…..

I started with the one un-cut strip and placed it on the line…..

I then kept adding strips……

….making sure that the outside lines stayed straight.

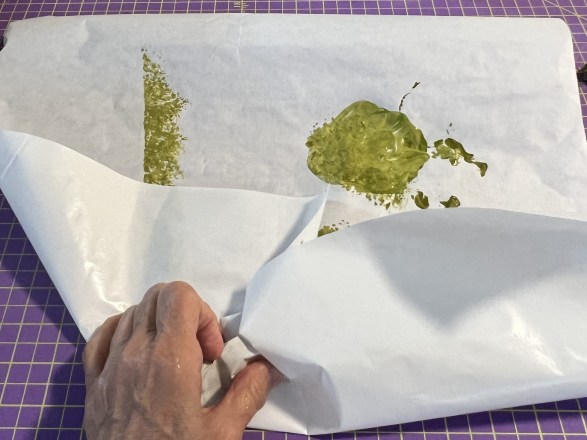
Once I was happy with the lines, I removed the Wonder-Under strips…..

…..and ironed it all in place.

When I was finished, EACH strip set was perfectly straight…..

…..and ready to be sewed together!!

Come back tomorrow to see the finished quilt!!!

It is a cute one!!!


. . . . . . . . . . . . . . . . . . . . . . . . . . . . . . . . . . . . . . . . . . .

In this blog, I post stories about creativity, techniques, tools of the trade, and lots more about the wonderful art of quilting. If you are enjoying these posts, please subscribe to be notified of each new blog as it becomes available.

Sunflower Quilting

I enjoyed playing with another “Circle in a Square” grid design from Dorie Hruska’s book “Floral Confetti”, this time a Sunflower design…….

I LOVE Sunflowers so this was a pleasure to quilt!!!

I like it even better when the thread color matches the background….

While I have enjoyed these last two designs, I have found them to be a bit difficult to work thru. I can see using them in some situations, but I honestly don’t think that I will use them often!!


……………………………………………………………………………..

Do you struggle to decide what to quilt in your blocks? If so, check out my FREE series…..

Click HERE for more information

It’s Like Quilting on Butter!!

Yesterday I put on my big girl pants and started quilting on the Color Wheel quilt I have put off for over 3 years!!!

And believe me, I was SCARED!!

I had taken the advice of several readers and used a wool batting and I had no idea how it was going to work out.

I started out by clipping the quilt into my “dog grooming bars”…..

These help the quilt to float a bit and reduce drag.

Next, I added another table just to the right of my elbow…..

Finally, to get the ENTIRE quilt at table height, I put a pillow in my lap…..

As I took the first stitches, I was amazed at how easy it quilted and how good it looked…..

This is by far the biggest project I have ever done and I was concerned about how well it would work on my machine.

Mind you, there is a lot of “puddling” going on…..

After 2.5 hours of quilting, I had finished most of one section…..

….and I LOVE how it is looking……

So now instead of dreading my studio time, I am scouring my schedule over the next few days to see how I can get up there even MORE!!!

Stay tuned……


…………………………………………………………………………………………………….

If you have an interest in ruler quilting, check out this online course…..

Click HERE for more information

THREE YEARS

Well, I can’t believe that I am saying this, but…..

I have presented a blog post EVERY SINGLE DAY for the last THREE years!!!

I started posting daily in 2020 when I had LOTS of extra time on my hands and I have been able to continue it for all of this time.

Back in April, I wrote a post saying that I was feeling stressed and was going to give myself permission to miss days but so far I haven’t missed.

I believe that the simple act of telling myself that it was OKAY if I missed really relaxed me with the whole process.

Is there something that you need to give yourself permission for??

. . . . . . . . . . . . . . . . . . . . . . . . . . . . . . . . . . . . . . . . . . .

In this blog, I post stories about creativity, techniques, tools of the trade, and lots more about the wonderful art of quilting. If you are enjoying these posts, please subscribe to be notified of each new blog as it becomes available.

Freezer Paper to the Rescue

Don’t you hate it when you need to paint one little piece of fabric but you don’t want to have to put down plastic and get out all of the paint trays…. and the palettes….. and the brushes…. and everything else? 

Try this next time!!

Grab a piece of freezer paper and cover your table with it.

Because it has a waxy surface on the back, no liquids are going to travel through the paper to the table…..

You can even use the paper to mix your paint, meaning that you don’t have to clean a palette after you’re done…..

For most of my botanical painting, I prefer to use a sea sponge, and yes, I have a FAVORITE one!!

Just dip the sponge in the paint palette a few times on the paper…..

And then paint the fabric….

The best thing about this is when you were done, you scrunch it up…..

roll it all into a ball…..

…and throw it away!!

So next time, skip the plastic and head for the freezer paper 

………………………………………………………………………………………………………

On Tuesdays, I provide a tip, technique, or product review. Please subscribe to the blog to ensure that you don’t miss ANY of them!!