Ocean Fabric Pull

A few weeks back I wrote about a request from my daughter to make a baby quilt for one of her friends.

In the post, I wrote about buying a pattern that had 400 pieces in it and figuring out a way to simplify the quilt…..REALLY simplify it!!

At the time, I had done a small fabric pull…..

I left that post by saying that I was going to buy some solids to add to this.

Then I added a LOT of other fabrics so the final pull looked like this…..

Okay…..this needs some organization!!

I pulled out my “Value Finder” and got busy…..

If you don’t know, a Value Finder is a filter that takes the color out of the picture and replaces it with red (or green, depending on which filter you use).

Mine is an older version that isn’t available anymore, but you might be interested in this one….

These can be purchased on Amazon….

You can also look at a black-and-white photo of the fabric and get a similar result…..

I started out by pulling all of the dark fabrics and, using the value finder, ordering them by value…..

That complete, I was ready to move on to the medium-valued fabrics. I actually found it easier to pull out the light-colored fabrics, leaving the medium shades.

Man, I love some of these fabrics!!!

Finally, I arranged the light color fabrics…..

In each case, I initially arranged them the way that I thought they should go, and would then look thru the Value Finder to see if I was right.

It was interesting to see which fabrics I placed incorrectly!!

Now that they were sorted, I was able to look at all the fabrics I had picked….

And, here they are with the Value-Finder attached…..

I was pleased with the range in values and colors, but I needed to trim some more before I started.

I decided to pull any fabric that I couldn’t get a 30-inch strip out of. There is no reason to put a seam in if I don’t have to.

I did keep two fabrics that weren’t 30 inches wide. Both were just too great to leave out!

I also needed to pick my Sky Fabrics. I am thinking of five fabrics for the sky, and am looking at the lighter end of my fabrics and obviously focusing on blue ones…..

I know that there are six fabrics here but that blue & yellow just HAS to be part of the mix.

I think that these will do for now.

…………………………………………………………………………………………

Subscribe to my mailing list and receive this free pattern for “Dancing Squares”…..

You can sign up HERE……

SADIE!!!!!

I can at last show the finished quilt……

I absolutely LOVE how she turned out, even though the creative journey has been a long one.

Just for grins, I went back a looked at all of the posts leading up to this past week…..

August 8, 2021 – It started out as an idea

November 20, 2021 – Making a Start

November 24, 2021 – OOPS….that is a mistake

November 25, 2021 – Collage Neck& Head

November 27, 2021 – Trimming her down

December 1, 2021 – Background Iteration #1

December 2, 2021 – Backgorund Iteration #2

December 3, 2021 – Background Iteration #3

December 4, 2021 – Background Iteration #4

December 5, 2021 – Background Iteration #4.5

December 16, 2021 – More Background

I am SO glad that I took my time and waited on the background until I knew EXACTLY what I wanted to do.

It can be hard to wait but sometimes you just have to give yourself that time.

So now the question is……

A Home for Sadie

This week will be a different sort of week for Frances Quilts

For the last few months, I have been working sporadically on a quilt that I started two years ago. I wanted to wait until it was finished before I showed you the process

I finished it this weekend so now I can share the whole story.

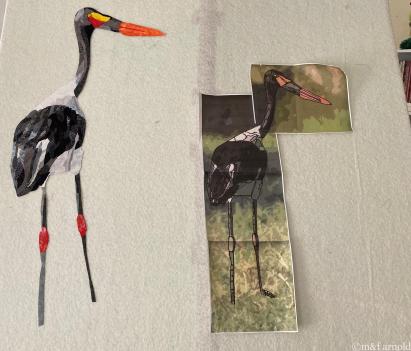
The inspiration started with this picture of a Saddle-Billed Stork I took it when we were in Mozambique in June 2019…..

As soon as we returned home, I enlarged the photo and did the fiber collage…..

But she needed a background, and I couldn’t decide what to do. I knew that I wanted to do something pretty fancy but was so confused about what it would be!!

I painted a background.……

but I knew that it needed something else.

I played with thread painting, hoping to attain a meadow appearance…….

…….but there was no way to get to what I envisioned.

Last summer, I worked through the process of making thread lace, using the technique on my Botero flower garden quilt……..

Back in January, I played around with making thread lace grass, and was pleased with how it looked…..

Then my crazy Spring hit and here we are in August. One thing became patently obvious…..

IT IS TIME TO FINISH THIS QUILT!!!!

So……a full two years after I started this quilt, I am ready to show you the results!!

Over the next three days, I am going to show the process of making the thread grass. On day four, we will look at dyeing and using cheesecloth.

Day five will be dedicated to thread-painting the top and day 6 will talk about the quilting process.

SO…..it will be a FUN week…..get ready for a wild ride!!

To be sure that you don’t miss a single post, be sure to subscribe….

. . . . . . . . . . . . . . . . . . . . . . . . . . . . . . . . . . . . . . . . . . .

In this blog, I post stories about creativity, techniques, tools of the trade, and lots more about the wonderful art of quilting. If you are enjoying these posts, please subscribe to be notified of each new blog as it becomes available.

Applique prep – Part 3

This past weekend, I presented two methods for preparing pieces for hand applique. First I tried a product from Alex Anderson, then I tried making the templates from layers of freezer paper.

Now let’s try template plastic.

The template plastic is heat resistant, and my first step is to trace the images onto the plastic, but turned them over and numbered them on the backside…..

That means that as long as the numbers are facing me on the backside of the fabric, they should be going in the correct direction.

Let’s get them cut out……

It is important not to have any little divots in the plastic as the fabric will conform directly to those, but you can use an emery board to clean up the edges….

There was one reason that I was hesitant to use template plastic. I don’t like that it simply “sat” on the backside of the fabric and wouldn’t stay put. I got tired of it sliding around as I tried to turn under the edges.

But, what if I placed a tiny bit of glue on the back of that template, and then stuck it to my fabric….

The next step was to carefully clip up to the edge of the template, especially around the curves….

Now I was ready to turn the edges under. I used the “Magic Sizing” technique that I talked about in Sunday’s post. Here is a video of the process. I switched to my travel iron which made it much easier…..

I have to say that this petal looks almost perfect….

I did two more petals and then made some comparisons. The top row was using the fusible paper from Alex Anderson. The middle row was using freezer paper. And, the third row is this template plastic……

The jury is definitely in… I’m going to work with template plastic!!!

So I need to get busy!

Since the stems were basically just straight lines, I decided to go ahead and use the templates that I had cut from Alex Anderson’s paper…..

I was very careful to cut these out CLOSE to the template so that the seam allowance wasn’t too big. I used the Magic Sizing technique and the stems were soon ready to go…..

…..although there were a few burned fingers along the way.

So, now I need to finish prepping the pieces and get started sewing.

I am really looking forward to having this to work on at night…..it sure beats snoozing!!

. . . . . . . . . . . . . . . . . . . . . . . . . . . . . . . . . . . . . . . . . . . . . . . . . . .

One of my favorite things about quilting is motivating others and helping them in their quilting journey. As part of this endeavor, I LOVE to present programs and workshops to groups and guilds around the world. All of my programs work well with Zoom meetings, and I would love to speak to your group.

You can find out more at this link…..

Appliqué Prep – part 2

Yesterday I talked about preparing applique pieces using the product from Alex Anderson, but I wasn’t happy with the results…..

WHAT TO DO!!

In a previous life, I had done some appliqué using freezer paper as my base so I decided to return to that.

With this technique, you use the freezer paper template and fold the fabric edges over it.

I traced the design for three of the blooms onto the paper side of a piece of freezer paper….

I then stacked up three layers of freezer paper….

and ironed them together using a cool dry iron….

I cut the pieces out and found that since I had used THREE layers of Freezer Paper, the template was nice and stiff…..

I ironed the shiny side of the freezer paper template onto the fabric…..

and then cut them out with a scant quarter-inch overhang.

Now it’s time to see how these edges turn over and if I can get them smoother than I did with the paper from Alex Anderson.

Since I don’t particularly like using a glue stick, I’m going to try using the magic sizing trick….

…..that I learned from Karen Kay Buckley.

Since you don’t need much of the spray, I sprayed a small amount into the cap……

And then dipped a stencil brush in…..

Note here that NOT MUCH IS NEEDED!!!

Next, I brushed the sizing onto the fabric edges….

(My concern here is that the paper is going to start losing its stiffness because of the liquid.)

I used the tip of my iron to carefully work around the pattern, pressing the edges in and holding the iron there until it dried…..

I found that the Freezer Paper DID hold its shape!!

Once I had gone around the entire petal, I turned it to the front and put the iron on top of the whole thing……

And look…..

This is the nicest-looking petal I have seen so far!!

And yes, I realize that the point isn’t perfect but I can tuck that little piece in when I’m actually doing the appliqué.

Let’s keep going.

The second one worked well but on the third one, the paper started bending a little bit. I think I used too much magic sizing on it, but I simply put the iron on it and let it dry, and then started over again with a smaller amount. It seemed to work fine. 

This one has a few more bumps in it, but again I’m thinking it’s because the paper got wet……

However, these three are certainly better than the ones I prepared yesterday……

While this technique worked better than the first one, I still had issues with the paper becoming saturated with Magic sizing and starting to lose its integrity.

SO I guess that means I need to do one more test and try the Heat-resistant Template Plastic …..

Come back Tuesday for the results!!!


Be sure to subscribe so you don’t miss a single post!!

. . . . . . . . . . . . . . . . . . . . . . . . . . . . . . . . . . . . . . . . . . .

In this blog, I post stories about creativity, techniques, tools of the trade, and lots more about the wonderful art of quilting. If you are enjoying these posts, please subscribe to be notified of each new blog as it becomes available.