Star Explosion…the next chapter

Over the last 2 months, you have seen bits and pieces of my latest quilt called “Star Explosion”. When I last posted explicitly about the quilt, it was at this stage……

.

….and I had run out of cream-colored fabric!! I figured I needed 3 more yards and was starting to panic when I couldn’t find more. Finally, I found one store with 1-3/4 yards and another with 1-1/4 yards. THAT was a relief!!!!

Once I had the fabric in hand, it was time to decide where the quilt was headed next!!!

I felt that I needed to pull some of the “duller” colors in the center star to the outside of the quilt so I started playing with possibilities……

Maybe cubes…..

……or stripes……

Definitely NOT!!!

What about some smaller stars…..

YEP….that is where I am heading!!

My first thought was exactly HOW I was going to do all of the inset seams where the star meets the background, but I finally realized that I could piece the star first…..

and then add the background to the COMPLETED star…..

SO MUCH EASIER!!!

It was important for me to match the star points when I began adding these long strips and I used a four-part sewing process….

I would first match the points……

….and pin them into place…..

….carefully laying out the rest of the strip and pinning it well.

Next, I used a basting stitch to sew those points together…..

When they looked ok……

…..I went back and sewed the full seam using a normal stitch length…..

Yes, it was a bit time-consuming, but it meant that I didn’t need a lot of quality time with my seam ripper!!!

Now, the majority of the piecing is finished……

Come back tomorrow as I turn this fun design into a square-ish top!!

Red Pepper Flake Quilting….

When I was signing up for the 2022 Monthly Color Challenge, I saw that one of the blocks was based on RED PEPPER!!!

Since I LOVE using red pepper in my cooking, it was a no-brainer that I was going to present this block!!

BUT, before I start on that, let me tell you about something new. I had so much fun making this small charity quilt…..

….that I turned it into a pattern that you can get for FREE!!!

For a limited time, you can sign up for my newsletter and receive this free pattern “Dancing Squares”!! Sign up HERE

Now….back to our regularly scheduled program………

The first thing that I did was to grab a bottle of red pepper flakes and dump a bunch out so that I could examine it for color…..

I was interested to see that there were not only white seeds in the mixture but also a number of different reds!!

I rushed to the red “cubicle” and quickly pulled out a stack of red fabrics…

Since I am using the same background fabric for all of my blocks, it was easy to pick the one fabric that I wanted to work with and the patches were quickly cut……

First I made flying geese using the 4-at-a-time method…..

If you have never tried this technique before, you might check out this post for all of the instructions.

Next, I added the triangle corner to the “snowball” block, first sewing it on and then folding it over AND pressing it in place… just to be sure that it was the correct fit…..

I then opened it up and cut off the extra triangles…..

….and re-pressed it…..

Ironing it in place BEFORE you cut is the key here. It will really help to keep the triangles in place!!

After the patches were made, it was quick work to put the block together…..

I am especially happy with how the red fabric reminds me of the individual red pepper flakes!!!

I really do like this photo, but now my block smells mildly of pepper….that is okay with me!!

If you want to check out how other quilters interpreted this challenge, please follow these links…..

Patterns By Jen

Sunflower Stitcheries

True Blue Quilts

AnjaQuilts


Don’t forget to sign up HERE to get your free quilt pattern


Filler Finale…..

As I mentioned last week, I finished the “Free Motion Filler” Challenge from Angela Walters.

Once I decided to slow down and take my time with the practice sessions, I really enjoyed this challenge and learned so many new designs that I can’t wait to use!!

I mean…..how can you NOT like the textures here…..

This also gave me a good chance to try out the “dog grooming arms” that my husband bought me for my last birthday…..

I found that they really helped to hold the quilt up as I worked on it…..

I was originally concerned that I would spend all of my time re-clipping as I moved from area to area, but I didn’t find that to be a problem.

So….it was two challenges for the price of one!!!!

I think that it is now time for me to quit PRACTICING my FMQ skills and start actually USING them!!!

August means FOOTBALL….and quilts

Over the last months, I have been sharing the quilts that I made as part of the British Quilt List challenge in 2009…..

The challenge for August was to make thirty-six, 2.5-inch half-square triangles and then play with them until you found a design that you liked!!

Since it was August and the beginning of college football season, I went with the University of Georgia RED & BLACK….

I remember having so much fun playing with the squares until I found a pattern that was pleasing…..

So, even if you may not be a Georgia fan, I hope that you enjoy the quilt and I would highly encourage you to sew up some half-square triangles and make one for yourself!!!!

And….finally……

GO DAWGS!!!!

Quilting without a plan!!

Yesterday I mentioned my dilemma about how to quilt my latest project. Since I couldn’t figure out exactly what to do, I started with a couple of simple things that I saw.

But where to go next???

I spent some time on Procreate, playing with various ideas……

….but none of them truly appealed to me. However, I did like PARTS of them!!

Firstly, I added the “petals” in part of the negative space…..

Then I added matching arcs to the outside of the pinwheel…..

Now, that made a really funky shape!!!

I then thought about quilting a circle around the pinwheel, but that didn’t turn out so well…..

The idea was good, but I didn’t have a ruler big enough to do the circle and it ended up being lumpy and bumpy, and out came the seam ripper!!!

I started looking at my rulers and realized that this one could be used to make a design that was ALMOST a circle…..

What if I use that arc and be sure to hit each of the points? THAT will work!!

But what to do next?

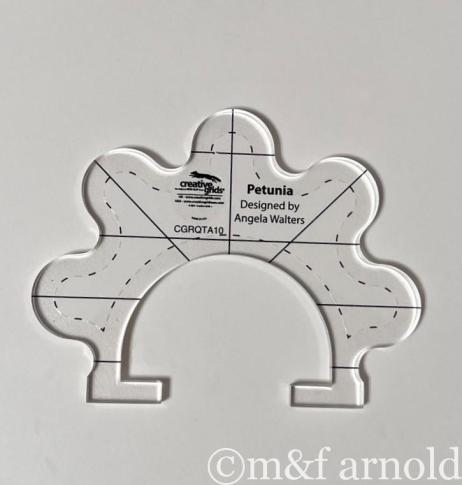
I found another of Angela’s new rulers…..

…and thought that it might be fun to add a flower design!!

In the end, I used three different rulers to quilt each side of the pinwheel. First I used the arc ruler to quilt from one point down to the next…..

Then I used “Petunia” to quilt the next design, ending back up where I had started…..

I liked how this looked……

….but I knew that I needed a third line to bring me to a position where I could move forward to the next side. I solved this problem by adding another arc, using yet another ruler…..

The final design looked like this…..

I am happy with how the quilting turned out and am pleased to say that every bit of the interior quilting was done using 5 rulers…..

For the two outside borders, I chose to use a couple of curvy line designs…..

Here is the finished quilt……

This has been a sweet project from inception to finish and it makes me happy to remember my new friends on the other side of the world!!!

THANKS LADIES!!!!