Help….I need a good name

Doesn’t it feel good to finish a project that has been years in the process??

YES, I finished this quilt last week…..

For those who may not remember, it was inspired by this photo….

I used “Electric Quilt” to design two blocks…..

I then played with them to come up with this design…..

When I received a bunch of gorgeous blue and green hand-dyed fabrics, I knew that it was time to start piecing!! The top has been ready for 18 months but it took this long to figure out how to quilt it!!

After readers gave tons of ideas, I decided on straight lines following the basic design of the triangles. That is a LOT of straight lines!! Let’s just say that I am now perfectly comfortable using a straight ruler for quilting!!

BUT WHAT WOULD I DO DIFFERENTLY????

I enjoy looking at each quilt and thinking about how I could make it better the next time, and for this quilt, there are TOO many lines of quilting. I like my general idea of having the large triangles run into each other…..

BUT, I should have had the spacing of the in-between lines be further apart!!

Live and learn!!

Having said that, I do like the look of the quilting, especially from this angle…..

I have written the pattern for this quilt but need a name before I can publish it.

PLEASE HELP……WHAT WOULD YOU NAME IT???


Shower curtain for the win!!

In the continuing saga of how to quilt my “woodpile” quilt, I posted on Tuesday that I had decided to start with some large triangles that would tie the 3 smaller triangle sets together…..

Now it was time to figure out how to tie the large triangles together. In order to try out a bunch of different ideas, I pinned the quilt to my design wall and covered it with a cheap clear, plastic shower curtain, making sure that it extended well beyond the edge of the quilt….

Using a water-soluble pen, I proceeded to draw all over the quilt, trying different design ideas as I went…..

When I was finished, I misted the shower curtain with water…..

….and cleaned it off with a paper towel…..

…..leaving me with a clean surface to start on all over again!!

I had used this system on small blocks but never on a whole quilt and it proved to be an amazing tool!!

And it only cost $1!!!!

Do you have any “unusual” tools that you use in your quilting studio??

FMQ with a longer ruler

I like to quilt using a smaller ruler most of the time, but I have learned that there are times that a longer ruler works better.

However, there are a few tricks to using this longer ruler!!

Let me back up……

I have finally decided how to quilt the “woodpile” quilt top that I presented last week. You guys had fantastic ideas and I decided that I would turn the three small triangles into one BIG triangle…..

I still have NO idea what I am going to do after I finish all of these triangles, but that is another story.

BUT, as I was happily quilting away, I found myself feeling hungry and wishing for a hamburger. Then I realized that I was quilting the “Whataburger” Hamburger chain logo…..

Yes, everytime we visit Texas, there is at least ONE Whataburger photo!!

Okay…back on track now.

I did a short video to give a few tips for using these longer rulers……

Do you have long rulers that you have found helpful? Please let me know which ones they were!!

I’ve Got Mail!!

Today I had a package in the mailbox and was excited to see that it was from Angela Walters which meant that I HAD NEW RULERS!!!!

She has just released three rulers for high-shank machines and I think that they are going to be SO much fun.

Here is what I did in just a few minutes…..

The first one is “Dot” and she looks like this…..

….and she can EASILY do this……

OH MY!!!!

Secondly, I played with “Smiley”……

This is one of the nicest arc rulers that I have seen. I just played for a few minutes and came up with several designs, but especially liked these nested petal shapes…..

Finally, came Petunia…..

She is a petite ruler that fits in the palm of my hand, but look what I did…..

Isn’t that fun!!!

So, you guys keep reading but I am heading upstairs to quilt!!!

Blocks 7 and 8…..

Blocks 7 and 8 are “in the bag” so to speak!! Only four more to go in our TWELVE WAYS TO QUILT A SAWTOOTH STAR challenge!!

The first one had lots and lots of straight lines…..

…including a Square Spiral design in the center.

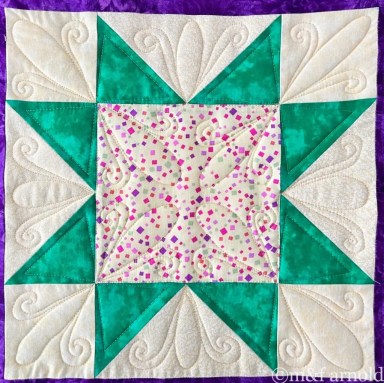
Block 8 was all about the curve….working with a Fleur-de-lis type of design…..

Have a look at the video and then give these fun designs a try….either by quilting or by drawing it out!!!

I have already started thinking about Blocks 9 and 10!!

One of them is going to be a mixture of straight and curvy lines and may end up being a challenge to quilt…..stay tuned!!

If you need more information about this challenge, please check out my website….

Are you in a rut with your machine quilting? Sure, you know HOW to do FMQ and you have 4 or 5 patterns that you do well. BUT, you are bored with those designs and need a push to try some new things. If so, please join “MOVE-IT…. a Free-Motion Quilting Boot Camp”!! I will take you on a FREE 10-week journey to learn new designs and become more comfortable with just MOVING IT!! You can sign up by clicking HERE