Since I have talked a lot in the past few months about Fernando Botero, I thought that you might enjoy another of his paintings……

I think that I can identify with these women…..how about you??
Since I have talked a lot in the past few months about Fernando Botero, I thought that you might enjoy another of his paintings……
I think that I can identify with these women…..how about you??
Yesterday, I talked about quilting the background of the Flower Field quilt, leaving it at this stage…..

Now I needed to figure out how to finish the edges of the quilt. I debated about adding a border to the final quilt but quickly decided that it didn’t need it.
It was time to square up the quilt and I used my laser Square…..

I was surprised about how much the fabric had shifted and skewed during the surface design process.
After it was squared up….

….I had to decide how to finish the quilt edges.
I would have preferred to simply face the quilt but I was afraid that having all of the dimensional stuff along the edges would mean that a facing wouldn’t have turned well.
In the end, I added binding but matched two separate binding fabrics to the top and bottom so that it wasn’t as noticeable. This was a great compromise to facing the quilt.
At long last, the experiment was finished!!…….

It was such a fun process and I look forward to trying something like this again really soon!!!
Now I just have to find a name for the quilt……
When last I left you, the Fernando Botero-inspired flower field had a lot of brown and green…..

….but like our backyard, was beautiful….but a bit boring…..

It was definitely time to add some punch to this field!!!
I started out by pulling more threads and yarns from my “stash”……

…..and couching them in as “pops” of color…..
I was disappointed to find out that this specialty yarn….

…couldn’t be couched easily. There simply wasn’t anything for the needle and thread to get hold of!!
I added a few more threads and then decided that it was time to put some flowers in this field.
I pulled out a box of hand-dyed offcuts that had been gifted to me…..

….and started cutting circles (similar to the painting inspiration)…..
I liked how it was looking BUT…..
I had to decide exactly when I was going to start QUILTING on this piece. I was pretty sure that I wanted to flowers to puff a bit which meant that they needed to be quilted rather than thread painted.
I also debated about adding two battings to help achieve that puff and finally decided to add my usual “Hobbs Heirloom Fusible Batting” to the backing fabric and then put a fluffy polyester batting on the top…..

BUT, how was I going to quilt it with all of those pieces loose on the top?
The answer was that “I WASN’T!!
I did use a bit of wonder-under to adhere the purple, stringy flower at the top and it quilted beautifully…..

But, I did manage to knock most of the other flowers off as I quilted this one….

OKAY….this will be a case of “organic flower arrangement”!!!
I used tweezers to position some of the smaller blooms…..

….but most were just quilted where they lay…..

There were some happy surprises along the way, including this yellow center that scrunched up as I quilted…..

PERFECT!!!
I did truly enjoy having my new thread tower sitting next to me as I changed threads again and again and again!!

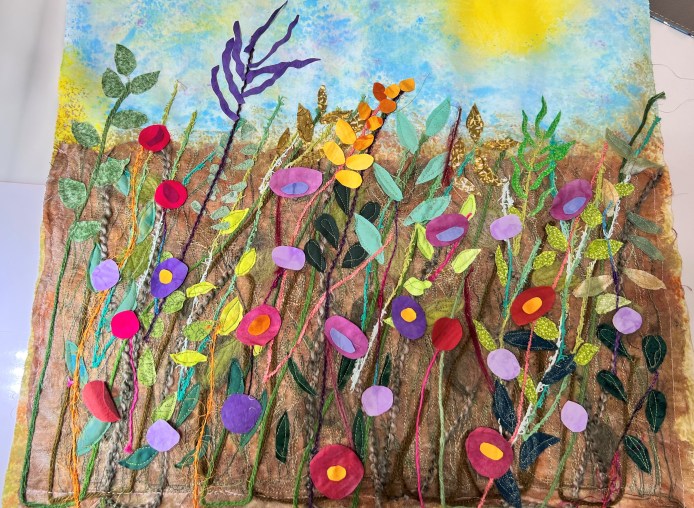
At the end of this session, this is where the piece stood…..

….and while I LIKE it, I am sure that it needs something else!! Right now it seems too messy and fussy…..too many disparate designs in the same space.
HMMMM….maybe I can fix that with some quilting….
MORE TO COME……
When I last left you with the Botero project, it was at this phase….

Now I was ready to attach the cheesecloth piece to the painted piece. Before I did that, I ironed a piece of Shearweight Fusible Pellon Interfacing (#906F) on the back to further stabilize the fabric….

….and used my scissors to “rough-up” the cheesecloth edges so it didn’t look so “perfect”!!

I chose to only attach it on the sides, leaving the top open…..

Now it was time to couch some more threads on, starting with a variegated yarn and then moving to a “Sugar and Cream” thread that is used to crochet dishrags……

The “messy” bits look great in the garden…..

Now it was time to add leaves!!
I grabbed my packages of green crumb fabrics…..

….and started free-cutting leaves and adding them to the top…..

I REALLY like how that looks!!!
I was having so much fun doing this part, that I made a video about the process…..
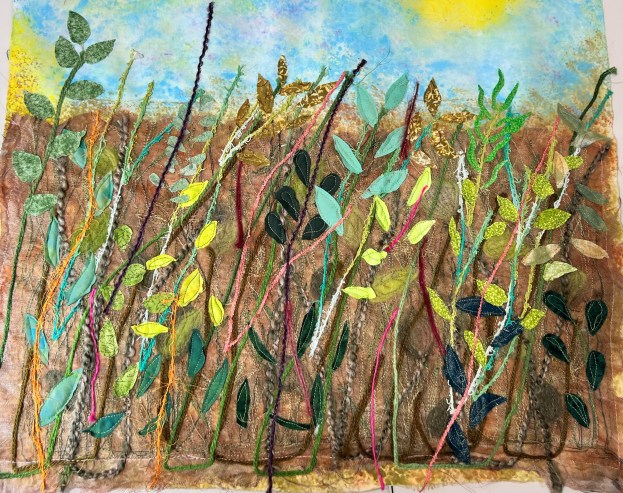
At the end of the day, I had a greened-up background……

I can’t WAIT to start adding flowers (color) to it!!!!

Yesterday morning I set 3 hours aside for creative ventures and I was scared stiff!!
WHY is that such a scary proposition??
I knew the project that I wanted to play with, but it is something that I have never tried before and that scares me to death!!!
It shouldn’t but it sure does!!
OKAY….here is the project!!
During COVID days, one of our guild members (Sharon) took an online course from Michelle Mischkulnig of Chelle Textiles. In that class, she created this amazing threadwork scarf…..

I fell in love with it and immediately got onto the website and started reading about her process. She uses a water-soluble Vilene as the base for all of the stitching. The Vilene is sticky on one side, so the idea is to place lots of threads, yarns, and embellishments on the sticky side of the Vilene and then place another piece over the top, sticking the two stabilizers together with all of the bits in the middle. Then you quilt like mad to connect all of the bits and pieces. When the stabilizer is washed out, it leaves a lovely lacy scarf.
Now, I didn’t really want to make a scarf but I loved the idea of using this technique.
THE INSPIRATION…….Back in April, I posted this photo of a Botero painting and said that I found it inspiring…..

…but could I use this new technique to make some similar??
My first decision was to not work directly on the Vilene but to use a piece of dyed cheesecloth as my base. I was originally thinking about a green background for the bottom but found a piece that was already dyed brown and decided to just use it…..

I adhered the stabilizer to one side of the cheesecloth…..

My first plan was to cover this piece of cheesecloth with lots of threads and other bits…..

…but I quickly realized that I wanted to STITCH these on and not just lay them down. So I sat down to stitch.
But then I got worried and decided that I needed to make a test piece first. So I prepared a smaller piece and started stitching…..

….only to find out that the fabric bunched up a lot with the stitching.
I added a 2nd piece of stabilizer to the back and that made all the difference….

With the big piece double stabilized, it was time to start some stitching, and MAN was it fun…..

I started with a variegated green thread and put the pedal down and FLEW across the piece. It was so freeing to stitch with such abandon!!
I did have to stop once when my needle got gunked up with the adhesive, but a quick clean with an alcohol wipe solved that problem….


At the end of my scary creative time, I had this to show……

Where am I going next with this?

THAT question makes my head hurt!!
Come back for more and, if you have suggestions, PLEASE pass them on!!