Back in 2016, we spent several weeks in India and one VERY memorable Saturday visiting the Jejuri Temple just outside of Pune.
I took a photo of this ceiling as we were leaving the temple and as I have looked at it over the years, I am interested in the dimension that it exudes. Sometimes I only see a flat design when I look, but sometimes I feel as if it has some dimension to it. Perhaps it was painted in a dome and that is the dimension that I see, but either way, I really like it!!!
…and would love to use the pieced circles in a quilt someday!!
Our day at the temple was one of the most memorable of our trip and…..the yellow doesn’t come out!! If that intrigues you, read further……
This post contains affiliate links. I am a participant in the Amazon Services LLC Associates Program. I may earn a small commission if you purchase thru the links provided here. It does NOT change the price that you pay for any items you buy.
Last week I showed you the new way that I had learned to make a Franken-batting……..
In this blog, I post stories about creativity, techniques, tools of the trade, and lots more about the wonderful art of quilting. If you are enjoying these posts, please subscribe to be notified of each new blog as it becomes available.
This post contains affiliate links. I am a participant in the Amazon Services LLC Associates Program. I may earn a small commission if you purchase thru the links provided here. It does NOT change the price that you pay for any items you buy.
When I left you on Thursday, I had made one of the leaves for my “Monarch and Milkweed” challenge but had run into a problem with quilting the veins…..
There simply wasn’t enough to hold onto!!
Then I started thinking about the washout stabilizer that I had used for a previous quilt It is a sticky-sided water-soluble Vilene that comes on a 10-yard roll. If you are interested, you can purchase it HERE.
SO…..I made four more leaves…..
…turned them and marked the veins…..
Next, I rolled out a small portion of the Vilene and peeled off the backing paper…..
The side facing up is now sticky.
I placed the leaves on top….
…and placed another piece of the Vilene over it…..
Now, I had another problem……I couldn’t see the veins that I had drawn!!!
I fixed that by using the wash-out pen and re-drawing the veins on top of the Vilene.
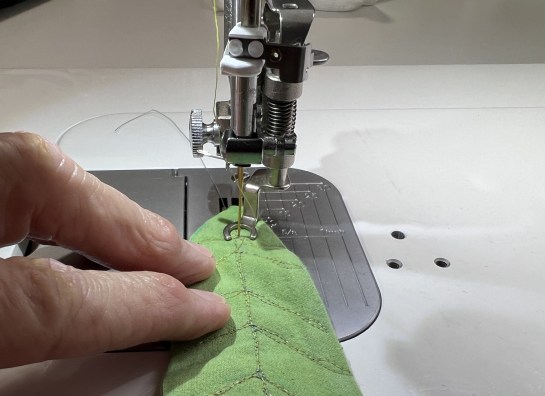
I also switched to my Sit-Down Longarm so that I could use the applique foot…..
The stabilizer held everything in place and it was SO very easy to stitch the lines now.
I cut out the excess stabilizer…..
….and pitched them into a warm water bath…..
Immediately, the water became murky with the sloughed-off stabilizer…..
YUK!!!!
I moved to another water bath and lightly scrubbed the pieces with my fingers….
The final water bath was completely clear…..
So now I had FIVE leaves to play with…..
The original one is second from the right.
I LOVE using the Vilene!! It has a fabric feel to it so it isn’t ‘slinky” like some stabilizers.
When I used it previously I sometimes had trouble with my needle getting gummed up but it wasn’t a big issue!!
One of my favorite things about quilting is motivating others and helping them in their quilting journey. As part of this endeavor, I LOVE to present programs and workshops to groups and guilds around the world. All of my programs work well with Zoom meetings, and I would love to speak to your group.