Let’s start stitching!!

We are coming to the end of the “Sadie, the Saddle-Billed Stork” project.

Today we will start the thread painting and quilting.

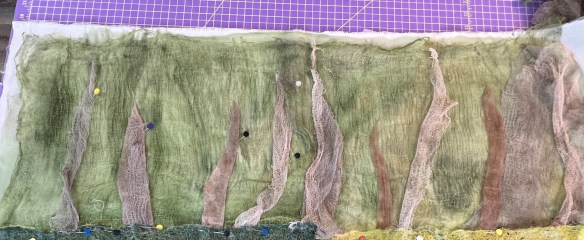
The first thing that I had to do was attach the “thread grass” to the background….

I had to be careful that I was covering all of the edges…..

If I needed a bit of extra grass, I used some of the offcuts that I had from making the grass….

Once they were stitched in place, you couldn’t tell that it had been patched.

At the top, I was careful to tuck the cheesecloth under the grass…..

Everything was now ready for Sadie to make her appearance….

I pinned her on and immediately started thinking about how I was going to thread-paint her…..

I realized that I was scared to start the thread painting and began by only doing simple things, like stitching around every one of the feathers and every section of her body. That was okay but wasn’t enough!!

I finally decided to go all in and spent the next several hours happily stitching…..

When I was happy with the stitching, I basted the quilt and started quilting.

Since I had laid down so much thread on the top, I decided to keep the quilting simple.

The meadow was quilted in a simple wavy line……

I loved the texture that it added to the piece.

I did change the quilting along the two “path-type” areas…..

The leaves had already been heavily thread painted so the quilting just outlined them further.

I added vertical squiggly lines in the background trees too.

It was a BLAST to quilt and I look forward to showing you the FINISHED quilt…..

Come back tomorrow!!!

. . . . . . . . . . . . . . . . . . . . . . . . . . . . . . . . . . . . . . . . . . .

In this blog, I post stories about creativity, techniques, tools of the trade, and lots more about the wonderful art of quilting. If you are enjoying these posts, please subscribe to be notified of each new blog as it becomes available.

Now what??

Yesterday I showed you all of the cheesecloth that I had dyed, but now what was I going to do with it??

I started videoing this process, but after I spent about 10 minutes just staring at the area and not really doing anything, I decided that it might be a fairly BORING video……

I kept on picking up pieces of cheesecloth, laying them on top, and then saying…..”nope”!!

I had an “AHA” moment when I laid this piece over the painted fabric……

OKAY…..that can be my starting point!!

My first thought was to start with the tree trunks that were coming up from the meadow so I cut off a piece of brown/grey and laid it down…..

Then I added some more……

…being careful to wrinkle the cheesecloth up so that it wasn’t just a flat piece of fabric.

Okay….I was on a roll now!!

It didn’t take long to get all of my “tree trunks” in place.

Since some of the straight pins were getting in my way, I decided that it was time to permanently attach these tree trunks.

I once again used my “applique quilting foot” which does a wonderful job of keeping the edges in place as I stitch…..

I thought about the palm trees that I had seen when we were in this area and remembered that they had a rough texture to them, so I added a bit of filler stitching in as I went…..

When I placed Sadie over the top, I was thrilled with how it was looking…..

Now to add more!!

I looked at the picture and realized that there were more brown trunks on the right-hand side of the photo so started throwing even more cheesecloth at it…..

I had worked REALLY hard to get a super dark green cheesecloth, but when I added it to the piece, it was way TOO dark!!

I fixed it by over-painting it with some lighter green…..

…and eventually putting light cheesecloth on top of it…..

It didn’t take long to get all of the cheesecloth in place…..

And look at how much I had left over……

If you need dyed cheesecloth…..shoot me a message 😎😎 !!

We are nearing the end of this project, so be sure to come back tomorrow as I work thru the thread painting and quilting of this great quilt.

. . . . . . . . . . . . . . . . . . . . . . . . . . . . . . . . . . . . . . . . . . .

In this blog, I post stories about creativity, techniques, tools of the trade, and lots more about the wonderful art of quilting. If you are enjoying these posts, please subscribe to be notified of each new blog as it becomes available.

Cheesecloth fun!!

I am enjoying working on “Sadie” but each step has provided a different set of issues.

Now that I had all of the meadow grass done…..

….it was time to tackle the trees/leaves at the very back of the photo.

Since the focal point of the photo was Sadie, it meant that the background was blurred out…..

….and I really wanted to accomplish this on the quilt as well.

BUT HOW???

I knew that fabric would be too stark and that painting would be too different from the intense thread of the rest of the background!!

While racking my brain, I hit upon the blog post I had written about making the “Botero Flower Garden” quilt….

In it, I talked about dyeing cheesecloth and using it as the background.

WOULD THAT WORK??

There was only one way to find out….. head to the garage and do some dyeing!!

I pulled out my box of “Set-A Color” Fabric Paints from Pebeo……

….and grabbed some supplies out of my “painting bin”…..

I pulled these colors for the greens…..

….and these browns and greys……

I had one piece of cheesecloth already on my shelf and found two other types in my local store. It was interesting to see the different textures and colors…..

I had a fun hour and dyed LOTS of pieces of cheesecloth.

I am NOT a person who carefully measures her dyes but rather I throw in what I think will work and go from there.

In each case, I put one of each type of cheesecloth into a bowl and poured in the paint……

I then added water to the bowl to give more liquid volume……..

….and proceeded to dip and squeeze until the cloth was completely covered in paint…..

I continued this process until I had a bunch of pieces in greens and browns…..

When they were dry, I headed back to my studio and carefully ironed each piece…..

Now that I had LOTS of cheesecloth to play with…..

…..the question was how to use them!!

Come back tomorrow and I’ll show you what I came up with!!!

. . . . . . . . . . . . . . . . . . . . . . . . . . . . . . . . . . . . . . . . . . .

In this blog, I post stories about creativity, techniques, tools of the trade, and lots more about the wonderful art of quilting. If you are enjoying these posts, please subscribe to be notified of each new blog as it becomes available.

More threadwork!!

Yesterday we added the first layer of meadow grass to Sadie’s background……

Now it is time to work my way UP!!

I prepared the next (dark green) section in the same way that I did the first one. I started with wool, added some strings and other bits, and then added LOTS of thread……

Since this section is much darker, I decided to use King Tut #989 (Malachite) thread for the stitching. Since it is another variegated thread, it adds a nice movement to the stitching.

When I washed it out, I was upset that it had shrunk so much and didn’t come close to covering the dark green painted area…..

Fortunately, the piece stretched in width a WHOLE lot…..

I made use of that overage and filled in the blank areas and Sadie now has TWO layers of meadow…..

As I moved further up the piece (and further BACK in perspective) I wanted the threadwork to become more dense with less detail.

I also wanted to add an area that had a different look to it.

To accomplish this I started my stitching with a line of “back and forth” stitching…..

…..and filled in with overlapping small circles…..

I also threw in some areas of straight stitching among the circles.

Note that these circles are NOT perfectly formed and are really messy. To me, that is part of the charm of this technique!!!

Once these two sections were pinned in place……

….it was time to tackle the final “really dark” area.

Again, since this is even further in the back, I wanted it to be denser stitching.

I chose to do larger overlapping circles. In my free-motion quilting class, I call this “Messy Hairdo” and it is one of the easiest FMQ patterns to master…..

Since I wasn’t adding any wool roving or other items to the sandwich, I decided to use a non-fusible washout material……

It can be purchased on Amazon….

I ended up using three layers of the material so that I would have a good base for my stitching. This may have been overkill but it gave me more confidence in stitching.

I was happy with the look…..

….but it REALLY looked good when it was attached to the meadow…..

The reason I have a “fill-in” Sadie is because I was worried about continuing to move her back and forth. She was starting to fray a bit!!!

So the ONLY things left to do are the trees in the very back. They concern me greatly!!

Come back tomorrow and see how I solved this problem!!!

. . . . . . . . . . . . . . . . . . . . . . . . . . . . . . . . . . . . . . . . . . .

In this blog, I post stories about creativity, techniques, tools of the trade, and lots more about the wonderful art of quilting. If you are enjoying these posts, please subscribe to be notified of each new blog as it becomes available.

Thread Lace Reveal

Today we are on part 3 (Here is Part One …….and Part Two) of how to make Thread Lace and this is the most exciting part…..

I was really scared when it came to washing out the Vilene that has been holding my thread lace together for the last two days.

What if it all fell apart????

But, I knew that it had to be done……

Washing It Out and Attaching to base

As you can see, the experiment was definitely a success……

I could not be happier with how it turned out!!

So now I have the FIRST part of Sadie’s Meadow ready for her…..

As you can see, there is a LOT more to come!!

Stay tuned……

. . . . . . . . . . . . . . . . . . . . . . . . . . . . . . . . . . . . . . . . . . .

In this blog, I post stories about creativity, techniques, tools of the trade, and lots more about the wonderful art of quilting. If you are enjoying these posts, please subscribe to be notified of each new blog as it becomes available.