Let’s add the thread

Yesterday I posted about the starting process for making thread lace…..or thread grass in this case and when I left you it looked like this…..

I can hear you asking….”exactly what am I supposed to be seeing here?”.

Remember that there are bits of wool roving and strings and fabric slivers and all sorts of materials sandwiched between these two pieces of Water Soluble Sticky Vilene.

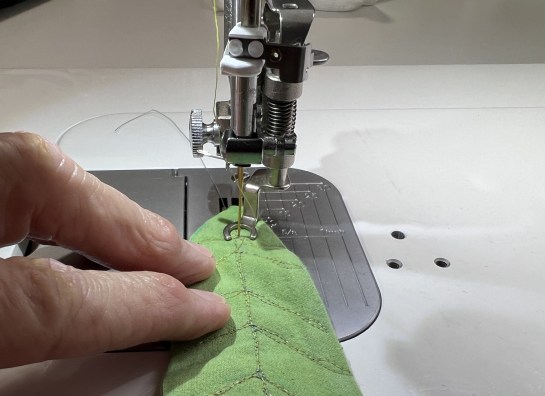
Today we are adding THREAD…..THREAD……THREAD

I could see the bits that were trapped in the Vilene as I stitched…..

….increasing both my CONCERN and my EXCITEMENT about how this was all going to work!!

This was the longest process in the making of the grass but it was a good excuse to drive FAST with my machine!!

STITCH…..STITCH…..STITCH

I had originally planned to use a bunch of different threads, but then I found this variegated “King Tut #880 (Green Olives)” from Superior Thread

It gave all of the color variations that I wanted and was MUCH easier to use!!!

This is how it looked towards the end of the day…..

Definitely more to see, but still a bit weird!!

Come back tomorrow as we do the magic washout!!

. . . . . . . . . . . . . . . . . . . . . . . . . . . . . . . . . . . . . . . . . . .

In this blog, I post stories about creativity, techniques, tools of the trade, and lots more about the wonderful art of quilting. If you are enjoying these posts, please subscribe to be notified of each new blog as it becomes available.

This post contains affiliate links. I am a participant in the Amazon Services LLC Associates Program. I may earn a small commission if you purchase thru the links provided here. It does NOT change the price that you pay for any items you buy.

You think that I would learn…..

Yesterday I got the leaves ready to add to the milkweed plant.

Now it was time to work on the flower head.

As I mentioned in a previous post, I had several different kinds of flowers….some with fusible and some double-sided.

I ran into the SAME problem with the double-sided flowers. They were too small for me to add the thread accents.

SO, I did the exact same thing as yesterday, using Sticky Vilene to sandwich the flowers….

….but ran into the same problem of not being able to see the flowers when it was under the machine.

So, I outlined them…..

….and started stitching…..

After a few dunkings in warm water, the flowers were ready to use…..

Now I moved back to the leaves and realized that they didn’t show up enough in their current state…..

Out came the fabric paint and my trusty sponge…..

…and I added some additional color to the outside of all of the leaves.

That helped, but they still needed something else….. maybe the veins need to be more prominent??

Out came the Fabrico markers…..

….and at this point I declared the leaves finished…..

So here it stands…..

Now I need to figure out what will be fused down before I quilt and what will wait until after.

You may have to wait a few days for that because I REALLY need some thinking time…….

. . . . . . . . . . . . . . . . . . . . . . . . . . . . . . . . . . . . . . . . . . .

In this blog, I post stories about creativity, techniques, tools of the trade, and lots more about the wonderful art of quilting. If you are enjoying these posts, please subscribe to be notified of each new blog as it becomes available.

Fixing my leaves….

This post contains affiliate links. I am a participant in the Amazon Services LLC Associates Program. I may earn a small commission if you purchase thru the links provided here. It does NOT change the price that you pay for any items you buy.

When I left you on Thursday, I had made one of the leaves for my “Monarch and Milkweed” challenge but had run into a problem with quilting the veins…..

There simply wasn’t enough to hold onto!!

Then I started thinking about the washout stabilizer that I had used for a previous quilt It is a sticky-sided water-soluble Vilene that comes on a 10-yard roll. If you are interested, you can purchase it HERE.


SO…..I made four more leaves…..

…turned them and marked the veins…..

Next, I rolled out a small portion of the Vilene and peeled off the backing paper…..

The side facing up is now sticky.

I placed the leaves on top….

…and placed another piece of the Vilene over it…..

Now, I had another problem……I couldn’t see the veins that I had drawn!!!

I fixed that by using the wash-out pen and re-drawing the veins on top of the Vilene.

I also switched to my Sit-Down Longarm so that I could use the applique foot…..

The stabilizer held everything in place and it was SO very easy to stitch the lines now.

I cut out the excess stabilizer…..

….and pitched them into a warm water bath…..

Immediately, the water became murky with the sloughed-off stabilizer…..

YUK!!!!

I moved to another water bath and lightly scrubbed the pieces with my fingers….

The final water bath was completely clear…..

So now I had FIVE leaves to play with…..

The original one is second from the right.


I LOVE using the Vilene!! It has a fabric feel to it so it isn’t ‘slinky” like some stabilizers.

When I used it previously I sometimes had trouble with my needle getting gummed up but it wasn’t a big issue!!

So now I have leaves to play with!!!

I am getting excited about this piece!!!!

. . . . . . . . . . . . . . . . . . . . . . . . . . . . . . . . . . . . . . . . . . . . . . . . . . .

One of my favorite things about quilting is motivating others and helping them in their quilting journey. As part of this endeavor, I LOVE to present programs and workshops to groups and guilds around the world. All of my programs work well with Zoom meetings, and I would love to speak to your group.

You can find out more at this link…..

Do you see a theme?

If you have been following along this summer, you will know that I have played with a variety of techniques, but there has been one thing in my mind that I have been heading for…..

SADIE THE SADDLEBILL STORK!!

To refresh your memory, I took a photo of Sadie when we were traveling last year in Mozambique….

Back in December, I collaged the stork and then started working on the background. It took me 4-1/2 tries to get something that I was happy with. When I left you, this is where it was…..’

I had thought that I would work on it some during the 2022 tax season but that was just a pipe dream!!!

I tried couching down a few threads…..

but quickly realized that I didn’t like it and pulled them out again. I mean, what was I thinking when I put them in a row like this??? I do think that I could use this thread to add some highlights.

Anyway, this summer I spent a lot of time on my Botero Flower Garden…..

…loving the look of the dyed cheesecloth as an underlay.

And yesterday I posted about thread painting this meadow…..

So the question for September is “how can I use these two techniques to embellish Sadie’s background??”

I have concerns about both techniques…..

  • The cheesecloth will make the surface rough and I am worried that Sadie wouldn’t be able to lay flat…..especially with her sweet, skinny legs.
  • The fabric may not stand up to the intense thread painting in the 2nd meadow

So, do I need to do some sort of hybrid??

I would LOVE to hear your thoughts?

A little thread painting

As I mentioned in Tuesday’s post, I was asked to finish a couple of pieces that my friend Diane started before her death.

One of these was a thread-painted piece.

Diane had fused fabrics down to create the scene and then started adding some stitching…..

From looking at it, I would guess that she was using a free-motion zig-zag stitch…..

Both of my current machines are straight stitch only so I was a bit concerned about changing the method that she was using!!

But, once I got started, I enjoyed adding interest to the sweet scene!!

The pine trees were greatly enhanced by the fabrics that she had selected….

I was most concerned about the tree on the left. I just wasn’t sure exactly what she was wanting to show here…..

….maybe a sunset where just the outline of the tree showed?

I started out adding some light grey over the black branches, came back in with a bit darker gray, and finally pulled out a green/grey and started scribbling little circles over the black branches.

This is where it came alive…..

…and I am pleased with the final result!!

I did all of the stitching on my Juki Sit-Down Longarm and realize now that the extra power and speed made this much easier.

But, my favorite thing about this piece is the grass in the front field…..

I used four different threads in a gradation from the top to bottom and then added some highlights using a lighter thread…..

Since the top was backed with a heavy stabilizer (which made stitching easy), I didn’t see a reason to add batting and quilting.

I fused a backing fabric to the back and bound it in the same fabric.

I love the final piece…..

….and, typical of Diane, she pushed me to try something new and find out that I REALLY enjoyed doing it!!