Over the last few days, I have been talking to you about the MQG Fabric Challenge that I am working on….
In particular, I have been gnashing over how to quilt it!!
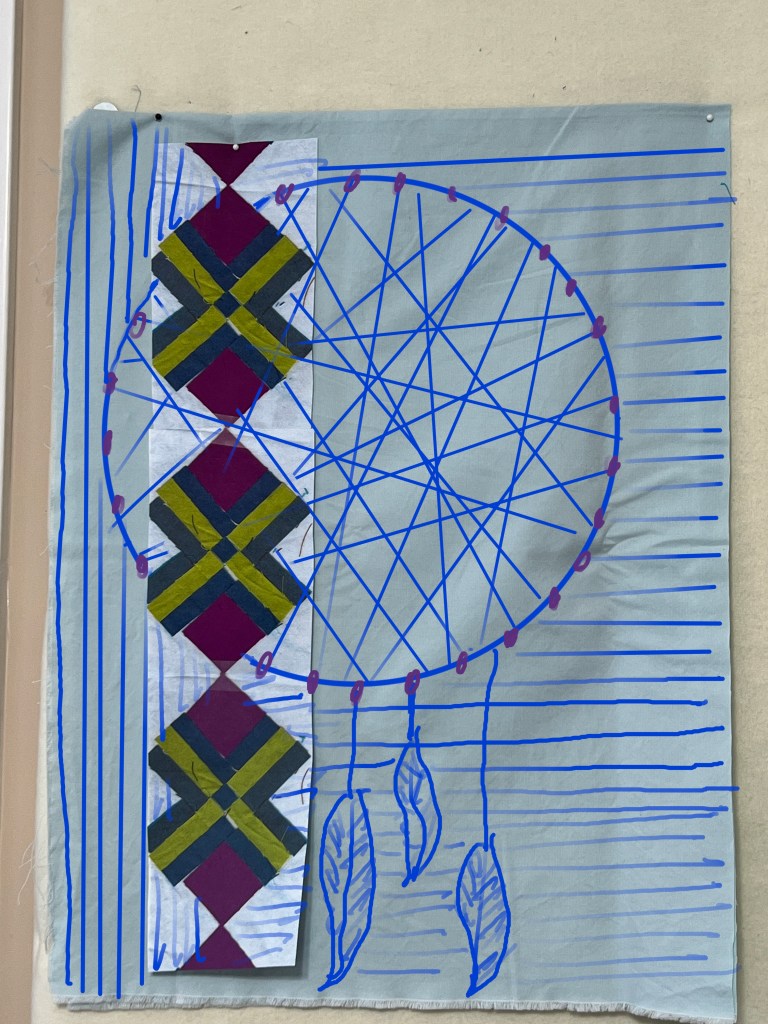
I finally made some decisions, including adding another set of arcs to the Dreamcatcher and decided to use the “arrows” for the Dreamcatcher outline…..
So now it was time to sit down and start quilting!!
Why don’t you join me…..
.
The next stage of my decision making relates to the feathers…..
Stay tuned for more!!
.
.
……………………………………………………………………………..
Do you struggle to decide what to quilt in your blocks? If so, check out my FREE series…..
Yesterday I thought that I had finished my piecing on the challenge quilt…..
so I started playing around with ideas for quilting……
After a few attempts, I realized that it was too short to accommodate the dream catcher and feathers that I wanted to add…..
AND, since this is a fabric challenge, I should probably include a bit MORE of the fabric…..
SO…..
I started piecing again!!
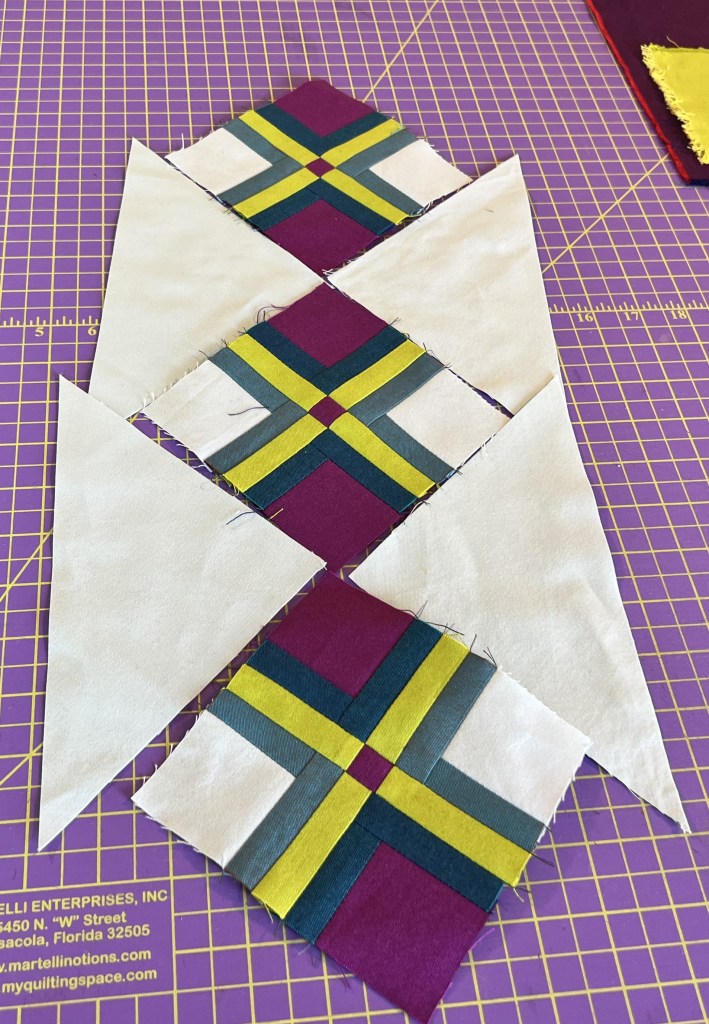
I am trying to be SUPER precise with the piecing. It is a simple pattern and there isn’t much of it, so I need to ensure that the points are all perfect!!
Even to the point that I re-did this point….
After I added two more block sets to the strip, it was time to add the background fabrics…..
I am not sure exactly what size I want the background to be so I went for “too big”, knowing that I can trim it down after I make the final decision.
Once again, I was very careful with the points, especially when they looked like this…..
After I added each side of the background, I followed these steps…..
Spritz the seam with water……
Lightly iron the seam to loosen up the threads…..
Use my fingers to press the seam in place……
And finally press it again with the iron…..
This is how it looks right now…..
….but my expectation is that it will finish somewhere around this size…..
In this blog, I post stories about creativity, techniques, tools of the trade, and lots more about the wonderful art of quilting. If you are enjoying these posts, please subscribe to be notified of each new blog as it becomes available.
Since I was going to be working with smaller pieces of fabric, I decided that I would starch them before cutting. I like to use Magic Sizing, spraying the piece liberally and then ironing dry.
It made the fabric much stiffer and I think that it did help with the cutting and piecing!!
I started piecing the various sections…..
…..adding one strip at a time…..
Then I moved to the background sets…..
Before long I was ready to put the two sections together…..
In my original mock-up, I used a blue small square in the center…..
….but I had the thought that a red/maroon one might be better…..
I was right!!!
Once I had all of the squares made, it was time to add the background triangles……
One of my big concerns was that the threads from the color fabrics would shadow through the light-colored background fabric…..
To combat this, I did some extra trimming after each seam was sewed.
First I pulled back the seam allowance…..
….and trimmed the offending fabrics/threads off…..
Now I don’t have to worry about shadowing!!!
So here is my basic design…..
Next step is to decide if I need to add more squares….or maybe two “half-squares” on each end.
I think that I will plan the quilting next to see what other piecing I need to add.
Come back tomorrow for the planning process!!!
.
…………………………………………………………………………………………
Subscribe to my mailing list and receive this free pattern for “Dancing Squares”…..
Now it was time to make some decisions….. and it was the day before we were leaving on a 7-day overseas trip!! The bags were packed and ready to roll, the house was cleaned up, my studio was immaculate, and I had time on my hands.
Like any good quilter, I started a new project!!
I wanted to make a mock-up of my ideas to see if they would work, but I didn’t want to sew!!
Glue sticks to the rescue!!!
I pulled one piece of the background fabric and drew a line from top to bottom to allow positioning of the pieces…..
I started cutting out each of the fabric pieces, dotting a little glue on the back, and sticking it to the background…..
In a short time, I had this set glued together……
Now I got lazy!!
Instead of making even more glued designs, I took the original to my photocopier……
….and quickly had a bunch to play with……
I now moved to the paper versions and “pieced” them together to give the full design…..
I then pulled a larger piece of background fabric and pinned the paper mock-up to it……
I wasn’t sure that I wanted the extra strips, so I pinned them on.
With this in mind, I headed out on my trip, still thinking about it as I toured around the wilds of Sweden!!
I also had an ulterior motive for making the mock-up before I left…. I wanted to play with quilting designs using Procreate on my iPad. These are two of the ideas that I hatched……
I really like the thought of using a Dreamcatcher in the quilting…..but more about that coming up!!!
This project is well on its way!!!
How do you mock-up your future quilts?
.
.
…………………………………………………………………………………………………….
If you have an interest in ruler quilting, check out this online course…..
The next project that I need to work on is the MQG (Modern Quilt Guild) Fabric Challenge. I have shown you these fabrics before……
….and I was really excited about using them in a quilt.
I knew that I wouldn’t have much time to work on this quilt before the entry deadline of October 31st, so I decided to keep it reasonably small.
As I looked at the colors, I kept thinking about Seminole patchwork, so I immediately grabbed my book…..
I once made men’s ties for Christmas gifts and used a Seminole strip at an angle across each one. I sure wish that I had photos of those!!!!
I also called my friend Phyllis and asked for her resources. She had lived in Florida (where the Seminole Indians lived) for many years and she KNEW her Seminole Patchwork. She showed up with a slew of other resources……
….. and I happily started looking for designs.
Of course, now I can’t find the block that inspired this design…..I know that it is in one of those books, but this is what I started playing with……
And yes, I took photos of the fabric and scanned them into Electric Quilt 8 so that I could get a better idea of how it would look.
I put it on point and added another block with some strips and came up with this quilt……
Ignore the color gradation in the background blocks. That was from the photo that I used!!
I knew that I didn’t want to make THAT many blocks so I needed another way to test my design.
Come back tomorrow and I will show you my super-quick, no-sew drafting idea.
.
.
If you enjoy this blog, please share it with your friends!!!