Wellspring Quilting

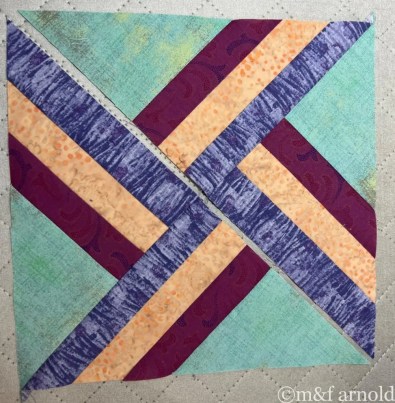
As I posted last week, the top was finished….

….and it was time to quilt.

The problem here is that it was December 31st and I wanted to give this as a gift on New Year’s Day!!!

MUST….HURRY!!!

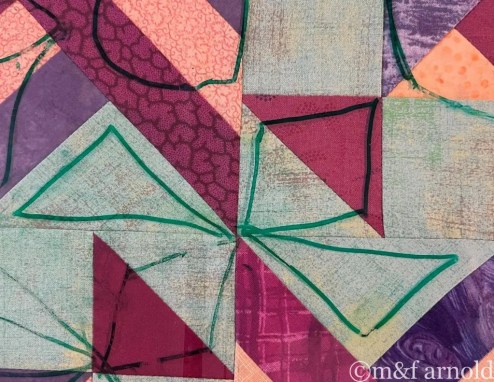
When it came down to it, I really didn’t have any ideas about how to quilt this design. I had recently purchased a roll of “Quilter’s Preview Paper” (which I will review in March),

and now quickly threw it down on the quilt top and started drawing.

After some stop-and-go planning, I had the basic idea that I wanted to quilt this pinwheel something like this…..

….and do the larger whirlwind like this…..

BUT, if I used those two designs, I ended up with the green triangles above being un-quilted and that wouldn’t do!!

As I played with it more, I realized that I could include those two triangles as part of the pinwheel quilting, resulting in something like this….

The entire inside of the quilt was done with rulers…. the “leaf” shapes in the whirlwind blocks were done with a Westalee ruler and the straight lines were done with a straight edge ruler. .

I was able to make a video of the quilting of the whirlwind block…..

But, I got in a hurry to finish and never filmed the pinwheel block….sorry!!

When it came to the borders, it was 7:oopm and I was seriously running out of time!!

I started out with a “ribbon candy” design in the purple border….

I have been working thru Angela Walters “Fabulous Feathers” challenge and decided to GO FOR IT!!

It was some fast and furious quilting, but I put the last stitch in the binding at 11:45pm on December 31st!!!

That gave me 15 minutes to do a quick clean of the studio and start 2022 ready to begin some new projects!!


I delivered the quilt on January 1st and was pleased with her excitement about the gift!! I pray that it will comfort her during this month of rest and recuperation.


Are you in a rut with your machine quilting? Sure, you know HOW to do FMQ and you have 4 or 5 patterns that you do well. BUT, you are bored with those designs and need a push to try some new things. If so, please join “MOVE-IT…. a Free-Motion Quilting Boot Camp”!! I will take you on a FREE 10 week journey to learn new designs and become more comfortable with just MOVING IT!! You can sign up by clicking HERE

Wellspring…alternate blocks

When I left you last week, I had completed all of the larger whirlwind blocks….

Now it was time to fill in those spaces with pinwheel blocks. The first step was to cut out all of the pieces needed for a particular colorway (remember that I have THREE different strip sets/colorways for each block)….

I spent a LOT of time drawing lines down the pieces….

…and then sewing on each side of the line…..

Some of these were left as half-square triangles, but some were sewn one more time to make quarter-square triangles….

It was fun to sew these pieces into the inside pinwheel….

Once again, I tried to be careful with matching the seams and points…..

When I was pressing these blocks I decided to try “spinning my seams” and, unlike my imaginings, I found it to be easy and to make the blocks lie SO much flatter….

At some point, I will add a Terrific Tip Tuesday post to show how to do this!!

When the block bits were all made, it was time to start sewing the sections together…..

When they were all put together, I added a border, and VOILA…..

The Top Was FINISHED!!!!

You guessed it, quilting comes next!!

Wellspring…more piecing

When I left you, I had made all of the units needed for the Whirlwind blocks. Now it was time to put them together!!

As I pointed out in the last post, there were two distinct sets of triangles…..

One set has the background triangle against the rose fabric and the other has it against the periwinkle fabric. As I found out the hard way, it was important to keep these separated.

When the blocks are properly laid out, they look like this…..

The first step was to sew two of the triangle sets together…..

You may notice that they are not the exact same size, but they are made larger, and then cut down so that isn’t going to be an issue.

I pressed to the “side of least resistance”…..ie. the fabric with no seams…..

Next was to lay out the block again…..

….and sew these two larger triangles together.

Because I wanted to be as accurate as possible, I pinned these two together using TWO pins….

….one on the seam that I would be sewing on…..

….and one on the OTHER side of the triangle, matching the seams down there as well….

The reason that this second pin is important is that it helps to square up the sewing line better, especially since you are dealing with bias edges!!

I sewed along the seam…..

…being careful to use my stiletto at the ending point to keep the fabrics from shifting.

If you have never used a stiletto, here is an older video explaining how they work…..

When I finished piecing all of the blocks, I trimmed them down to 9-inches…..

…although after the fact, I realized that they needed to be 8.5 inches so I RE-trimmed them!!!

Putting them up on the design wall made me smile indeed…..


Now to piece the alternating blocks…..stay tuned!!

Let’s Start Piecing

After the previous post’s design ideas, it was time to start piecing….my favorite part of the process!!

Remember that I had three different colorways and decided to work on one at a time.

The first step was to sew the strips together, always placing the “periwinkle” and “rose” fabrics on the outside and the “clay” fabric in the middle.

I absolutely LOVE sewing long strips like this. My fingers just float over the fabric as it flies under the needle….

.

…..and my mind has time to explore all sorts of things. Although let’s be honest, I am mostly thinking about my next quilt!!

The problem with adding a triangle to these strips is that there can be a lot of wasted fabric so I invented a way to solve that!!

I figured out how much fabric it took to cut two units and sub-cut my strip sets into those lengths….

I then sewed one triangle to each end of the strip, alternating sides….

I trimmed each triangle shape to include the strips…..

The end result was a small amount of wasted fabric…..

….and two sets of strip triangles….

Note that there are two distinct sets of triangles.

It was then easy to piece them all together, ending up with 6 whirlwind squares…..

Now to repeat the process for the next two color sets!!!

Keep watching for more…..

Wellspring Pattern Design

Last weekend I posted about picking the colors for my latest quilt that I am calling “Wellspring”.

I had found the inspiration for this quilt from a YouTube video by “Teresa Down Under” with the company “Sewn Up”. You should check out her Youtube channel HERE.

In her video, she was showing three different ways to make a “whirlwind” quilt block and this one was my favorite of the three….

I did some quick calculations…..

…and decided that I would work with an 8-inch block.

I followed her instructions to make a block with 3 strips on one side, and then to cut it in half diagonally…..

The main block that was made from these subsets was gorgeous….

…but the alternating block was plain….

I immediately saw that this particular seam was going to be hard to match….

…and I wondered if I wanted to go to all of that effort to have a block that basically looked like this….

If I was going to do that, I might as well just make it from plain strips of fabric!!

So, I went back to the initial block…

…and started thinking about what I could do with it!!

I jumped onto Electric Quilt and began playing with possible designs. I felt as if I wanted to keep a pinwheel/spinning design in the alternating block and ended up with this idea….

Now to figure out how to piece it without wasting LOTS of fabric.