Ocean Fabric Pull

A few weeks back I wrote about a request from my daughter to make a baby quilt for one of her friends.

In the post, I wrote about buying a pattern that had 400 pieces in it and figuring out a way to simplify the quilt…..REALLY simplify it!!

At the time, I had done a small fabric pull…..

I left that post by saying that I was going to buy some solids to add to this.

Then I added a LOT of other fabrics so the final pull looked like this…..

Okay…..this needs some organization!!

I pulled out my “Value Finder” and got busy…..

If you don’t know, a Value Finder is a filter that takes the color out of the picture and replaces it with red (or green, depending on which filter you use).

Mine is an older version that isn’t available anymore, but you might be interested in this one….

These can be purchased on Amazon….

You can also look at a black-and-white photo of the fabric and get a similar result…..

I started out by pulling all of the dark fabrics and, using the value finder, ordering them by value…..

That complete, I was ready to move on to the medium-valued fabrics. I actually found it easier to pull out the light-colored fabrics, leaving the medium shades.

Man, I love some of these fabrics!!!

Finally, I arranged the light color fabrics…..

In each case, I initially arranged them the way that I thought they should go, and would then look thru the Value Finder to see if I was right.

It was interesting to see which fabrics I placed incorrectly!!

Now that they were sorted, I was able to look at all the fabrics I had picked….

And, here they are with the Value-Finder attached…..

I was pleased with the range in values and colors, but I needed to trim some more before I started.

I decided to pull any fabric that I couldn’t get a 30-inch strip out of. There is no reason to put a seam in if I don’t have to.

I did keep two fabrics that weren’t 30 inches wide. Both were just too great to leave out!

I also needed to pick my Sky Fabrics. I am thinking of five fabrics for the sky, and am looking at the lighter end of my fabrics and obviously focusing on blue ones…..

I know that there are six fabrics here but that blue & yellow just HAS to be part of the mix.

I think that these will do for now.

…………………………………………………………………………………………

Subscribe to my mailing list and receive this free pattern for “Dancing Squares”…..

You can sign up HERE……

SADIE!!!!!

I can at last show the finished quilt……

I absolutely LOVE how she turned out, even though the creative journey has been a long one.

Just for grins, I went back a looked at all of the posts leading up to this past week…..

August 8, 2021 – It started out as an idea

November 20, 2021 – Making a Start

November 24, 2021 – OOPS….that is a mistake

November 25, 2021 – Collage Neck& Head

November 27, 2021 – Trimming her down

December 1, 2021 – Background Iteration #1

December 2, 2021 – Backgorund Iteration #2

December 3, 2021 – Background Iteration #3

December 4, 2021 – Background Iteration #4

December 5, 2021 – Background Iteration #4.5

December 16, 2021 – More Background

I am SO glad that I took my time and waited on the background until I knew EXACTLY what I wanted to do.

It can be hard to wait but sometimes you just have to give yourself that time.

So now the question is……

Isn’t it finished yet??

For all of you who have toiled thru the Monarch challenge quilt process…..THANK YOU!!!

When I left you yesterday, I only had a small piece of fabric and needed to make as many flowers as possible out of it…..

I pulled out my wonder-under and started carefully fusing it to various shaped pieces of fabric…..

When I had crammed as many flowers and buds in as possible, I had 18 new flowers and almost as many buds…..

I carefully cut them out…..

……not wanting to lose ANY of the fabric!!

There wasn’t much left when I was thru…..

I decided that some of the smaller circle buds weren’t needed. Instead, I turned a lot of them into larger ovals!!

I fused them to the flower and started stitching them down. Now I had another supply problem as I was running out of thread…..

Will the problems EVER end??

I sewed down the new flowers and then added the double-sided ones……

I LOVED how it looked…..


OKAY….come back tomorrow and I PROMISE that the Monarch Challenge quilt will be finished!!!

. . . . . . . . . . . . . . . . . . . . . . . . . . . . . . . . . . . . . . . . . . .

In this blog, I post stories about creativity, techniques, tools of the trade, and lots more about the wonderful art of quilting. If you are enjoying these posts, please subscribe to be notified of each new blog as it becomes available.

Let’s talk Monarch’s!!

So, yesterday, I had the background finished and now it was time to think about the guest of honor….the butterfly!!

I found a great photo online and enlarged it to the size I wanted.

I started out by drawing the outline on a piece of black fabric and then roughly cutting it out.

Next, I added the wing bits…..

As I was trying to figure out how to add all of the small white areas, my friend Linda said “Why don’t you paint them??” At one point I thought I might do some painting on this quilt so I brought my paint supplies with me!!

It didn’t take long to paint the white spots. I decided to add a bit of grey to the edges to give them a bit more depth.

I also added a bit of green paint to the inner sections to give more depth there too.

Since I am NOT a painter, what I did was minimal but I think that it added a lot to the Monarch!!

Now it was time to tackle the Milkweed.

I brought this photo with me…..

….and used it as my guide.

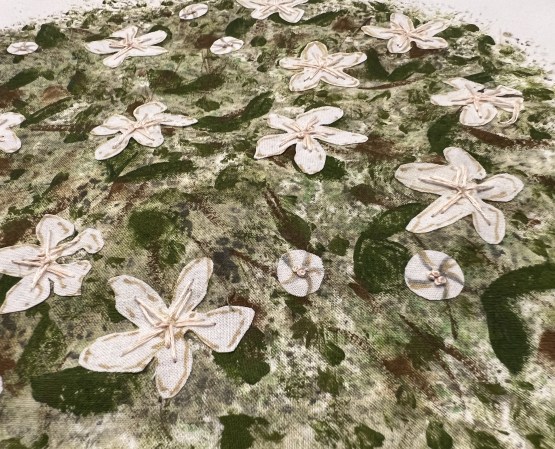
Once again, I am going for depth so started with some paints on white fabric. I got excited doing this step and kept forgetting to take photos, but you can see it pretty well in this photo….

I started out with a sea sponge, then added brush strokes in green and then some brown as well.

Next, I used the photo and cut out lots and lots of flower shapes. The first set was fused onto the background and heavy embroidery threads were added to the centers. I also used a marker to add some more interest.

The next morning, I added a layer of batting to the back and another set of flowers…..this time sewing them on the machine….

I actually like those better than the hand-sewn ones but I think that the diversity will add to the design.

Once I saw that this idea was going to work okay, I cut out a bunch more flower shapes with fusible on the back and then also fused two fabrics together and cut out flowers that will be loose on the top.

Before I left for the retreat, I found a font that I liked and printed out the words. It was easy work to transfer them to the fusible web and cut them out of fabric. They didn’t show up well on the green background so I added a black fabric strip under them.

I will rough-cut the black before I fuse it down.

When I left the retreat, the quilt was at this stage…..


Lot’s more to come…..I just have to find the time to do it!!!


…………………………………………………………………………………………

Subscribe to my mailing list and receive this free pattern for “Dancing Squares”…..

You can sign up HERE……

Borders for Pooh!!

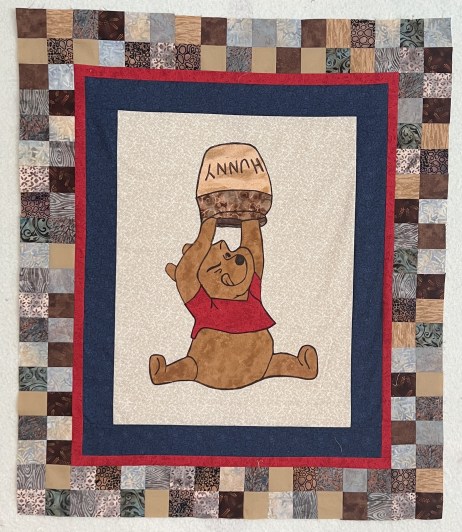
Yesterday I showed the start of a Pooh baby quilt, leaving it at this stage…..

I had sewn sets of strips together and cut them into two patch blocks……

….and then sewed those into 4-patches that I placed around the blue border…..

I liked how it looked but felt that I needed to bring some more red into the design. I started trying an outside border…..

…..but decided that it would look better with an inside border.

My problem was that the side had to be divisible by 2 and since I hadn’t really planned my borders first, I ended up trimming off 1/8th inch pieces until I got it to the correct size.

I started adding the squares and loved how it was looking…..

I added the two side borders and…..

IT WAS FINISHED!!!!

It should be fun and easy to quilt and then it can be shipped off!!!

Come back on Friday for the quilting!!

Now a question for you….. what type of quilt do you make when you need a quick baby quilt???

…………………………………………………………………………………………………….

If you have an interest in ruler quilting, check out this online course…..

Click HERE for more information