This year I wanted to make a jean jacket for my friend Marnie. She had admired the one that I made for myself some years back and I decided that it was time for her to have one too!!
The first step was to make a pattern for the back. I took some lightweight tracing paper and pressed it into the seams on the back, leaving a perfect pattern…..
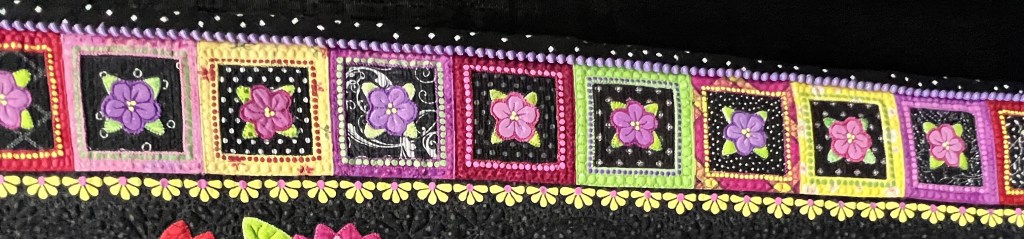
Now I needed to add some flowers. This is the first set that I auditioned…..
….but decided to use different designs and forgot to take a photo of the new pattern!
I now cut out a piece of Wonder Under that would fit on the back of the jacket and ironed it to the INSIDE of the jacket….
Of course, when I started removing the paper, I had issues with it coming loose….
I HATE when that happens, but I now know how to fix it!! Thirty seconds in my freezer…..
….did the trick and the rest of the paper peeled off perfectly……
Next step was to draw the designs on the jacket back and start CAREFULLY cutting them out…..
Honestly, this is the hardest part of this project!! When finished it looked like this….
Now to pick the fabric to use. But, I had cheated on this!! When Marnie was in my studio a couple of weeks ago, I had several pieces of fabric sitting out and I looked to see which one she went to first. This was it…..
So, I placed the fabric down on my ironing board and placed the cutwork jacket on top of the fabric, being sure that the fabric piece was big enough to cover all of the Wonder-Under on the jacket back.
I made a few adjustments and then ironed the jacket and the fabric together…..
Since I take so much of the denim out, I always worry about messing with the “structural integrity” of the jacket so I go one step further and put a lining over the cut out area.
This was accomplished by cutting a piece of Wonder Under that was the size of the back panel and ironed it to the backside of another piece of fabric…..
I folded the fabric edges over and fused it to the inside back…..
I sewed it in place along the pre-existing seams…..
The final step was to quilt around each of the shapes several times…..
This is finished product…..
I decided that she needed a small flower on the front but, instead of cutting the denim, I simply appliqued it in place…..
I am thrilled with how it turned out!!
It is a very simple project and can be made with an old jacket that needs an update or a brand new one!!
So….get busy and let’s have a chorus of Cut-Work Jean Jackets!!
.
………………………………………………………………………………………………………
On Tuesdays, I provide a tip, technique, or product review. Please subscribe to the blog to ensure that you don’t miss ANY of them!!
In this blog, I post stories about creativity, techniques, tools of the trade, and lots more about the wonderful art of quilting. If you are enjoying these posts, please subscribe to be notified of each new blog as it becomes available.
This post contains affiliate links. I am a participant in the Amazon Services LLC Associates Program. I may earn a small commission if you purchase thru the links provided here. It does NOT change the price that you pay for any items you buy.
Since I seem to be working in alphabetical order, let’s look at the Applique category. I always find it interesting that both turned applique and raw-edge applique are included in the same category.
Regardless, here are a few of my favorites.
Since many applique quilts are filled with flowers, this one stood out as being different…..
“Toronto Architecture” by Keith Dommer
Note that each of those pieces are finished with a piped edge. That is a LOT of piping!!
There are so many wonderful touches in this next quilt….and I apologize that I failed to get the name of the maker. IF you recognize the quilt, please let me know the details so that I can add them here….
Not only is the applique impeccable, but the quilting adds a new dimension….
….and there are some sweet touches too…..
I am a sucker for daisies……
“Daisy Dots” by Lynne Taylor
Look at this fun border….
This quilt truly appealed to me….
“My Favorite Indigo Blue and KUMIKO” by Chiyoko Yoshimori
It is such an imaginative way to use bias binding!!
AND, it got me thinking about planning a hand applique with Celtic Applique or something similar!!
Isn’t this fun!!
“A Crowd of Strangers” by Jill Kerttula
The Third-Place quilt was one that truly caught my attention…..
“A Crowd of Strangers”by Jill Kerttula
There are SO many things about this quilt that were interesting, starting with the floor…..
….and continuing to the individuals in the view…..
The Second-Place ribbon went to…..
“Wild Rose” by Noriko Kido
It was exquisite in the piecing, applique, and quilting!!
The Winner of the Category was…..
“Coming Home” by Lyn Keogh
Again, the details were well done and the workmanship was exquisite!!
We met Lyn as she stood with her quilt and loved her interaction with several students who were asking questions about the quilt, particularly about her inspiration for the quilt…..
Lyn Keogh talks about the inspiration for her 1st place quilt
She was a kind and humble woman and we enjoyed talking with her.
So….that is the Applique Category……
Tomorrow I will tackle a special Exhibition called “Athletes”! Come back for some amazing quilts and an interview with their maker!!
.
…………………………………………..
If you don’t want to miss my personal tour of the International Quilt Festival in Houston, be sure to subscribe…….